# Get started with WhatsTool Business

<figure><picture><source srcset="/files/AX3h2tM2wtLablrMwcMZ" media="(prefers-color-scheme: dark)"><img src="https://1440145200-files.gitbook.io/~/files/v0/b/gitbook-x-prod.appspot.com/o/spaces%2F2TgfOHUAGg0ndAgP3vRh%2Fuploads%2F9k4tpEu2Pn3TBlD5B7dR%2Flogo.png?alt=media&amp;token=62737946-269c-4b0c-b8ad-f30442016531" alt="Whatstool Busines"></picture><figcaption></figcaption></figure>

**Welcome to WhatsTool Business**\
**WhatsTool Business is a complete application designed for businesses looking to improve their communication with customers via WhatsApp. The app provides a variety of features that can help businesses streamline their WhatsApp communication and improve their customer service.**

{% embed url="<https://whatstool.business/>" %}

## Fundamental Components

<table data-view="cards"><thead><tr><th></th><th></th><th></th><th data-hidden data-card-cover data-type="files"></th></tr></thead><tbody><tr><td></td><td>      <strong>WhatsApp Channel</strong></td><td></td><td><a href="https://1440145200-files.gitbook.io/~/files/v0/b/gitbook-x-prod.appspot.com/o/spaces%2F2TgfOHUAGg0ndAgP3vRh%2Fuploads%2FdyKl0rXYIWulsEasNaOk%2FWA.png?alt=media&amp;token=716e69f5-1854-4542-89a5-80944191df8b">WA.png</a></td></tr><tr><td></td><td>              <strong>Quick Reply</strong></td><td></td><td><a href="https://1440145200-files.gitbook.io/~/files/v0/b/gitbook-x-prod.appspot.com/o/spaces%2F2TgfOHUAGg0ndAgP3vRh%2Fuploads%2Fkf6CFZQV1m95vUw3Evb3%2FQR.png?alt=media&amp;token=2cd5dcac-0b1c-421b-8ce2-0306edbfcfb8">QR.png</a></td></tr><tr><td>                   </td><td>                  <strong>Labels</strong></td><td></td><td><a href="https://1440145200-files.gitbook.io/~/files/v0/b/gitbook-x-prod.appspot.com/o/spaces%2F2TgfOHUAGg0ndAgP3vRh%2Fuploads%2F7dYbZfXYLn4xDgdAmCZx%2Fl.png?alt=media&amp;token=3505079c-fa87-4ae2-92d7-93944e5ad6b0">l.png</a></td></tr><tr><td></td><td>           <strong>Custom fields</strong></td><td></td><td><a href="https://1440145200-files.gitbook.io/~/files/v0/b/gitbook-x-prod.appspot.com/o/spaces%2F2TgfOHUAGg0ndAgP3vRh%2Fuploads%2FqsG1OQauo6fZ9whuK1IZ%2FCF.png?alt=media&amp;token=c51932d4-e7ce-47c0-855a-3f76bf8ba662">CF.png</a></td></tr><tr><td></td><td>      <strong>WhatsApp Templates</strong></td><td></td><td><a href="https://1440145200-files.gitbook.io/~/files/v0/b/gitbook-x-prod.appspot.com/o/spaces%2F2TgfOHUAGg0ndAgP3vRh%2Fuploads%2FC8b0dGSELv3tcFh6pZym%2FGroup%203613.png?alt=media&amp;token=0830f3fd-f864-4d61-ae06-1d81f7a37ba8">Group 3613.png</a></td></tr><tr><td></td><td>       <strong>Agent Management</strong></td><td></td><td><a href="https://1440145200-files.gitbook.io/~/files/v0/b/gitbook-x-prod.appspot.com/o/spaces%2F2TgfOHUAGg0ndAgP3vRh%2Fuploads%2FE3GDZuNQ74cTrTSDdTOa%2FAM.png?alt=media&amp;token=1e114b9f-c54f-4e6b-b996-ed10a85e20ae">AM.png</a></td></tr></tbody></table>

## Key Features

<table data-view="cards"><thead><tr><th></th><th></th><th></th><th data-hidden data-card-cover data-type="files"></th><th data-hidden data-card-target data-type="content-ref"></th></tr></thead><tbody><tr><td>    <strong>Generate your own bot</strong></td><td><ul><li><a data-footnote-ref href="#user-content-fn-1">Balance autom</a>ation with the human touch</li></ul></td><td></td><td><a href="https://1440145200-files.gitbook.io/~/files/v0/b/gitbook-x-prod.appspot.com/o/spaces%2F2TgfOHUAGg0ndAgP3vRh%2Fuploads%2F9GKsHK9y4SOA2DTZIJdi%2Fchatbot.png?alt=media&amp;token=7a5d30e6-60c1-45ec-943a-58d4c30b5288">chatbot.png</a></td><td><a href="https://whatstool.business/chatbots">https://whatstool.business/chatbots</a></td></tr><tr><td>                <strong>Campaign</strong></td><td><ul><li>WhatsApp Broadcast for up to 100k recipients in a single click.</li></ul></td><td></td><td><a href="https://1440145200-files.gitbook.io/~/files/v0/b/gitbook-x-prod.appspot.com/o/spaces%2F2TgfOHUAGg0ndAgP3vRh%2Fuploads%2FMkPDVcubGTRH6a05plxZ%2Fwhatsapp_marketing.png?alt=media&amp;token=96bc3678-8ddf-4749-90a5-ff9de86431c8">whatsapp_marketing.png</a></td><td><a href="https://whatstool.business/whatsapp-broadcast-message">https://whatstool.business/whatsapp-broadcast-message</a></td></tr><tr><td>               <strong>Analytics</strong></td><td><ul><li>Chat and Tabular view of data enhances the analytics view</li></ul></td><td></td><td><a href="https://1440145200-files.gitbook.io/~/files/v0/b/gitbook-x-prod.appspot.com/o/spaces%2F2TgfOHUAGg0ndAgP3vRh%2Fuploads%2FTu1X3X6J8NLLdQlA5o5v%2FAnalytics.png?alt=media&amp;token=e263c6db-ae83-4931-ac3f-1442116da873">Analytics.png</a></td><td><a href="https://whatstool.business/analytics">https://whatstool.business/analytics</a></td></tr><tr><td>    <strong>WhatsApp Business API</strong></td><td><ul><li>Grow your business 10x with power WhatsApp Business API</li></ul></td><td></td><td><a href="https://1440145200-files.gitbook.io/~/files/v0/b/gitbook-x-prod.appspot.com/o/spaces%2F2TgfOHUAGg0ndAgP3vRh%2Fuploads%2FDYX9pKHutqtZ5xGCKSXc%2Fbusiness_api.png?alt=media&amp;token=a933eff6-f146-4acf-8bf8-d1cca420c06c">business_api.png</a></td><td><a href="https://whatstool.business/whatsapp-api">https://whatstool.business/whatsapp-api</a></td></tr><tr><td>              <strong>Multi Agent</strong></td><td><ul><li>Add Multiple Team members to handle the Business</li></ul></td><td></td><td><a href="https://1440145200-files.gitbook.io/~/files/v0/b/gitbook-x-prod.appspot.com/o/spaces%2F2TgfOHUAGg0ndAgP3vRh%2Fuploads%2F7cu4JjeVaHddowMEJ4lF%2Fmulti_agent.png?alt=media&amp;token=52e1bfe1-22cd-4750-a040-34105085a5a6">multi_agent.png</a></td><td><a href="https://whatstool.business/whatsapp-multi-agent">https://whatstool.business/whatsapp-multi-agent</a></td></tr><tr><td>          <strong>Developers API</strong></td><td><ul><li>Seamlessly Integrate your existing systems with WhatsTool Business</li></ul></td><td></td><td><a href="https://1440145200-files.gitbook.io/~/files/v0/b/gitbook-x-prod.appspot.com/o/spaces%2F2TgfOHUAGg0ndAgP3vRh%2Fuploads%2FBFvx7fhCgS7PmofJuCVG%2FIntegration.png?alt=media&amp;token=f5222a6a-59e7-4611-a959-c3e36cbae360">Integration.png</a></td><td><a href="https://whatstool.business/integration">https://whatstool.business/integration</a></td></tr></tbody></table>

## App Integrations

<figure><img src="https://1440145200-files.gitbook.io/~/files/v0/b/gitbook-x-prod.appspot.com/o/spaces%2F2TgfOHUAGg0ndAgP3vRh%2Fuploads%2Fb7He3iCPK2Qydl5AMFaf%2Finte_01.png?alt=media&amp;token=73c45e2d-e536-4bce-af15-8c88566d7990" alt="" width="375"><figcaption><p>App Integrations</p></figcaption></figure>

<table data-view="cards"><thead><tr><th></th><th></th><th></th><th data-hidden data-card-target data-type="content-ref"></th><th data-hidden data-card-cover data-type="files"></th></tr></thead><tbody><tr><td></td><td>                 <strong>Zoho CRM</strong></td><td></td><td><a href="https://docs.whatstool.business/app-integration/zoho-crm">https://docs.whatstool.business/app-integration/zoho-crm</a></td><td><a href="https://1440145200-files.gitbook.io/~/files/v0/b/gitbook-x-prod.appspot.com/o/spaces%2F2TgfOHUAGg0ndAgP3vRh%2Fuploads%2FcIDmBmIfb6P582ErOU2K%2Fdownload.png?alt=media&amp;token=b5bf302c-044f-4ce6-afd3-e79d7c3759c3">download.png</a></td></tr><tr><td></td><td>               <strong>Razorpay</strong></td><td></td><td><a href="https://docs.whatstool.business/app-integration/razorpay">https://docs.whatstool.business/app-integration/razorpay</a></td><td><a href="https://1440145200-files.gitbook.io/~/files/v0/b/gitbook-x-prod.appspot.com/o/spaces%2F2TgfOHUAGg0ndAgP3vRh%2Fuploads%2FCY3ydeLWUyTu4vT8tISc%2FRazorpay_payments.png?alt=media&amp;token=e2f3f7ad-bbfc-451d-9612-3380d2393edf">Razorpay_payments.png</a></td></tr><tr><td></td><td>                   <strong>Pabbly</strong></td><td></td><td><a href="https://whatstool.business/pabbly-connect-whatsapp-api">https://whatstool.business/pabbly-connect-whatsapp-api</a></td><td><a href="https://1440145200-files.gitbook.io/~/files/v0/b/gitbook-x-prod.appspot.com/o/spaces%2F2TgfOHUAGg0ndAgP3vRh%2Fuploads%2FWqHbLBFiFGnPVXN5TUHh%2FPabbly.webp?alt=media&amp;token=a67d5a7b-e980-4b2a-9513-d693e095bc86">Pabbly.webp</a></td></tr><tr><td></td><td>           <strong>Google Sheet</strong> </td><td></td><td><a href="https://docs.whatstool.business/app-integration/google-sheet">https://docs.whatstool.business/app-integration/google-sheet</a></td><td><a href="https://1440145200-files.gitbook.io/~/files/v0/b/gitbook-x-prod.appspot.com/o/spaces%2F2TgfOHUAGg0ndAgP3vRh%2Fuploads%2FBD2156FQZPSyFMi7nIxr%2Fdownload%20(1).png?alt=media&amp;token=e1f86350-0e5a-467a-a951-443a1bce407d">download (1).png</a></td></tr><tr><td></td><td>                   <strong>Zendesk</strong></td><td></td><td></td><td><a href="https://1440145200-files.gitbook.io/~/files/v0/b/gitbook-x-prod.appspot.com/o/spaces%2F2TgfOHUAGg0ndAgP3vRh%2Fuploads%2FEaUGITp9uMWCVQKgrft4%2Fdownload%20(5).png?alt=media&amp;token=faf712a6-c29f-4e24-a2d0-5e86c727dfb0">download (5).png</a></td></tr><tr><td></td><td>                    <strong>Hubspot</strong></td><td></td><td></td><td><a href="https://1440145200-files.gitbook.io/~/files/v0/b/gitbook-x-prod.appspot.com/o/spaces%2F2TgfOHUAGg0ndAgP3vRh%2Fuploads%2Ffh1RllW67WSwzN8kvZWG%2Fdownload.jpg?alt=media&amp;token=d34ac928-ff99-495c-8a5c-584afb8d3827">download.jpg</a></td></tr><tr><td></td><td>               <strong>Shiprocket</strong></td><td></td><td></td><td><a href="https://1440145200-files.gitbook.io/~/files/v0/b/gitbook-x-prod.appspot.com/o/spaces%2F2TgfOHUAGg0ndAgP3vRh%2Fuploads%2FmwEn3VrRUTECZrChkMHP%2Fdownload%20(3).png?alt=media&amp;token=27eebaa4-5efc-4eff-99bc-e9eec0d0f69e">download (3).png</a></td></tr><tr><td></td><td>                   <strong>Shopify</strong></td><td></td><td><a href="https://docs.whatstool.business/app-integration/shopify">https://docs.whatstool.business/app-integration/shopify</a></td><td><a href="https://1440145200-files.gitbook.io/~/files/v0/b/gitbook-x-prod.appspot.com/o/spaces%2F2TgfOHUAGg0ndAgP3vRh%2Fuploads%2Fm3azOC8bXD4eOLeOW8n2%2Fdownload%20(2).png?alt=media&amp;token=77d809e2-0e76-4cf2-bc65-40b5055e2eaf">download (2).png</a></td></tr><tr><td></td><td>               <strong>Zapier</strong></td><td></td><td></td><td><a href="https://1440145200-files.gitbook.io/~/files/v0/b/gitbook-x-prod.appspot.com/o/spaces%2F2TgfOHUAGg0ndAgP3vRh%2Fuploads%2FoFIfkQT3KDvgeNOLXHBU%2Fdownload%20(4).png?alt=media&amp;token=ebaf913e-de1a-420e-a651-f669c13e44ef">download (4).png</a></td></tr><tr><td></td><td>             Facebook Ads</td><td></td><td></td><td><a href="https://1440145200-files.gitbook.io/~/files/v0/b/gitbook-x-prod.appspot.com/o/spaces%2F2TgfOHUAGg0ndAgP3vRh%2Fuploads%2FpJ6cUelaKJsywOdhb0xA%2Fimages%20(1).png?alt=media&amp;token=fecb45c0-a675-4829-8dcf-046a7f3e760d">images (1).png</a></td></tr></tbody></table>

[^1]:


# Create an account in WhatsTool Business.

Create your account and explore WhatsTool Business.

## Create a free account in WhatsTool Business

You can create a free account on Whatstool in two ways - Either Sign up with ***Google*** (Google workspace mail id) or Sign up with ***Work email ID*** or Fill in the required details to login.

{% hint style="info" %}
Note : Kindly use your Work Email ID and Fill all the details according to your Organisation.
{% endhint %}

1. Go to <https://whatstool.business/>  and Click on Get Started.
2. Kindly login with ***Google Mail*** to Signup or ***Work Email*** if you have.
3. Fill the Details Name, your personal WhatsApp Number and Website.
4. Click on Create Account
5. Kindly check your Email for the OTP&#x20;
6. Enter the OTP and Verify the Account
7. Fill the Details of your Organisation.

**Now, You're set Explore the WhatsTool Business**

{% hint style="info" %}
Kindly refer the Video for creating the Account in WhatsTool Business
{% endhint %}

{% embed url="<https://app.supademo.com/demo/qF0WfvWuW7jyCqnOXV9DF>" %}
Registrations
{% endembed %}


# How to connect your number to WhatsApp API ?

**The Major things required to get start with WhatsApp API :**

1. Be ready with your Non WhatsApp Number.
2. Facebook Business Manager Account.
3. Business Registration for Business Verification in Meta (If Available).

{% hint style="info" %}

## Important Points to note before starting the process

1. If you are using WhatsApp with the number, take a backup of the data (if needed) and remove the account.
2. Business phone number should be handy to receive OTP!
3. Keep your Facebook Business Manager account logged in on another tab of the same browser.
4. Make sure your Business Manager account is not Ads Restricted.
   {% endhint %}

{% embed url="<https://youtu.be/gNUVH7lZm_w>" %}
Youtube
{% endembed %}


# WhatsTool Business Demo - Complete Walkthrough

In the doc we are going to explain the complete functionality of WhatsTool Business.

### Contents

1. Setup your WhatsApp business API and profile
2. Add your team member and assignment rule
3. Prepare your first message, creation of templates
4. Run a campaign
5. Shared team inbox
6. Automation
7. Chatbot flow
8. API Integration

## Setup you WhatsApp Business API and Profile

{% embed url="<https://app.supademo.com/demo/clv0ljz2g0858s1g9cl33qaz7>" %}
Whatsapp Business API profile
{% endembed %}

## Add your team member and assignment rule.

{% embed url="<https://app.supademo.com/demo/L-SooyqNXN_8TVD4jn8WI>" %}
Add your team
{% endembed %}

## Prepare your first message, creation of template

{% embed url="<https://app.supademo.com/demo/rAw1lBk4YrfJNQkBG4Wuc>" %}
Template creation
{% endembed %}

## Run a campaign&#x20;

{% embed url="<https://app.supademo.com/demo/cltqx2glj0pefvnjwxcla8c3d>" %}
Campaign
{% endembed %}

## Shared Team Inbox

{% embed url="<https://app.supademo.com/demo/gnsylhGOgD96ao4_v7AQ0>" %}
Shared Team Inbox
{% endembed %}

## Automation

{% embed url="<https://app.supademo.com/demo/clv0n31hb086as1g9eyajs902>" %}
Default Action
{% endembed %}

## Chatbot Flow

{% embed url="<https://app.supademo.com/demo/ljcVDR9f4UmOyIrtraQP0>" %}
Chatbot flow
{% endembed %}

## API Integration : Automation&#x20;

<br>


# Quick Short Videos

All the videos section of the WhatsTool Business are given below

## Chats Section

<table><thead><tr><th width="218">Topic</th><th>Hindi Video</th><th>English Video</th></tr></thead><tbody><tr><td><strong>Sending Template</strong></td><td><p>चैट कैसे शुरू करें  </p><p><a href="https://www.loom.com/share/94400c17bd9b4206bf55d678d5cad6c6?sid=2d39b6fa-ac86-4251-9144-317a38eb08aa">Watch Video</a></p></td><td><p>How to Initiate the Chat</p><p><a href="https://www.loom.com/share/94400c17bd9b4206bf55d678d5cad6c6?sid=2d39b6fa-ac86-4251-9144-317a38eb08aa">Watch Video</a></p></td></tr><tr><td><strong>Delete Chat</strong></td><td><p>चैट कैसे डिलीट करें  </p><p><a href="https://www.loom.com/share/3e85fa8a318140eabc2856af5b56092d?sid=d88f980c-924f-407f-906a-775302dd86d7">Watch Video</a> </p></td><td><p>How to Delete Chat </p><p><a href="https://www.loom.com/share/3e85fa8a318140eabc2856af5b56092d?sid=d88f980c-924f-407f-906a-775302dd86d7">Watch Video</a></p></td></tr><tr><td><strong>Block Chat</strong></td><td><p>चैट को कैसे ब्लॉक करें </p><p><a href="https://www.loom.com/share/ad11a65e30ef4c2993a996936c17388b?sid=255df104-ce20-42e9-bf69-be9d80fbc298">Watch Video </a></p></td><td><p>How to Block Chat </p><p><a href="https://www.loom.com/share/ad11a65e30ef4c2993a996936c17388b?sid=255df104-ce20-42e9-bf69-be9d80fbc298">Watch Video </a></p></td></tr><tr><td><strong>Send Quick reply</strong></td><td><p>त्वरित उत्तर कैसे भेजें  </p><p><a href="https://www.loom.com/share/c64b1bb497a3445eae11fd4ec4a0ace1?sid=1d47b492-d2a1-4dcc-b76d-3b2af1f6451b">Watch Video </a></p></td><td>How to send a Quick Reply   <a href="https://www.loom.com/share/c64b1bb497a3445eae11fd4ec4a0ace1?sid=1d47b492-d2a1-4dcc-b76d-3b2af1f6451b">Watch Video</a></td></tr><tr><td><strong>Assign Label</strong></td><td><p>लेबल कैसे निर्दिष्ट करें </p><p><a href="https://www.loom.com/share/bf5d351bb0ee4646aa68ec2cdb1cf216?sid=d90e2c69-c9fa-4033-bb8f-3fbfc5e1513e">Watch Video</a></p></td><td><p>How to Assign Label </p><p><a href="https://www.loom.com/share/bf5d351bb0ee4646aa68ec2cdb1cf216?sid=d90e2c69-c9fa-4033-bb8f-3fbfc5e1513e">Watch Video </a></p></td></tr></tbody></table>

## Contacts Section

<table><thead><tr><th width="218">Topic</th><th width="265">Hindi Video</th><th>English Video</th></tr></thead><tbody><tr><td><strong>Import Contacts</strong></td><td><p>संपर्क कैसे आयात करें</p><p><a href="https://www.loom.com/share/f099ff8e8bc346cf9c994dcd3a1758db?sid=70e91243-47f8-4593-8941-b0511bc22e95">Watch Video</a> </p></td><td><p>How to Import contacts </p><p><a href="https://www.loom.com/share/f099ff8e8bc346cf9c994dcd3a1758db?sid=70e91243-47f8-4593-8941-b0511bc22e95">Watch Video </a></p></td></tr><tr><td><strong>Export Contacts</strong></td><td><p>संपर्क कैसे निर्यात करें</p><p><a href="https://www.loom.com/share/ec13c2f5c6464163b3715c232167d8f5?sid=7513c86b-3429-43af-8136-905aa07a1036">Watch Video </a></p></td><td><p>How to Export Contacts </p><p><a href="https://www.loom.com/share/ec13c2f5c6464163b3715c232167d8f5?sid=7513c86b-3429-43af-8136-905aa07a1036">Watch Video</a> </p></td></tr></tbody></table>

## Campaign Section

<table><thead><tr><th width="215">Topic</th><th width="267">Hindi Video</th><th>English Video</th></tr></thead><tbody><tr><td><strong>Campaign Creation</strong> </td><td><p>अभियान कैसे बनाएं </p><p><a href="https://www.loom.com/share/5865c74f47e54de6ba3bdb02322f3fbe?sid=5edf200d-4b05-42a2-9194-f002f92f4a93">Watch Video </a></p></td><td>How to create a campaign <a href="https://www.loom.com/share/5865c74f47e54de6ba3bdb02322f3fbe?sid=5edf200d-4b05-42a2-9194-f002f92f4a93">Watch Video</a> </td></tr><tr><td><strong>Retargeting</strong></td><td><p>ग्राहक को पुनः लक्षित कैसे करें </p><p><a href="https://www.loom.com/share/71b270727fd1460ea4fd83497f525fae?sid=df4196e6-fd94-4d1d-9b6b-9ae0132bc51a">Watch Video</a></p></td><td>How to retarget customer <a href="https://www.loom.com/share/3313093f96684b468146fccb5790f111?sid=b5ed3035-4436-472e-9be9-914ebb42bbff">Watch Video</a> </td></tr><tr><td><strong>Schedule Campaign</strong></td><td><p>अभियान का शेड्यूल कैसे करें  </p><p><a href="https://www.loom.com/share/f4122fb0e5504d7ca43a5cce9eb54a7c?sid=9e5d708b-d9bc-4af5-9476-aa8815d99c5a">Watch Video</a>   </p></td><td>How to schedule the campaign  <a href="https://www.loom.com/share/f4122fb0e5504d7ca43a5cce9eb54a7c?sid=d60e5d88-2959-426d-8dd1-8f98b3c00069">Watch Video</a></td></tr></tbody></table>

## Chatbot Section

<table><thead><tr><th width="214">Topic</th><th>Hindi Video</th><th>English Video</th></tr></thead><tbody><tr><td><strong>Chatbot Creation</strong></td><td><p>चैटबॉट का निर्माण कैसे करें </p><p><a href="https://app.supademo.com/demo/ljcVDR9f4UmOyIrtraQP0">Watch Video </a></p></td><td>How to construct Chatbot  <a href="https://app.supademo.com/demo/ljcVDR9f4UmOyIrtraQP0">Watch Video</a> </td></tr><tr><td><strong>Importing Chatbot</strong></td><td>चैटबॉट में टेम्पलेट कैसे आयात करें <a href="https://www.loom.com/share/ccee0b8fd528430b988287dd63d44565?sid=8d761ccf-2de5-4e27-abc9-ddda7708459b">Watch Video </a></td><td><p>How to import template in chatbot </p><p><a href="https://www.loom.com/share/ccee0b8fd528430b988287dd63d44565?sid=8d761ccf-2de5-4e27-abc9-ddda7708459b">Watch Video</a></p></td></tr><tr><td><strong>Constructing the BOT Order Management</strong></td><td><a href="https://www.loom.com/share/95218c5dfa514d10ad9aa59f92d5f711?sid=65a1ade0-37d0-4ef5-af41-29b408e82aeb">Demo Video</a> <a href="https://www.loom.com/share/95218c5dfa514d10ad9aa59f92d5f711?sid=65a1ade0-37d0-4ef5-af41-29b408e82aeb "> </a></td><td><a href="https://www.loom.com/share/95218c5dfa514d10ad9aa59f92d5f711?sid=65a1ade0-37d0-4ef5-af41-29b408e82aeb">Demo Video </a><a href="https://www.loom.com/share/95218c5dfa514d10ad9aa59f92d5f711?sid=65a1ade0-37d0-4ef5-af41-29b408e82aeb "> </a></td></tr></tbody></table>

## Commerce Section

<table><thead><tr><th width="218">Topic</th><th>Hindi Video</th><th>English Video</th></tr></thead><tbody><tr><td><strong>Importing Catalog</strong></td><td><p>डेटा फ़ीड का उपयोग करके कैटलॉग को कैसे कनेक्ट करें  </p><p><a href="https://www.loom.com/share/a163633a7e4a4793a1b12959abe9a528?sid=a5e351ee-7360-4527-ba2e-d0ab89e0b6ca">Watch Video</a> <a href=" https://www.loom.com/share/a163633a7e4a4793a1b12959abe9a528?sid=a5e351ee-7360-4527-ba2e-d0ab89e0b6ca "> </a></p></td><td><p>How to Connect the Catalog using the Data feed  </p><p><a href="https://www.loom.com/share/a163633a7e4a4793a1b12959abe9a528?sid=a5e351ee-7360-4527-ba2e-d0ab89e0b6ca ">Watch Video</a> </p></td></tr><tr><td><strong>Adding images</strong></td><td><p>एकाधिक छवियाँ कैसे जोड़ें </p><p><a href="https://www.loom.com/share/cb55e396e6fa40a9b0af5def138b8378?sid=b861263e-973a-46f3-9d6e-4666d1a5c3c8">Watch Video </a></p></td><td>How to add multiple images <a href="https://www.loom.com/share/cb55e396e6fa40a9b0af5def138b8378?sid=b861263e-973a-46f3-9d6e-4666d1a5c3c8">Watch Video</a> </td></tr></tbody></table>

## Template Section

<table><thead><tr><th width="219">Topic</th><th>Hindi Video</th><th>English Video</th></tr></thead><tbody><tr><td><strong>Template Creation</strong></td><td><p>टेम्प्लेट कैसे बनाएं </p><p><a href="https://www.loom.com/share/584d06bc1e7c454ca57dd7c55b8eb578?sid=0dc89c7f-8383-4d5f-9641-18475e5a869a">Watch Video </a></p></td><td> How to Create a Template  <a href="https://www.loom.com/share/112173f924b9459cbf705e62cdc5a5c2?sid=fbe0e015-221f-4b1b-8f86-a7a386f50b97">Watch Video</a> </td></tr><tr><td><strong>Template Edit</strong></td><td><p>टेम्पलेट को कैसे संपादित करें </p><p><a href="https://www.loom.com/share/537375e8521546cba173c37473ac40ab?sid=68efb0ac-6226-410e-bb90-e6f026b4735f">Watch Video </a></p></td><td>How to Edit the Template  <a href="https://www.loom.com/share/537375e8521546cba173c37473ac40ab?sid=68efb0ac-6226-410e-bb90-e6f026b4735f">Watch Video</a></td></tr></tbody></table>

## Team Management

<table><thead><tr><th width="227">Topic</th><th>Hindi Video</th><th>English Video</th></tr></thead><tbody><tr><td><strong>Add Team member</strong></td><td><p>टीम सदस्य कैसे जोड़ें  </p><p><a href="https://www.loom.com/share/67ad0b9ba4034551b832cb5df2c49f44?sid=b6148270-4b64-4de3-8331-9ff901d7de52">Watch Video </a></p></td><td>How to add team member  <a href="https://www.loom.com/share/67ad0b9ba4034551b832cb5df2c49f44?sid=b6148270-4b64-4de3-8331-9ff901d7de52">Watch Video</a></td></tr><tr><td><strong>Assigning Team member</strong></td><td><p>टीम सदस्य कैसे नियुक्त करें </p><p><a href="https://www.loom.com/share/668236b9b1494bb9adaac9316481326b?sid=0a5ef65e-d053-4a38-b387-e970375d2a03">Watch Video</a>  </p></td><td>How to assign Team member  <a href="https://www.loom.com/share/668236b9b1494bb9adaac9316481326b?sid=0a5ef65e-d053-4a38-b387-e970375d2a03">Watch Video</a> </td></tr></tbody></table>

## WhatsApp API Number&#x20;

<table><thead><tr><th width="227">Topic</th><th>Hindi Video</th><th>English Video</th></tr></thead><tbody><tr><td><strong>Profile Setup</strong></td><td>प्रोफ़ाइल को कैसे संपादित करें  <a href="https://www.loom.com/share/81b1611724d247318bd3c76bb962e423?sid=ef15fac0-d30a-476d-b67e-45d4dd13bb81">Watch Video</a> </td><td><p>How to edit the profile </p><p><a href="https://www.loom.com/share/668236b9b1494bb9adaac9316481326b?sid=0a5ef65e-d053-4a38-b387-e970375d2a03">Watch Video </a></p></td></tr><tr><td><strong>Display name and Deletion of the Number</strong></td><td><p>प्रदर्शन नाम कैसे संपादित करें और नंबर कैसे हटाएं </p><p><a href="https://www.loom.com/share/b38e4e8dafbb4396a8b74c13681ba539?sid=0385f985-f20d-4568-bf38-70b6b805c2ad">Watch Video </a></p></td><td><p>How to Display name </p><p><a href="https://www.loom.com/share/b38e4e8dafbb4396a8b74c13681ba539?sid=d0be10dd-31cd-4780-9cd3-72e836084ab9">Watch Video</a></p></td></tr><tr><td><strong>Adding Wallet</strong></td><td><p>क्रेडिट कैसे जोड़ें  </p><p><a href="https://www.loom.com/share/2f4530ada59f4f4586e1cb33a9311682?sid=1916ba7e-4a4c-4a7e-959a-d5e4c3000471">Watch Video</a> </p></td><td><p>How to add credit  </p><p><a href="https://www.loom.com/share/2f4530ada59f4f4586e1cb33a9311682?sid=1916ba7e-4a4c-4a7e-959a-d5e4c3000471">Watch Video</a></p></td></tr></tbody></table>


# Q\&A Best Practices


# 1. How to verify facebook business account ?

**Link**: <https://business.facebook.com/settings/security>

**Kindly click on above link and follow the steps to verify your facebook business account.**

<figure><img src="https://1440145200-files.gitbook.io/~/files/v0/b/gitbook-x-prod.appspot.com/o/spaces%2F2TgfOHUAGg0ndAgP3vRh%2Fuploads%2F5bajwgcvoilSdFn2fRGc%2Fbusin-ver.png?alt=media&amp;token=a5c06516-358c-4efe-b3c7-72f1d283222c" alt=""><figcaption></figcaption></figure>

**Step 1:** Go to Business Manager's Security Centre. Click Start verification.

**Step 2:** Provide your business's details, including the legal business name, address, phone number and website.

**Note:** Make sure that the details you submit exactly match the details of your legal business entity. Also make sure that your business's website loads and is HTTPS compliant.

**Step 3:** Confirm your business's details.

**Step 4:** Upload supporting documents, such as a business licence or articles of incorporation, to confirm the details you entered.

**Step 5:** Choose a method to confirm your connection.

**Step 6:** A confirmation code will be sent if you choose email, phone, text message or WhatsApp. To confirm via domain verification

**Step 7:** When you've finished, click Done.

## Accepted document types

If your business is not listed when you attempt to verify it, you may be asked to upload official documents to prove that your business has been registered. These documents should validate the legal name of your business and your business's official postal address or phone number. Remember to cover any additional personal information that we do not need to verify your business, such as a social security number or the local equivalent in your country, if it is included in the document. You may also be asked to provide proof of website domain ownership if you choose to receive a verification code at your email address.

The primary document types that are acceptable for business verification are as follows. Make sure that these documents are not expired and are issued by the relevant authorities.

1. **Certificate/Articles of incorporation**
2. **Business registration** or licence document
3. **Government-issued business tax document**: This could include a tax certificate. Self-filed tax documents are not accepted.
4. **Business bank statement**
5. **Utility bill:** A utility bill is only accepted for Business address and Phone number. The legal business name must be on the utility bill. A utility bill is not an acceptable document for legal business name verification


# 2. How to see quality score ?

**Link**: <https://business.facebook.com/wa/manage/phone-numbers/>

**Kindly click on above link and follow the steps to know quality score of your number.**

Your quality rating is a rating based on the recent messages that your customers have received over the past seven days. This rating is determined by the feedback from your customers, such as the recent blocks, your phone number and other reporting issues.

You can find the quality rating below the Phone numbers tab in your Meta WhatsApp Manager. The Quality rating column displays the quality states, including:

**Green:** High quality

**Yellow:** Medium quality

**Red:** Low quality

If your quality rating reaches a low state or your phone number status changes, you'll receive an email and notification in Business Manager as a warning. Your Status will change to Flagged or Restricted.

**Flagged:** This status occurs when the quality rating reaches a low state. Businesses can't upgrade messaging limit tiers during the Flagged phase. If the message quality improves to a high or medium state by the seventh day from when your status was moved to Flagged, the status will return to Connected. If the quality rating doesn't improve, your status will still return to Connected, but you'll be placed in a lower messaging limit tier.

**Restricted:** This status occurs when you reach your messaging limit. During a Restricted phase, you can't send any notification messages until the 24-hour window is reset. You can still respond to any messages that customers initiate.


# 3. How to apply for green tick ?

## **Official Business Account on WhatsApp** <img src="https://1440145200-files.gitbook.io/~/files/v0/b/gitbook-x-prod.appspot.com/o/spaces%2F2TgfOHUAGg0ndAgP3vRh%2Fuploads%2FOLlTtbdbciAPfGOPN74y%2Fimages.png?alt=media&amp;token=6b6809ca-29fe-419d-a408-be4063cc25f6" alt="" data-size="line">

**WhatsApp's Official Business Account (OBA)** is a prestigious recognition for brands and entities, indicating their authenticity and well-known presence. Here's what you need to know about **OBAs**, how to attain one, and what it means for your business:

### **Recognizing an Official Business Account**

* The Official Business Account receives a green checkmark <img src="https://1440145200-files.gitbook.io/~/files/v0/b/gitbook-x-prod.appspot.com/o/spaces%2F2TgfOHUAGg0ndAgP3vRh%2Fuploads%2FOLlTtbdbciAPfGOPN74y%2Fimages.png?alt=media&amp;token=6b6809ca-29fe-419d-a408-be4063cc25f6" alt="" data-size="line"> badge on its profile.
* In the chat list, chat screens, and contacts view, **the business name is displayed** instead of the phone number, even if the user hasn't added the business to their address book.
* This checkmark signifies WhatsApp's verification that an authentic, reputable brand owns the account.

### **Obtaining Official Business Account Status**

* **OBA status** is not purchasable. It is conferred to selected businesses by WhatsApp based on specific criteria.
* The decision to grant **OBA status** hinges on factors like **notability**. WhatsApp seeks well-known and frequently searched brands or entities.
* **Notability**, in this context, doesn't reflect the business's authenticity but its *significant online presence*, particularly in news articles from publications with substantial audiences. Paid or promotional content is not considered for review.
* Official business accounts are associated with specific phone numbers and display names.&#x20;

{% hint style="info" %}
If the display name is changed after obtaining OBA status, the account must go through the approval process once more.
{% endhint %}

{% hint style="warning" %}
OBA approval for a WhatsApp Business Account does not extend to more than 1 numbers associated with that account, particularly if those numbers have different display names. In such cases, it's advisable to update display names for the child brands as follows: '{{sub-brand name}} by {{notable name}}'.
{% endhint %}

### **Requirements for OBA Application**

To apply for an Official Business Account, you must meet the following criteria:

* 2-factor verification enabled for your WhatsApp API Number.
* A valid Meta Business ID with a Verifiede Business Manager.
* Adherence to WhatsApp's policies, especially its Commerce Policy.
* Reach **Quality Tier 2** (The must be ‘**high**’ at the time the application is made and the minimum Messaging Limit is **1k**), denoting a high-quality business account.
* Has a substantial presence in online news articles (at least 5 external media coverage links from newspapers, magazines, etc.).

If your company fulfills these requirements, you can submit your application for an Official Business Account.

{% hint style="warning" %}
Please note your **Business Verification** needs to be completed before applying for OBA Status .&#x20;
{% endhint %}

### Apply for a Green Tick

1. Go to WhatsApp Channel on your WhatsTool Business Account. Navigate to Apply Green Tick section.  Click on **Apply for Green tick button**.&#x20;
2. You will be redirected to your Business Manager. Navigate to Account tools > Phone numbers > Settings of Phone Number (the number for which you want the OBA Status ).&#x20;
3. Fill out the required information like your Business Website, Reason for requesting, up to 5 supporting links to show that the business is notable, Business Name in it's original language, and Facebook Page.&#x20;

Once Facebook reviewed your request, you will receive a notification if your account has been granted OBA or not. If your request is rejected, **you can submit a new request after 30 days.**

{% hint style="success" %}
Successful applications result in an **automatic upgrade to OBA status**, requiring no further action. However, WhatsApp does not guarantee OBA status for all applicants.
{% endhint %}

### **Denied Requests and Ongoing Growth**

* If your OBA request is denied, it indicates that WhatsApp's Meta team has reviewed your account and determined it's not eligible for OBA status at that time.
* While awaiting OBA status, businesses can enhance their online presence and reapply after a 30-day waiting period.
* Despite OBA status, businesses have access to a business profile associated with each phone number. This profile includes details like a profile picture, email, website, and business description, all of which are editable.

{% hint style="danger" %}
Facebook do not grant Official Business Accounts to business employees, test accounts, and Business App. Official Business Accounts are only available to UPI Platform users since accounts on the Business App do not go through Business Verification.
{% endhint %}


# 4. How often phone number status changes ?

### Status changes

When the quality rating reaches low quality, your phone number quality rating changes to Low. If the phone number quality is Low and on track to be downgraded to a lower message tier, the phone number status changes to Flagged. When a phone number is Flagged, if the quality doesn't improve over 7 days, the status returns to Connected. However, the messaging limit will decrease to the next level. For example, the phone number that used to have the 100,000 messaging limit now has the 10,000 messaging limit.

* Connected: You can send outgoing messages within your set messaging limit.
* Flagged: This status occurs when the phone number’s quality rating changes to Low and is on track to be downgraded to a lower message tier. Businesses can't upgrade messaging limit tiers while the status is Flagged. If the quality rating:
  * Improves to a high or medium quality by the 7th day from when your status was changed to Flagged, the status will return to Connected and your messaging limit tier will remain unaffected.
  * Does not improve to a high or medium quality by the 7th day from when your status was changed to Flagged, your status will return to Connected. However, your messaging limit will decrease to the next level.

If your quality rating reaches low quality, or your phone number status changes to Flagged or Restricted status, you'll receive an email and notification in Business Manager as a warning.

* Restricted: This status occurs when you reach your messaging limit, regardless of the quality rating. While the status is Restricted, you can’t send any outgoing messages until 24 hours have elapsed. You can still respond to any messages that customers initiate.

Note: If you are a business solution provider (BSP), pass this information to your clients so that they can proactively manage these warnings.

### Messaging limits

[Messaging limits](https://developers.facebook.com/docs/whatsapp/api/rate-limits#messaging) determine the maximum number of business-initiated conversations each phone number can start in a rolling 24-hour period. A business-initiated conversation starts when the first message is delivered to a customer and ends 24 hours later. A conversation can’t end before then.

If you reach the messaging limit, you can start more conversations when one or more active conversations end. Remember that messaging limits don’t apply to the user-initiated conversations.

There are 4 levels of messaging limits applying to businesses that have completed the business verification:

* Allows your phone number to have 1,000 business-initiated conversations (with 1,000 unique customers) in a rolling 24-hour period.
* Allows your phone number to have 10,000 business-initiated conversations (with 10,000 unique customers) in a rolling 24-hour period.
* Allows your phone number to have 100,000 business-initiated conversations (with 100,000 unique customers) in a rolling 24-hour period.
* Allows your phone number to have unlimited business-initiated conversations in a rolling 24-hour period.

Note: A business starts with 1,000 business-initiated conversations per phone number when it completes the business verification.

Beginning May 2022, if your messaging limit is close to being reached or at risk of being decreased, you will be alerted through the overview dashboard. You can click into this alert to learn more about how to increase your messaging limit or prevent it from being decreased. You’ll also be able to see your history of messaging limits.


# 5. What are the types of error code for failed message ?

The Cloud API is built on the Graph API, so if you are unfamiliar with handling Graph API error responses, see Graph API's [error handling](https://developers.facebook.com/docs/graph-api/guides/error-handling) documentation.

In general, we recommend that you build your app's error handling logic around `code` values and `details` payload properties. These properties and their values are more indicative of the underlying error.

Code titles, which do not have a dedicated property in API error response payloads, are included as part of the `message` value. However, we recommend that you do not rely on titles for your error handling logic as titles will eventually be deprecated.

## Types of Error Codes

<table><thead><tr><th width="158">Error Code</th><th width="338">Description</th><th>Posssible Solutions</th></tr></thead><tbody><tr><td><p><code>80007</code></p><p>Rate limit issues</p></td><td>The WhatsApp Business Account has reached its rate limit.</td><td>See WhatsApp Business Account <a href="https://developers.facebook.com/docs/whatsapp/cloud-api/overview/#rate-limits">Rate Limits</a>. Try again later or reduce the frequency or amount of API queries the app is making.</td></tr><tr><td><p><code>131048</code></p><p>Spam rate limit hit</p></td><td>Message failed to send because there are restrictions on how many messages can be sent from this phone number. This may be because too many previous messages were blocked or flagged as spam.</td><td>Check your quality status in the WhatsApp Manager and see the <a href="https://developers.facebook.com/docs/whatsapp/messaging-limits#quality-rating-and-messaging-limits">Quality-Based Rate Limits</a> documentation for more information.</td></tr><tr><td><p><code>131056</code></p><p>(Business Account, Consumer Account) pair rate limit hit</p></td><td>Too many messages sent from the sender phone number to the same recipient phone number in a short period of time.</td><td>Wait and retry the operation, if you intend to send messages to the same phone number. You can still send messages to a different phone number without waiting</td></tr><tr><td><p><code>368</code></p><p>Temporarily blocked for policies violations</p></td><td>The WhatsApp Business Account associated with the app has been restricted or disabled for violating a platform policy.</td><td>See the <a href="https://developers.facebook.com/docs/whatsapp/overview/policy-enforcement/">Policy Enforcement</a> document to learn about policy violations and how to resolve them.</td></tr><tr><td><p><code>131031</code></p><p>Account has been locked</p></td><td>The WhatsApp Business Account associated with the app has been restricted or disabled for violating a platform policy, or we were unable to verify data included in the request against data set on the WhatsApp Business Account (e.g, the two-step pin included in the request is incorrect).</td><td><p>See the <a href="https://developers.facebook.com/docs/whatsapp/overview/policy-enforcement/">Policy Enforcement</a> document to learn about policy violations and how to resolve them.</p><p><br></p><p>You can also use the <a href="https://developers.facebook.com/docs/whatsapp/cloud-api/health-status">Health Status API</a>, which may provide additional insight into the reason or reasons for the account lock.</p></td></tr><tr><td><p><code>100</code></p><p>Invalid parameter</p></td><td>The request included one or more unsupported or misspelled parameters.</td><td><p>See the endpoint's <a href="https://developers.facebook.com/docs/whatsapp/cloud-api/reference">reference</a> to determine which parameters are supported and how they are spelled.</p><p>Ensure when setting the business public key, it is a <a href="https://developers.facebook.com/docs/whatsapp/cloud-api/reference/whatsapp-business-encryption#gen">valid 2048-bit RSA public key in PEM format</a>.</p><p>Ensure there is no mismatch between the phone number id you are <a href="https://developers.intern.facebook.com/docs/whatsapp/cloud-api/reference/registration#register-phone">registering</a> and a previously stored phone number id.</p></td></tr><tr><td><p><code>130472</code></p><p>User's number is part of an experiment</p></td><td>Message was not sent as part of an <a href="https://developers.facebook.com/docs/whatsapp/cloud-api/guides/experiments">experiment</a>.</td><td>See <a href="https://developers.facebook.com/docs/whatsapp/cloud-api/guides/experiments#marketing-message-experiment">Marketing Message Experiment</a>.</td></tr><tr><td><p><code>131000</code></p><p>Something went wrong</p></td><td><p>Message failed to send due to an unknown error.</p><p>When <a href="https://developers.facebook.com/docs/whatsapp/cloud-api/reference/whatsapp-business-encryption#set-business-public-key">setting a business public key</a>, it either failed to calculate the signature, call the GraphQL endpoint, or the GraphQL endpoint returned an error.</p></td><td>Try again. If the error persists, open a <a href="https://business.facebook.com/direct-support">Direct Support</a> ticket.</td></tr><tr><td><p><code>131026</code></p><p>Message Undeliverable</p></td><td><p></p><p>Unable to deliver message. Reasons can include:</p><ul><li>The recipient phone number is not a WhatsApp phone number.</li><li>Sending an <a href="https://developers.facebook.com/docs/whatsapp/business-management-api/authentication-templates">authentication template</a> to a WhatsApp user who has a +91 country calling code (India). Authentication templates currently cannot be sent to WhatsApp users in India.</li><li>Recipient has not accepted our new Terms of Service and Privacy Policy.</li><li><p>Recipient using an old WhatsApp version; must use the following WhatsApp version or greater:</p><ul><li>Android: 2.21.15.15</li><li>SMBA: 2.21.15.15</li><li>iOS: 2.21.170.4</li><li>SMBI: 2.21.170.4</li><li>KaiOS: 2.2130.10</li><li>Web: 2.2132.6</li></ul></li><li>The message was not delivered to create a high quality user experience. See <a href="https://developers.facebook.com/docs/whatsapp/cloud-api/guides/send-message-templates#per-user-marketing-template-message-limits">Per-User Marketing Template Message Limits</a>.</li></ul></td><td><p></p><p>Using a non-WhatsApp communication method, ask the WhatsApp user to:</p><ul><li>Confirm that they can actually send a message to your WhatsApp business phone number.</li><li>Confirm that your WhatsApp business phone number is not in their list of blocked numbers (<strong>Settings</strong> > <strong>Privacy</strong> > <strong>Blocked</strong> or <strong>Blocked contacts</strong>).</li><li>Confirm that they have accepted our latest Terms of Service (<strong>Settings</strong> > <strong>Help</strong>, or <strong>Settings</strong> > <strong>Application information</strong> will prompt them to accept the latest terms/policies if they haven't done so already)</li><li>Update to the latest version of the WhatsApp client.</li></ul></td></tr><tr><td><p><code>131047</code></p><p>Re-engagement message</p></td><td>More than 24 hours have passed since the recipient last replied to the sender number.</td><td>Send the recipient a business-initiated message using a <a href="https://developers.facebook.com/docs/whatsapp/cloud-api/guides/send-message-templates">message template</a> instead.</td></tr><tr><td><p><code>132001</code></p><p>Template does not exist</p></td><td>The template does not exist in the specified language or the template has not been approved.</td><td>Make sure your template has been approved and the template name and language locale are correct. Please ensure you follow <a href="https://developers.facebook.com/docs/whatsapp/message-templates/guidelines/">message template guidelines</a>.</td></tr><tr><td><p><code>135000</code></p><p>Generic user error</p></td><td>Message failed to send because of an unknown error with your request parameters.</td><td>See the endpoint's <a href="https://developers.facebook.com/docs/whatsapp/cloud-api/reference/">reference</a> to determine if you are querying the endpoint using the correct syntax. Contact <a href="https://developers.facebook.com/support/">customer support</a> if you continue receiving this error code in response.</td></tr></tbody></table>


# 6. How to request review to enable the business manager account ?

In this part of our social media series we’ll touch on advice and insights from a pro Facebook marketer. Read on if you find your Facebook Ad account disabled.

In 2022 Meta tightened their Ads rules. Based on Insider research, Facebook advertisers experienced more bans, longer reviews of up to 2 weeks, and problems accessing the appeal process. Even professional users with Ad budgets close to six figures reported they had **difficulties in getting help from personal agents**.

So don’t worry – you’re not alone. Facebook’s Ads policies and Terms of Services can be complex and difficult to navigate, and sometimes automated systems make mistakes. And if you are a small Facebook business just starting out with Facebook Ads, it might be even more challenging to get proper support for your first disapproved ad.

## 1. What to do in case of a ban final decision

Your Ads account can be disabled forever if:

* you do not resolve your case in 30 days.
* you request a review and they reply that it is a final decision. Sadly, it can happen even to innocent users.

Again, try to understand the ban reason to avoid it in the future. Keep away from using your friends accounts from your device where the ban took place: **your IP might be blacklisted** (depending on ban reasons) which might affect the other ad account trust level. Read on to know how to address the IP matter.

Creating another Ads account inside a Business Manager likely leads to a new ban. We recommend **removing the current BM and moving all your assets to a new BM**. To ensure that the old and new BMs are not connected, remove yourself from the old one. Using the same credit card in a fresh account will also likely result in an Ad account ban.

You can create only 2 BMs per user account. If you already have 2 Business Managers you will need to open a new personal account to proceed with your Ads. However, it is risky to have multiple Facebook accounts on 1 device.

## 2. Scenarios that lead to Facebook Ad account disabled

*Note: this list of scenarios isn’t final. Mind the Advertising policies and be ready to face other ban reasons or system mistakes.*

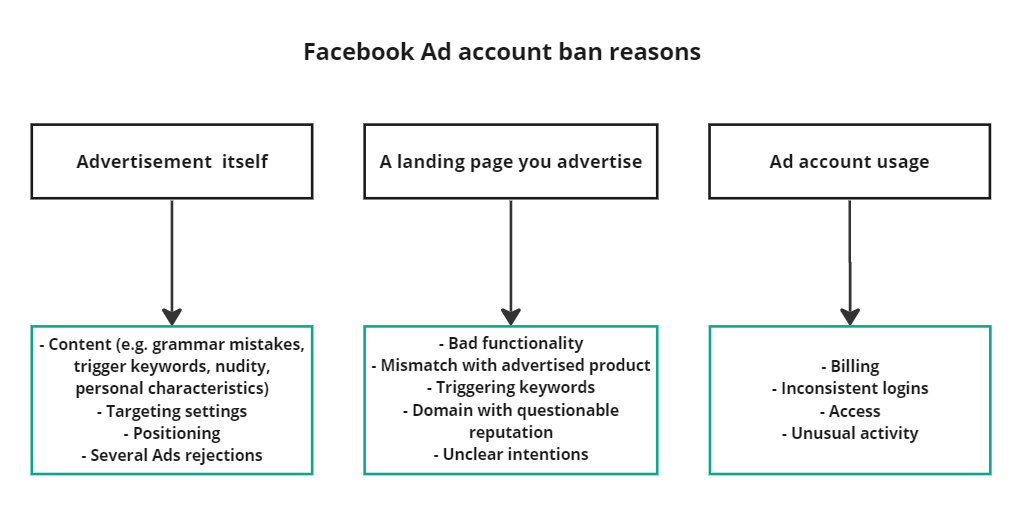
<figure><img src="https://gologin.com/wp-content/uploads/image11-1.png" alt=""><figcaption><p>Ban reason </p></figcaption></figure>

## 3. How do I fix a disabled Facebook ad account 2023?

If your Facebook ad account gets disabled in 2024, you can follow these steps to attempt recovery:

* &#x20; Go to Facebook’s “Account Quality” page.
* &#x20; Click on “Go to Account Quality”.
* &#x20; Click on “Request Review”.
* &#x20; In the form that appears, provide a detailed explanation of your ad activity and why you believe the disabling was a mistake.

The process might take a few days as Facebook will review your request. Don’t expect much as most accounts are disabled by automatic systems. Try reaching out for human support using methods described in the article.

## 4. Is there a chance to recover a disabled Facebook account?

Yes, there is a chance to recover a disabled Facebook account. You’ll need to submit an appeal through Facebook’s “Help Center”. Provide as much information as possible to support your appeal. The outcome will depend on the reason for the disabling and the result of Facebook’s review of your appeal.

## 5. How long does a Facebook ad account restriction last?

Yes. The duration of a Facebook ad account restriction, however, can vary. It depends on the severity of the policy violation. Some restrictions are temporary and may last just a few days or weeks. In more severe cases, you can get your account permanently down.

## 6. Reasons for Request review in Facebook : &#x20;

1. **Update business website** :  Kindly update your business website in the business info \
   Link :  <https://business.facebook.com/settings/info?business_id=5239069806193055>

Write this in the facebook :&#x20;

"**Hello Meta,**&#x20;

**Kindly enable my business manager account as it much more important to run my business through Whatsapp API, I've update my Business website and that also obeys all your business policy. Kindly revaluate again and enable the account asap.** \
\
**My Website : \</paste your website/>** "

2. **Policy Issues** :&#x20;

Link : [https://business.facebook.com/business-support-home/](https://business.facebook.com/business-support-home/5)

Write this in the facebook :&#x20;

"**Hello Meta,**&#x20;

**Kindly enable my business manager account as it much more important to run my business through Whatsapp API, my business obeys each and every policy given by the meta and all your business policy. Kindly revaluate again and enable the account asap.** \
\
**My Website : \</paste your website/>** "\
**My Privacy Policy** : **\</paste the link of privacy policy/>**


# 7. Template guidelines

## Templates <a href="#templates" id="templates"></a>

Templates are used in template messages to open marketing, utility, and authentication [conversations](https://developers.facebook.com/docs/whatsapp/pricing#conversations) with customers. Unlike free-form messages, template messages are the only type of message that can be sent to customers who have yet to message you, or who have not sent you a message in the last 24 hours.

Templates must be approved before they can be sent in template messages. In addition, templates may be disabled automatically based on customer feedback and engagement. Once disabled, a template cannot be sent in a template message until its quality rating has improved or it no longer violates our [business](https://l.facebook.com/l.php?u=https%3A%2F%2Fwww.whatsapp.com%2Flegal%2Fbusiness-policy%2F\&h=AT0X436CIyJ94Eg6swxHReCUwd1gPVcdCo582aZO3-_Nd-m2SulUYQqhqBZpaaeyjTm0m14Zzvi9aKxXXXxupX_gVUMypJIXYGIT6xoi9NXXEnXZL2Uc2rCLcisPRhuZXrCF-2ZJ_XSnpq3CH6KyHk6jy97AvcKLieJ4-Q) or [commerce](https://l.facebook.com/l.php?u=https%3A%2F%2Fwww.whatsapp.com%2Flegal%2Fcommerce-policy%2F\&h=AT1edzPxSZq9P2NVGGVpJkP9hWVZLF9QTM0jTFYavjG7-9avynL1tm8ibNVhBLaRED-vAw0zyt_myOlqQbS_Eg0IJT-MnCUUCCms9Cl5ucmEN7oCfY5dxvMcn7JRGtVp0vyd2E8D93yEoqQAGhm1Sg87AaJ_sRoJCo-kow) policies.

### Creation <a href="#creation" id="creation"></a>

Use the Business Management API to create templates. See [Create and Manage Templates](https://developers.facebook.com/docs/whatsapp/business-management-api/message-templates) to learn how. Alternatively, you can [use the WhatsApp Manager to manually create templates](https://www.facebook.com/business/help/2055875911147364).

### Approval Process <a href="#approval-process" id="approval-process"></a>

Once you have created your template you can submit it for approval. It can take up to 24 hours for an approval decision to be made. Once a decision has been made, a notification will appear in your WhatsApp Manager and we will send an email to your Business Manager admins. In addition, we will send a webhook notification if you are subscribed to message template status changes. See [Monitoring Status Changes](https://developers.facebook.com/docs/whatsapp/message-templates/guidelines/#monitoring-status-changes).

If your message template is approved, it's status will be set to **Active - Quality pending** and you can begin sending it to customers. If it is rejected, you can [edit it](https://developers.facebook.com/docs/whatsapp/message-templates/guidelines/#editing) and resubmit for approval, or [appeal](https://developers.facebook.com/docs/whatsapp/message-templates/guidelines/#appeals) the decision.

#### Samples <a href="#samples" id="samples"></a>

If your template uses variables you must include sample variable values (media assets, text strings, etc.) with your submission. This makes it easier for us to visualize how your template will appear to customers.

To include a sample with your submission in the WhatsApp Manager, first create your template, adding any variables that it requires, then click the Add Sample button. The preview pane will render any sample media assets or sample text values you provide.

![Template creation](https://scontent.fblr22-1.fna.fbcdn.net/v/t39.8562-6/183541941_313864493479565_8066320474827427715_n.png?_nc_cat=106\&ccb=1-7&_nc_sid=f537c7&_nc_ohc=aAKMr7RBKVkAX8OOOot&_nc_ht=scontent.fblr22-1.fna\&oh=00_AfD-d1OPtofH-UqHPEoifPC8nUgiTu1_F0eLHhgsqNa3OQ\&oe=66117AFB)

If using our APIs to create templates, include the `examples` property for each template component object in your request that uses a variable.

#### Common Rejection Reasons <a href="#common-rejection-reasons" id="common-rejection-reasons"></a>

Submissions are commonly rejected for the following reasons, so make sure you avoid these mistakes.

* Variable parameters are missing or have mismatched curly braces. The correct format is `{{1}}`.
* Variable parameters contain special characters such as a `#`, `$`, or `%`.
* Variable parameters are not sequential. For example, `{{1}}`, `{{2}}`, `{{4}}`, `{{5}}` are defined but `{{3}}` does not exist.
* The message template contains content that violates WhatsApp’s Commerce Policy: When you offer goods or services for sale, we consider all messages and media related to your goods or services, including any descriptions, prices, fees, taxes and/or any required legal disclosures, to constitute transactions. Transactions must comply with the [WhatsApp Commerce Policy](https://www.whatsapp.com/legal/commerce-policy/).
* The message template contains content that violates the [WhatsApps Business Policy](https://l.facebook.com/l.php?u=https%3A%2F%2Fwww.whatsapp.com%2Flegal%2Fbusiness-policy%2F\&h=AT1zt6lGA9QXmfnMCQlh7NUOSI-4vAtfh9z9TOxi_hu8MQYLdpgs3yP8TbxvMjrzaxh5b1UaDzoo4WPhXP8OrlAEJEKu8RUX3pgpkhE44JK6EqVR7y7g2-5rbg7PPv7LFzvZVKYYxbmVVKyHCqJ7ra-7iRInzmtnBBFDJw): Do not request sensitive identifiers from users. For example, do not ask people to share full length individual payment card numbers, financial account numbers, National Identification numbers, or other sensitive identifiers. This also includes not requesting documents from users that might contain sensitive identifiers. Requesting partial identifiers (ex: last 4 digits of their Social Security number) is OK.
* The content contains potentially abusive or threatening content, such as threatening a customer with legal action or threatening to publicly shame them.
* The message template is a duplicate of an existing template. If a template is submitted with the same wording in the body and footer of an existing template, the duplicate template will be rejected.

A rejection notification that includes the rejection reason will appear in [Business Support Home](https://business.facebook.com/business-support-home). You can view rejections in the **Business Support Home** by navigating to **Account Overview** > **View my accounts** (button) > (your Meta Business Account) > (your WABA) > **Rejected message templates**. Rejection info will also be sent via email.

You can refer to the **Business Support Home** notification to see the name and language of the existing template with the same content as the rejected duplicate template. You may also choose to edit the template and resubmit.

This check does not apply to templates categorized as `AUTHENTICATION`.

### Editing <a href="#editing" id="editing"></a>

You can edit a template using the [WhatsApp Manger](https://www.facebook.com/business/help/287011426725347) or the [Message Template](https://developers.facebook.com/docs/whatsapp/business-management-api/message-templates#edit-a-message-template) endpoint. Note that if you edit a message template and resubmit it for approval, its status will be set to **In Review** and it can't be sent to customers until its status has been set to **Active**.

### Sending Templates <a href="#sending-templates" id="sending-templates"></a>

Once a template has been approved (its `status` is set to `ACTIVE`) you may begin sending it to customers. To send a template using Cloud API, see [Send Template Messages](https://developers.facebook.com/docs/whatsapp/cloud-api/guides/send-message-templates). To send a template using On-Premises API, see [Sending Template Messages](https://developers.facebook.com/docs/whatsapp/message-templates/creation).

Note that a message template's `status` can change automatically from `ACTIVE` to `PAUSED` or `DISABLED` based on customer feedback and engagement. For this reason, we recommend that you [monitor status changes](https://developers.facebook.com/docs/whatsapp/message-templates/guidelines/#monitoring-status-changes) and take appropriate actions whenever a message template that you rely upon becomes, or is in danger of becoming, paused or disabled.

### Statuses <a href="#statuses" id="statuses"></a>

Templates can have the following statuses.

* **In-Review**: Indicates that the template is still under review. Review can take up to 24 hours.
* **Rejected**: The template has been rejected during our review process or violates one or more of our policies. See [Appeals](https://developers.facebook.com/docs/whatsapp/message-templates/guidelines/#appeals).
* **Active - Quality pending**: The message template has yet to receive quality feedback or read-rate information from customers. Message templates with this status can be sent to customers. See [Quality Rating](https://developers.facebook.com/docs/whatsapp/message-templates/guidelines/#quality-rating).
* **Active - High Quality**: The template has received little to no negative customer feedback. Message templates with this status can be sent to customers. See [Quality Rating](https://developers.facebook.com/docs/whatsapp/message-templates/guidelines/#quality-rating).
* **Active - Medium Quality**: The template has received negative feedback from multiple customers, or low read-rates, but may soon become paused or disabled. Message templates with this status can be sent to customers. See [Quality Rating](https://developers.facebook.com/docs/whatsapp/message-templates/guidelines/#quality-rating).
* **Active - Low Quality**: The template has received negative feedback from multiple customers, or low read-rates. Message templates with this status can be sent to customers but are in danger of being paused or disabled soon, so we recommend that you address the issues that customers are reporting. See [Quality Rating](https://developers.facebook.com/docs/whatsapp/message-templates/guidelines/#quality-rating).
* **Paused**: The template has been paused due to recurring negative feedback from customers, or low read-rates. Message templates with this status cannot be sent to customers. See [Template Pausing](https://developers.facebook.com/docs/whatsapp/message-templates/guidelines/#template-pausing).
* **Disabled**: The template has been disabled due to recurring negative feedback from customers. Message templates with this status cannot be sent to customers.
* **Appeal Requested**: Indicates that an appeal has been requested. See [Appeals](https://developers.facebook.com/docs/whatsapp/message-templates/guidelines/#appeals).

You can view a template's status by going to **WhatsApp Manager** > **Overview**, mousing over the suitcase icon (**Account tools**) and clicking **Message templates**. If you have multiple WhatsApp Business Accounts, select the account whose template statuses you want to view from the list of accounts in the dropdown menu in the top-right corner.


# 8. How to Edit display name and delete the Whatsapp API Number ?

### Display Names <a href="#deleting-phone-numbers" id="deleting-phone-numbers"></a>

A business phone number display name is the name that appears in WhatsApp Manager. It can also be displayed in WhatsApp chat thread headers, chat lists, and its profile, if the following conditions are met:

* The business portfolio that owns the WhatsApp Business Account associated with the business phone number has completed [business verification](https://www.facebook.com/business/help/2058515294227817).
* The business phone number's `name_status` is `APPROVED`.

Once the above conditions are met, the business phone number's `verified_name` (Display name in WhatsApp Manager) is displayed.

Note that if a WhatsApp user has edited the business's profile name within the app, its edited name will be displayed instead.

You can set a display name when you add a business phone number in the **App Dashboard** > **WhatsApp** > **API Setup** panel, or in the **WhatsApp Manager** > **Account tools** > **Phone numbers** panel, if you haven't reached your phone number limit.

If you submit your business portfolio for [verification](https://www.facebook.com/business/help/1095661473946872) and it becomes verified, we will either:

* approve your display name
* reject your display name
* ask you to message more

In each case, we will notify you by `phone_number_name_update` webhook and Meta Business Suite notification.

If approved, we will set your business phone number's `name_status` to `APPROVED`.

If rejected, we will set your business phone number's `name_status` to `DECLINED`. We recommend that you re-review our [display name guidelines](https://www.facebook.com/business/help/757569725593362), [edit your display name](https://www.facebook.com/business/help/378834799515077) accordingly, and file an appeal via [Developer Support](https://developers.facebook.com/docs/whatsapp/support#developer-support) or [Enterprise Developer Support](https://developers.facebook.com/docs/whatsapp/support#enterprise-developer-support).

If asked to message more, we don't have enough API usage data to determine if your number warrants a display name. Continue using the API, [monitor phone number and message quality](https://developers.facebook.com/docs/whatsapp/guides/how-to-monitor-quality-signals) and take appropriate actions to improve your quality scores, and we will automatically re-review your display name at a future date.\
&#x20;

Deleting Phone Numbers

#### Limitations <a href="#limitations" id="limitations"></a>

* Only an admin for the business portfolio can delete its business phone numbers.
* A number can't be deleted if it has been used to send paid messages within the last 30 days.
* If the number has been used to send paid messages within the last 30 days, you will be redirected to the Insights page showing the date of the last paid message. You can delete the number 30 days from this date.

To delete a registered business phone number:

1. Load your business portfolio in the [WhatsApp Manager](https://developers.facebook.com/docs/whatsapp/cloud-api/overview#whatsapp-manager).
2. If it doesn't automatically load the **Phone numbers** panel, navigate to **Account tools** (the toolbox icon) > **Phone numbers**.
3. Click the phone number's trash can icon and complete the flow.

You may be asked to provide your password if the phone number has a **Connected** status.

{% hint style="info" %}
Kindly refer the below for better understanding
{% endhint %}

{% embed url="<https://www.loom.com/share/b38e4e8dafbb4396a8b74c13681ba539?sid=038b2cf3-8c3d-4880-a734-9dddaf600b06>" %}
Display name and Deleting the Whatsapp API Number
{% endembed %}


# 8. How to disable 2FA in the Meta

Suppose your previous provider has enabled 2FA, and you are migrating your number to us. In that case, you will need to disable 2FA on your Facebook business manager page in order to activate your account with us.

Ensure you have admin access to your business manager page to disable 2FA.

To do this:

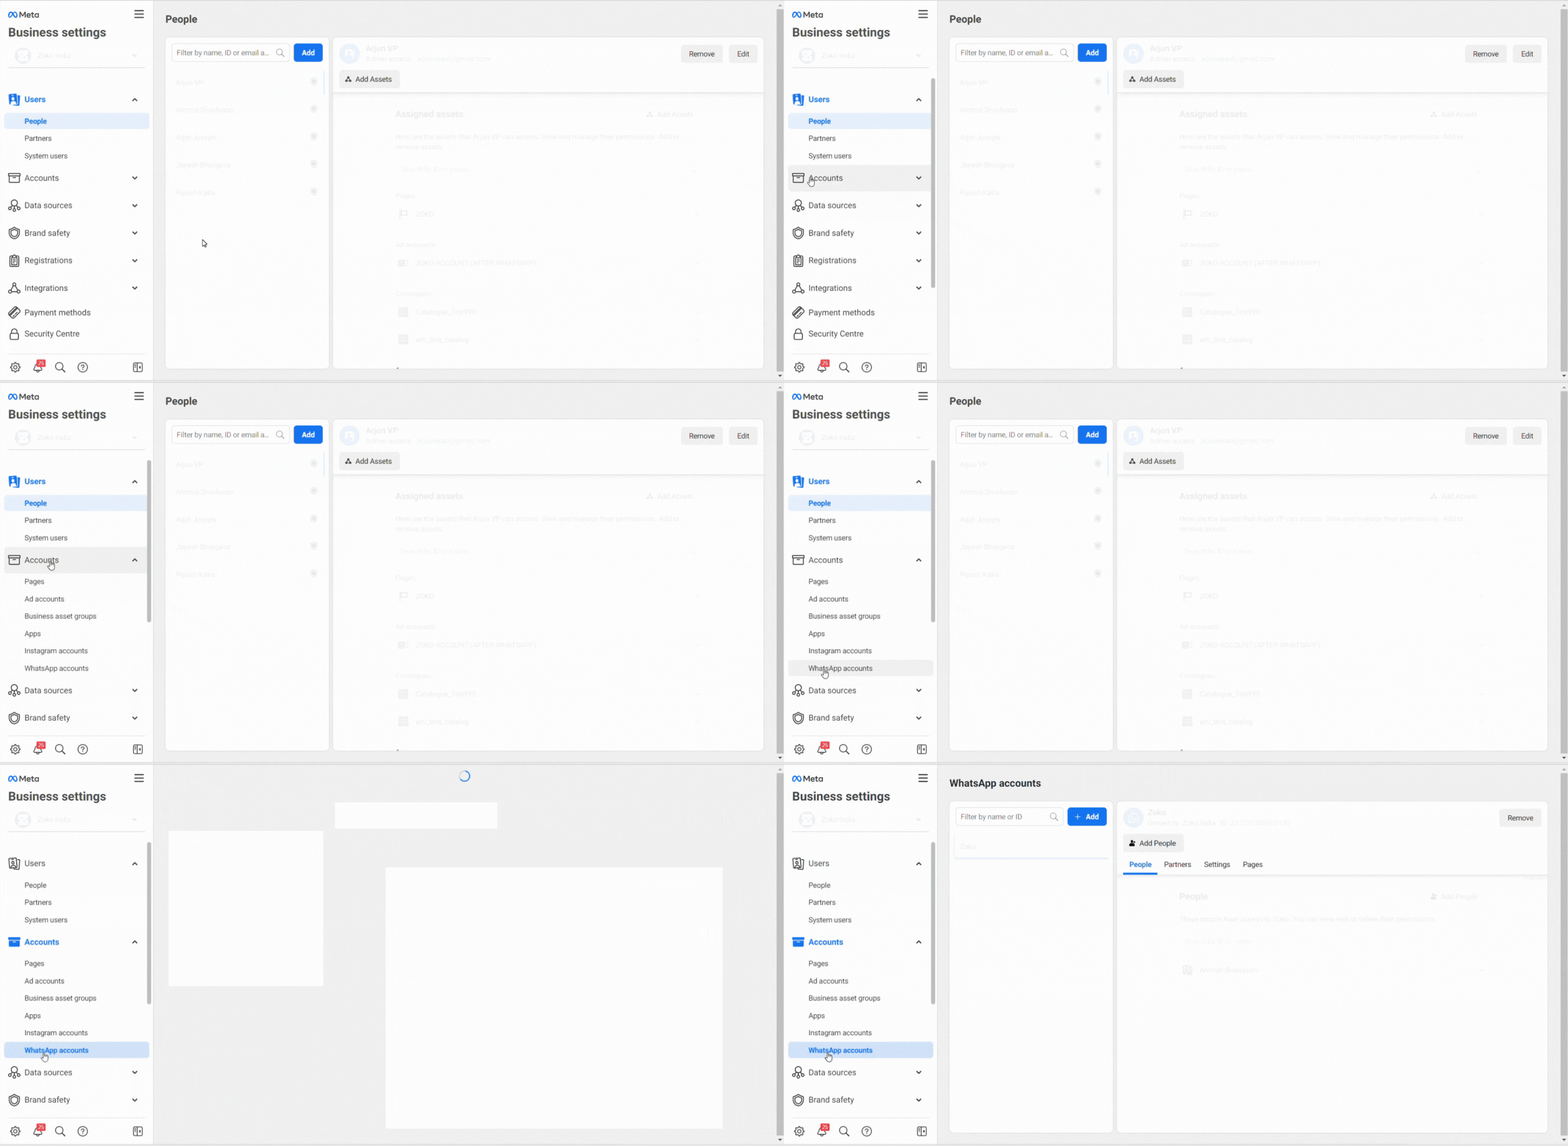
1\. Login to your[ **Facebook Business Manager**](https://business.facebook.com/settings).

2\. Click on **Accounts** on the left and select **WhatsApp accounts.**

<figure><img src="https://cdn.prod.website-files.com/62c7d8a855813a2bbe39ae10/6322c0aacdc1185d0ab947b6_2.gif" alt=""><figcaption></figcaption></figure>

‍

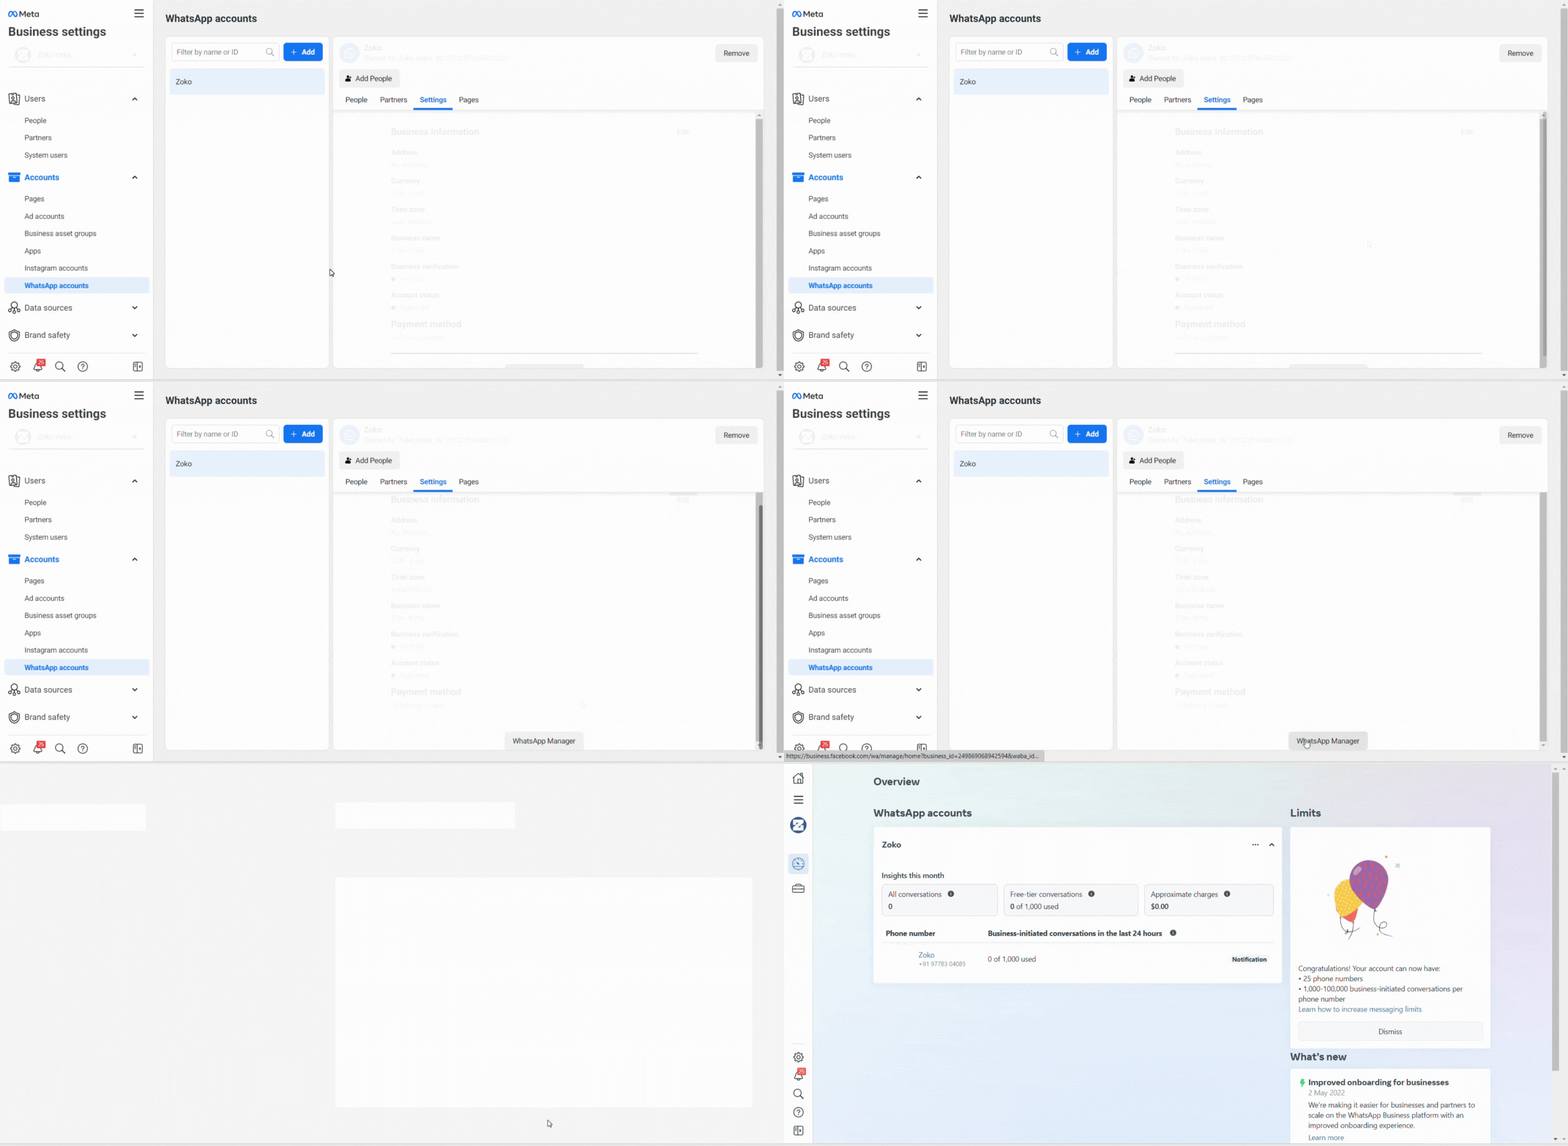
3\. Click on **Settings** under WhatsApp accounts.

<figure><img src="https://cdn.prod.website-files.com/62c7d8a855813a2bbe39ae10/6322bf639751c3c547883d4c_3.gif" alt=""><figcaption></figcaption></figure>

‍

4\. Click on the **WhatsApp Manager** button to be redirected to the WhatsApp overview page.

<figure><img src="https://cdn.prod.website-files.com/62c7d8a855813a2bbe39ae10/6322bf7b07b6f78217670da2_4.gif" alt=""><figcaption></figcaption></figure>

‍

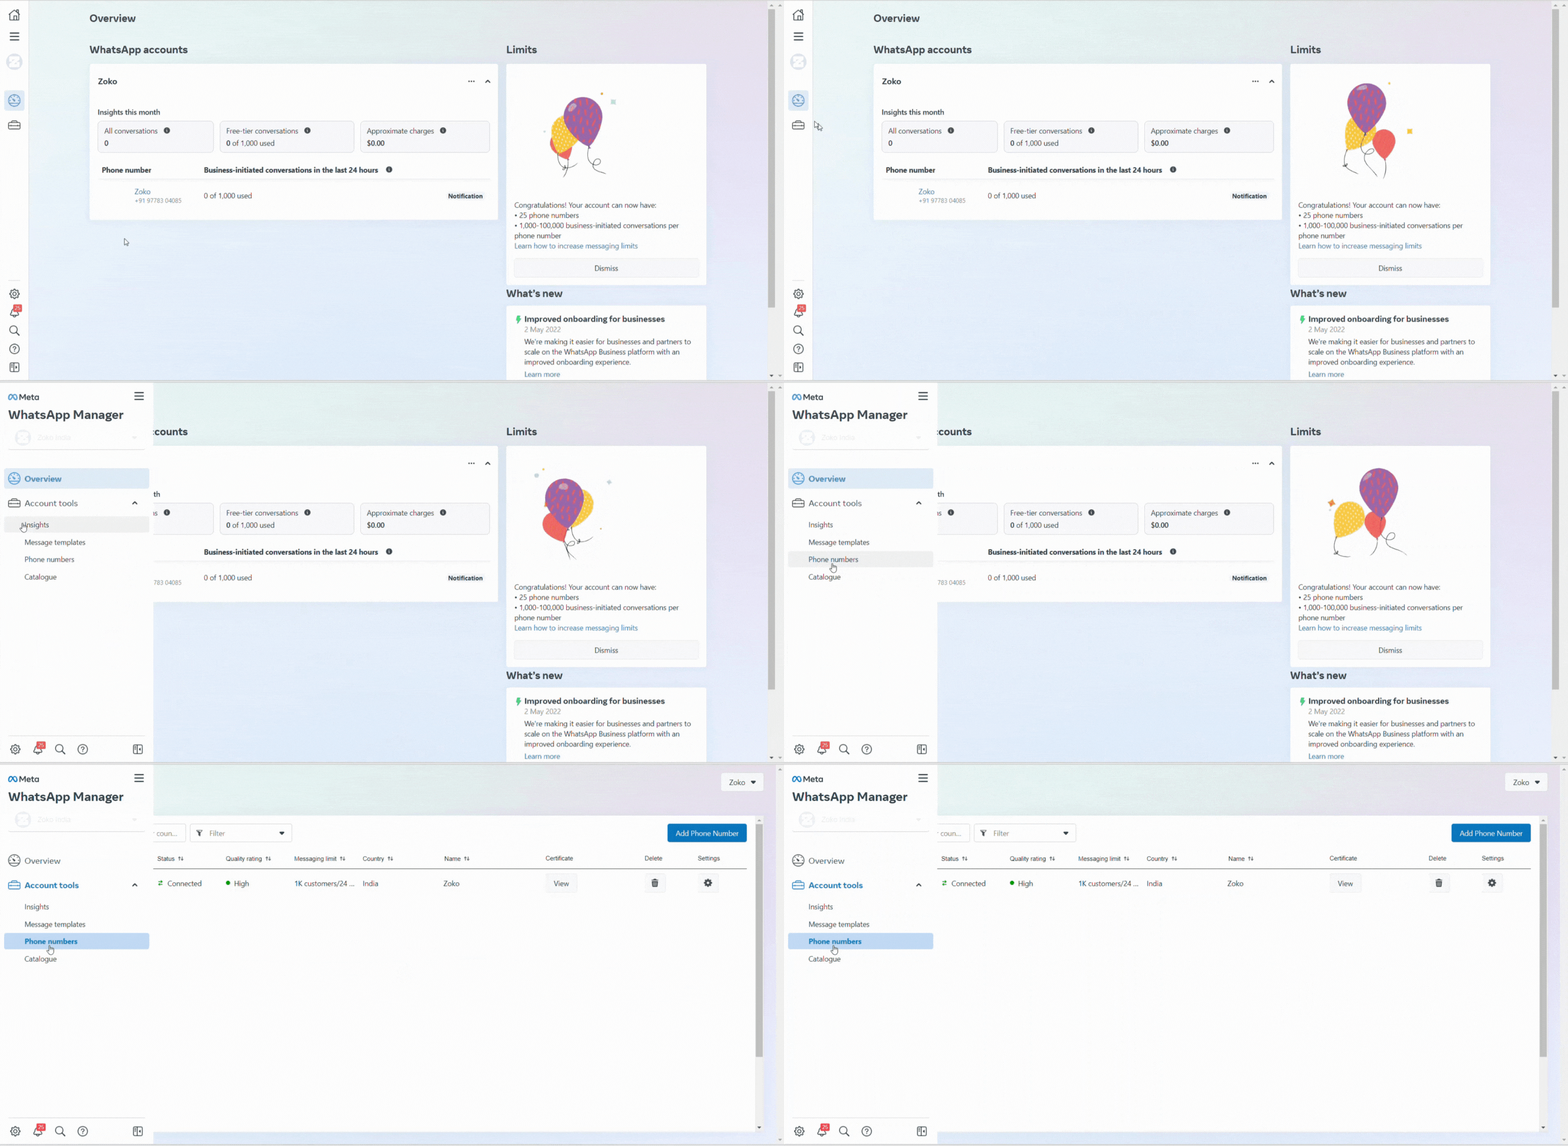
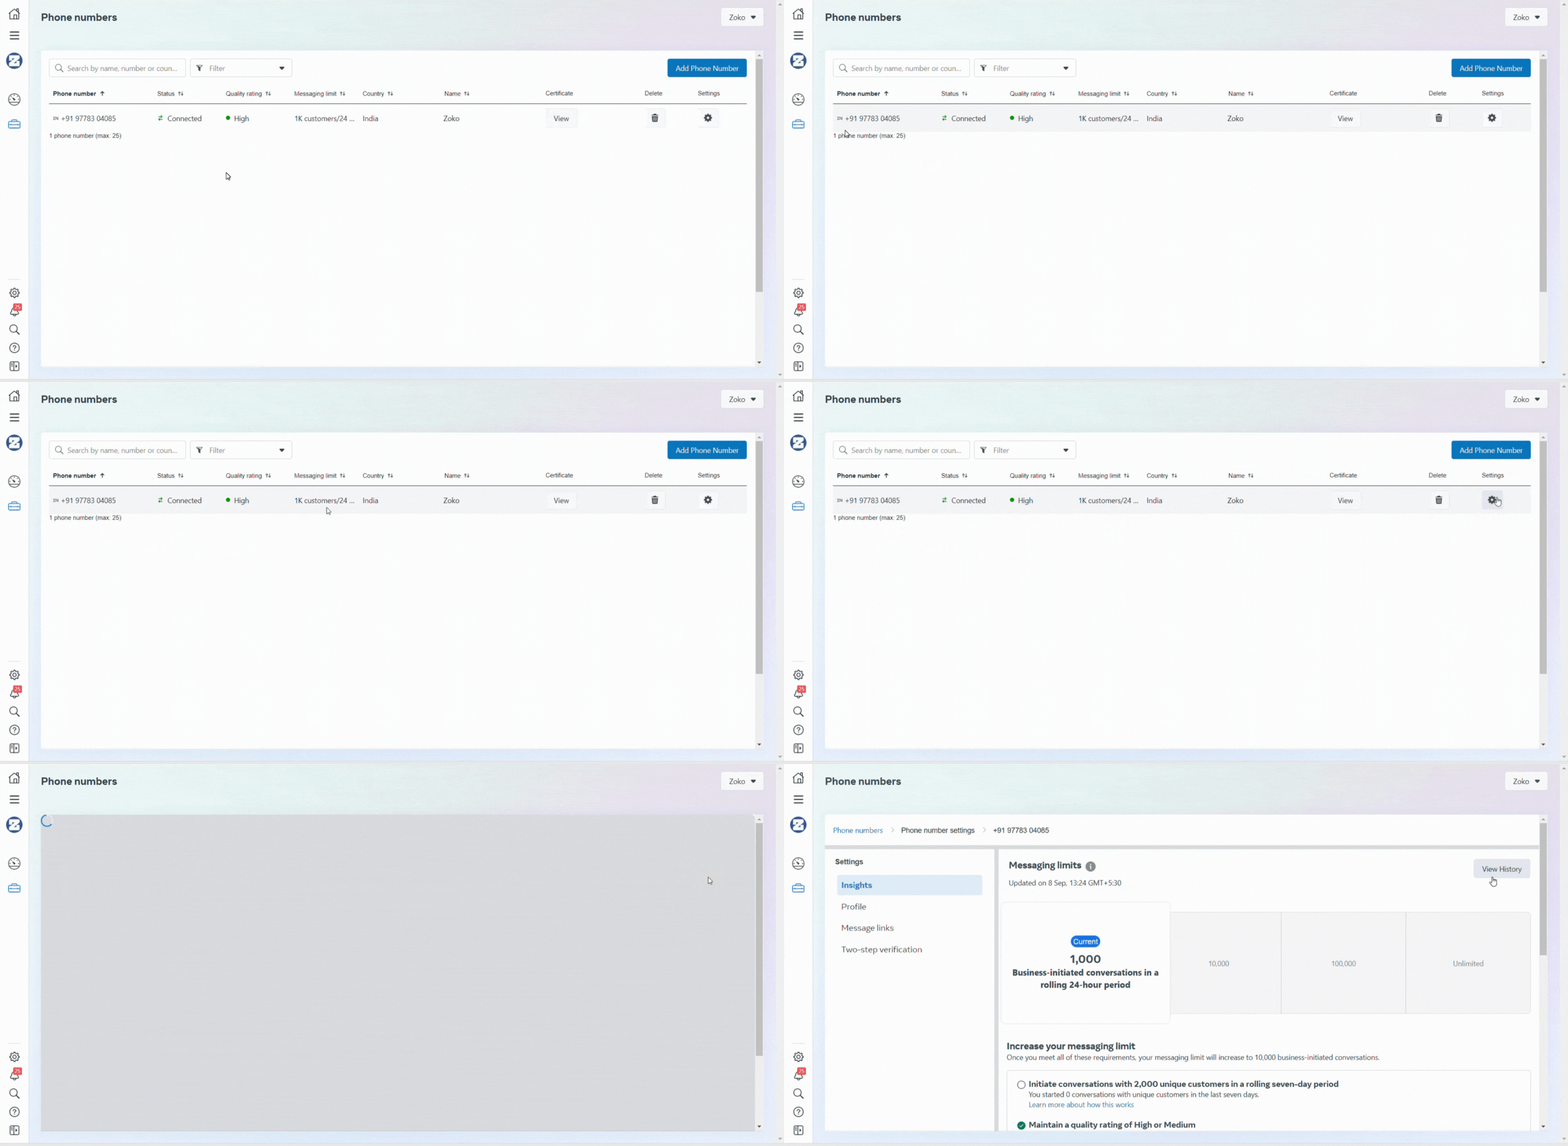
5\. Hover the mouse over the left to reveal the settings and click on **Phone numbers** under Account Tools.

<figure><img src="https://cdn.prod.website-files.com/62c7d8a855813a2bbe39ae10/6335907e1b88f9c7573cbba9_7.gif" alt=""><figcaption></figcaption></figure>

‍

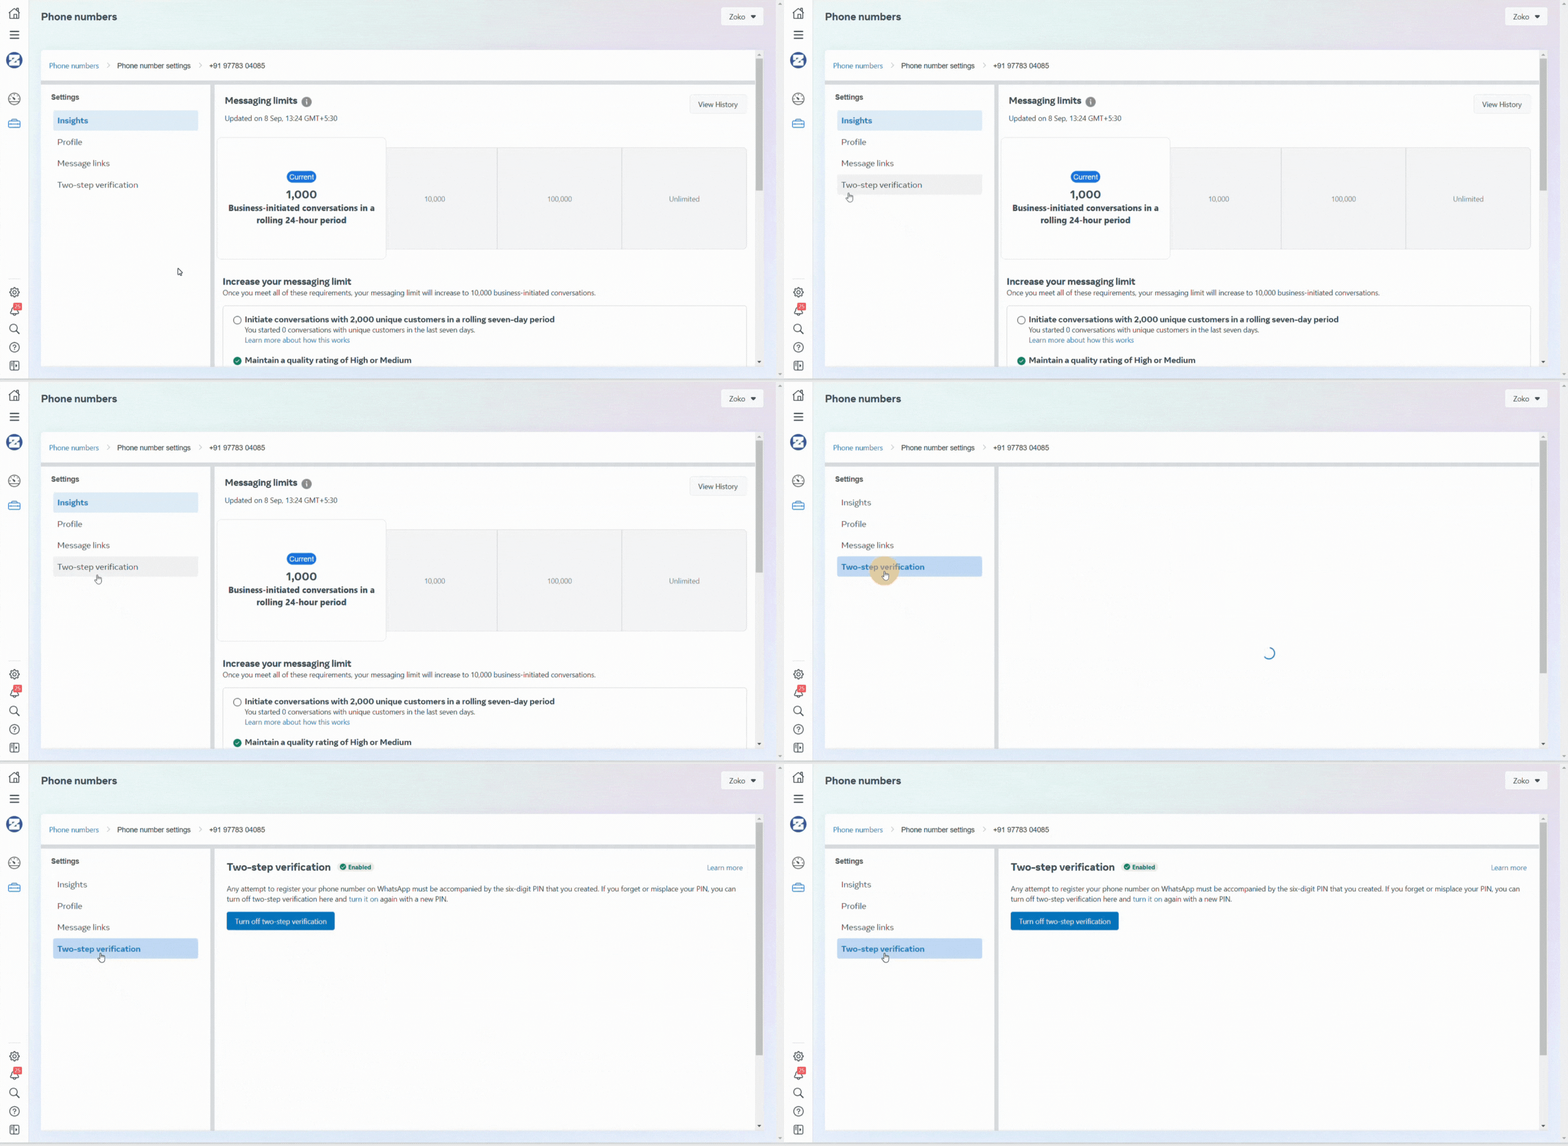
6\. You can see the lists of connected phone numbers here. Find your phone number and click on **Settings.**

<figure><img src="https://cdn.prod.website-files.com/62c7d8a855813a2bbe39ae10/6319b45bbcbf8d1929633a6d_6.gif" alt=""><figcaption></figcaption></figure>

‍

7\. Click on **Two-step verification.**

<figure><img src="https://cdn.prod.website-files.com/62c7d8a855813a2bbe39ae10/6319b468f8ea5ff2021ce3e5_7.gif" alt=""><figcaption></figcaption></figure>

‍

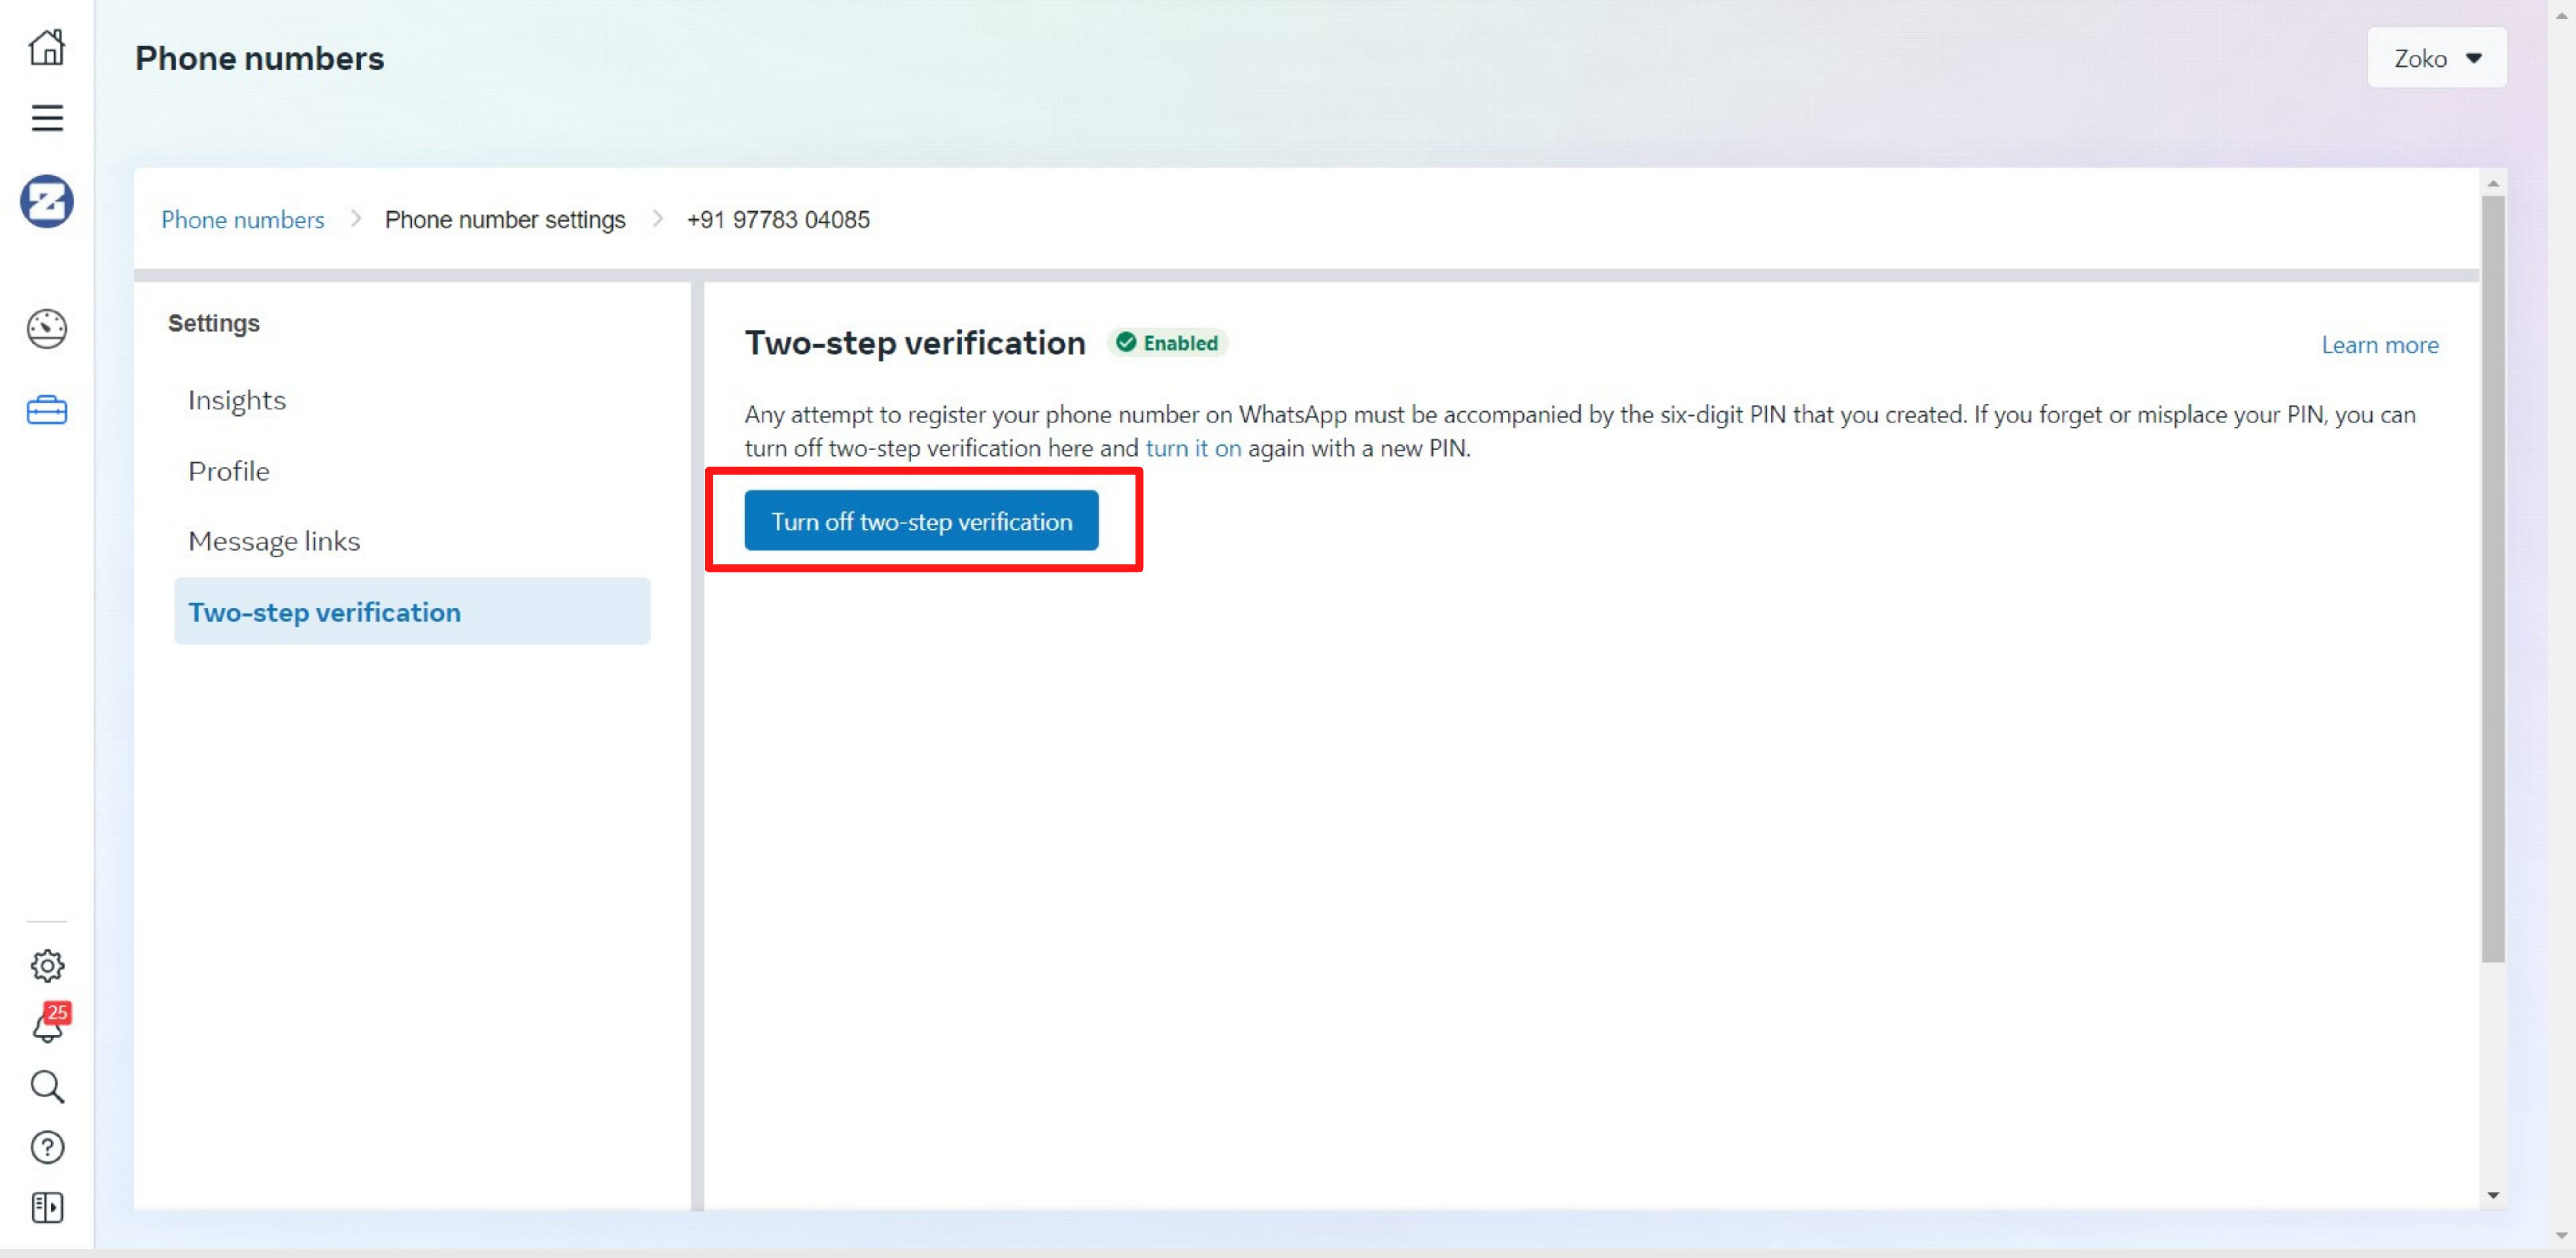
8\. Click on **Turn off two-step verification.**

**Note:** Once you have disabled 2FA, a confirmation email will be sent to your registered email address.

<figure><img src="https://cdn.prod.website-files.com/62c7d8a855813a2bbe39ae10/6319b47c9f73663ec5f59af7_8.png" alt=""><figcaption></figcaption></figure>

**Important Note:** If you are unable to disable 2FA on your facebook business manager, you will need to contact your previous provider directly to disable the 2FA.


# Frequently asked questions

**Meta**

1. ***What is the timeline for Business verification ?***\
   Once after the submission for business verification ! it needs 48hours to get Verified
2. ***What will the limit without business verification*** ?\
   250 messages per day will be the limit without business verification
3. ***What happens after business verification ?*** \
   After verification the limit will gets increase and the direct support will be available from meta
4. ***When will i get the green tick ?***\
   Once after business is verified you can just submit for the green tick with your Publications report
5. ***What are the major documents required for the Business Verification ?***\
   The primary document types that are acceptable for business verification are as follows. Make sure that these documents are not expired and are issued by the relevant authorities.

* **Certificate/Articles of incorporation**
* **Business registration** or licence document
* **Government-issued business tax document**: This could include a tax certificate. Self-filed tax documents are not accepted.
* **Business bank statement**
* **Utility bill:** A utility bill is only accepted for Business address and Phone number. The legal business name must be on the utility bill. A utility bill is not an acceptable document for legal business name verification


# Q\&A Best Practices


# WhatsTool Business Chats Guide

Discover key conversation terms in WhatsTool Business with our alphabetical glossary. Get clear definitions for a better understanding. Start exploring now!

This Glossary provides definitions for key terms related to conversations in WhatsTool Business.

<details>

<summary>Attach Media </summary>

Attaching the multiple media is possible, When the chat is open you can send upto 10 media files in one go

</details>

<details>

<summary>Assign the Team member</summary>

Manager can assign or transfer chat to an expert to resolve it

</details>

<details>

<summary>Quick Reply </summary>

Reuse frequent messages for faster reply

</details>

<details>

<summary>Templates</summary>

Create and manage all templates from our platform

</details>

<details>

<summary>Payment Gateway </summary>

Collect payment easily from customers on your favourite platform

</details>

<details>

<summary>Labels</summary>

With this feature, you can create labels for your contacts so that it becomes easy to categorize and distinguish in your CRM

</details>

<details>

<summary>Status</summary>

This feature provides a quick reference to the state of customer issues

</details>

<details>

<summary>Private Note</summary>

Private notes are within you and your team to get quick look into…

</details>

<details>

<summary>Advance Filter</summary>

Filter out issues based on customers & relevant details

</details>

<details>

<summary>Shared Inbox</summary>

Shared Team Inbox – Customer Chat Management, Agent Productivity and possibility to mange 100 of supports and sales messages

</details>

<details>

<summary>Catalog Products</summary>

Here, you can send all the products to your customers

</details>

<details>

<summary>Emojis</summary>

Symbols and emotions that can be used to add expression and personality to messages.

</details>

<details>

<summary>Mentions</summary>

The act of notifying a WhatsTool user about a customer conversation by using their name in a note.

</details>

<details>

<summary>User info</summary>

You'll be able to see all information about the customer

</details>

<details>

<summary>Custom fields</summary>

The additional information about the customers can be added in the Custom fields

</details>

<details>

<summary>Marketing Status </summary>

This tells about the customer whether the user is opt-out or opt-in

</details>

<details>

<summary>Delete &#x26; Block chat</summary>

This option provide you to delete the user chat and block the user

</details>

<details>

<summary>Chat Window</summary>

A window where conversation happens

</details>

<details>

<summary>Reply Box</summary>

The text box where users can create messages for customer chat, include private notes, and mention team members.

</details>


# Shared Inbox

WhatsTool Business Conversations: Your superhero sidekick for building connections with customers. Handle inquiries, address concerns, and gather feedback effortlessly

The team inbox in the WhatsApp API, Here are some key aspects and benefits of using a team inbox in the WhatsApp API:

<figure><img src="https://1440145200-files.gitbook.io/~/files/v0/b/gitbook-x-prod.appspot.com/o/spaces%2F2TgfOHUAGg0ndAgP3vRh%2Fuploads%2FvlnXNtSnZjOAnT68P2p8%2Fimage.png?alt=media&amp;token=e76e7b8d-f8ea-4352-8a45-94c0df4c8395" alt=""><figcaption></figcaption></figure>

**1. Centralized Communication**

The team inbox consolidates all incoming messages from customers into a single, centralized interface. This makes it easier for the support team to manage and respond to inquiries promptly, reducing the risk of missing or overlooking messages.

**2. Collaborative Environment**

Multiple team members can access the inbox simultaneously, allowing for a collaborative approach to customer support. Team members can see who is handling which conversation, and they can even transfer chats to colleagues if a different expertise is required.

**3. Efficient Response Management**

With features like automated greetings, quick replies, and templates, the team can respond to common queries quickly and consistently. This not only improves efficiency but also ensures that customers receive accurate and uniform information.

**4. Customer Segmentation**

The team inbox can help segment customers based on various criteria such as query type, urgency, or customer status. This allows for prioritized handling of inquiries and ensures that high-priority issues are addressed promptly.

**5. Tracking and Analytics**

Most team inbox solutions come with built-in analytics and reporting features. These tools help track key performance metrics such as response times, resolution rates, and customer satisfaction. This data is invaluable for identifying areas of improvement and optimizing the support process.

**6. Enhanced Security**

A team inbox ensures that sensitive customer information is handled securely. Access controls and permissions can be set to restrict who can view or handle certain types of messages, ensuring compliance with data protection regulations.

**7. Integration with CRM and Other Tools**

Team inboxes often integrate seamlessly with Customer Relationship Management (CRM) systems and other business tools. This integration allows for a more holistic view of customer interactions across different channels, leading to better-informed support and sales strategies.

**8. Scalability**

As businesses grow, the team inbox can easily scale to accommodate more users and handle increased message volumes. This makes it a future-proof solution that can adapt to the changing needs of the business.


# Reply Box

Enhance productivity with features like triggering bots, attaching files, using emojis, and more.

The Reply box is intended for WhatsTool Business users to create messages for customer chat, include private notes, and mention team members.

<figure><img src="https://1440145200-files.gitbook.io/~/files/v0/b/gitbook-x-prod.appspot.com/o/spaces%2F2TgfOHUAGg0ndAgP3vRh%2Fuploads%2FLV2zOsCdqGvLuCVZTSpn%2FScreenshot%202024-07-26%20125108.png?alt=media&amp;token=4bf8b902-4136-43b0-a50e-1df62c564168" alt=""><figcaption><p>Reply Box</p></figcaption></figure>

The below screenshot displays how a Reply Box looks inside Conversations. You can either send a Response to the customer using Reply or you can mention WhatsTool Business user in a private message using Notes.

### Reply Box

Apart from sending a session message or WhatsApp Template (in case of first Interaction), you can add enclose attachments, Emojis, Format the text, choose from the Canned Response, Send WhatsApp templates, rewrite using AI, and translate the message in your customers' language.

### Trigger Bot

WhatsTool Business provides users with the capability to trigger bots directly from the compose box. This feature streamlines workflows, enhances productivity, and ensures seamless integration of automated responses into your conversations.&#x20;

### Accessing the Bot Trigger Icon

Within the compose box interface, users will find a dedicated icon for triggering bots. This icon is conveniently located for easy access during message composition. A flow has to be selected which you want to trigger, the conversation will get assigned to bot and flow will be triggered.

<figure><img src="https://1440145200-files.gitbook.io/~/files/v0/b/gitbook-x-prod.appspot.com/o/spaces%2F2TgfOHUAGg0ndAgP3vRh%2Fuploads%2FpabYinTKXd4GJwm7cFRs%2Fimage.png?alt=media&amp;token=b265397c-8c13-46f4-a1bd-2202d96b0697" alt=""><figcaption><p>Private Note</p></figcaption></figure>

### Notes

WhatsTool Business note-taking tool is similar to your modern-day sticky notes, serving as a valuable resource for users. This feature helps WhatsTool Business users' to attach notes to customer conversations, enhancing your grasp of the customer's concern. This feature fosters improved communication and cooperation among WhatsTool Business users, resulting in a more seamless handover process.

### Mentions

Once you mention a WhatsTool Business users' using @name in Notes, the chat will be visible in their Mention Inbox for a smooth collaboration.


# Q\&A Best Practices


# 1. How to initiate a new chat ?

**Steps** :&#x20;

1. Click on New Chat
2. Enter the Customer WhatsApp Number
3. Select the Template and provide the variables ( If Necessary ) and click on select Template.
4. Click on Send Template.

{% hint style="info" %}
Kindly refer the short Video for better understanding
{% endhint %}

{% embed url="<https://www.loom.com/share/5c890c858e6d40378c547db43fbbfbbc?sid=62e5d536-a309-439a-9f22-ff7b53fd0cf2>" %}
Initate Chat
{% endembed %}


# 2. How to send a template ?

Steps:  When your having a chat with Customer and you want to send template.

1. Click on the Template icon inside the chat.&#x20;
2. Choose  the Template and provide the variables ( If Necessary ) and click on select Template.
3. Click on Send Template.

{% hint style="info" %}
Kindly refer the short Video for better understanding
{% endhint %}

{% embed url="<https://www.loom.com/share/9a37bcb616a940dfb2681484e6b7d424?sid=18ccb5f9-8da6-4873-aa6a-11d80cbfb28e>" %}
Template&#x20;
{% endembed %}


# 3. How to send a catalog product ?

Steps: This is to send a catalogue product for Indivindual Customers when the chat is Open .

1. Click on Cart Icon inside the Chat
2. Select the product and Quantity and click on cart
3. Fill the required details of the Product and Send.

{% hint style="info" %}
Kindly refer the short Video for better understanding
{% endhint %}


# 4. How to send a quick reply ?

Steps: This is to send a Quick Reply to users for repeat questions.

1. Click on Quick Reply Icon inside the Chat
2. Select the Quick Replies you want to send.
3. Then, Click on Send button.

{% hint style="info" %}
Kindly refer the short Video for better understanding
{% endhint %}

{% embed url="<https://www.loom.com/share/c64b1bb497a3445eae11fd4ec4a0ace1?sid=50342bac-9b25-4158-bd2c-5986c2395f47>" %}


# 5. How to request payment ?

Steps: This is to request a Payment from the Customers when it is in Open Chat.

1. Click on Payment Icon inside the Chat
2. Enter the Amount you want to request and write Description ( If needed )&#x20;
3. Then, Click on Send button.

{% hint style="info" %}
To request the payment you need to Integrate with **RazorPay**, Which is available in **APP Integration**
{% endhint %}

{% hint style="info" %}
Kindly refer the short Video for better understanding
{% endhint %}


# 6. How to add private note ?

Steps: This is to add Private Note in Customer chat. It'll be visible only to Team Member.&#x20;

1. Click on Private Note inside the Chat
2. Type the Message which you want to inform for your Team Member.
3. Then, Click on Send button.

{% hint style="info" %}
Kindly refer the short Video for better understanding
{% endhint %}

{% embed url="<https://www.loom.com/share/290ff0cef6fe4b2e92684b2053e31ead?sid=60624cf2-5c20-4c6b-b7bd-5a21fa11727a>" %}


# 7. How to assign label, team member & status in chat ?

### Assigning the Labels

Steps:&#x20;

1. Open the Particular Chat and Click on info on your right top&#x20;
2. Click on the Plus Icon in the Labels and select the required Labels to assign
3. Now, you've assigned the new Labels

### Assigning the Team Member

Steps:&#x20;

1. Open the Particular Chat and Click on info on your right top&#x20;
2. Click on the Team Member section Drop Down
3. Select the required team member&#x20;
4. Now, you've assigned the Team member

### Assigning the Status

Steps :&#x20;

1. Open the Particular Chat and Click on info on your right top&#x20;
2. Click on the Status section Drop Down
3. Select the required Status&#x20;
4. Now, you've assigned the Status

{% hint style="info" %}
Kindly refer the short Video for better understanding
{% endhint %}

{% embed url="<https://www.loom.com/share/6fa1c158fa8e40a28548ec61336a2267?sid=f335ee05-5017-4c80-99f1-f39ce13d8494>" %}


# 8. How to send multiple media in chat ?

Steps: This is to send multiple media in one go to Customers

{% hint style="info" %}
In this Section you can send upto 10 Media's in one click
{% endhint %}

1. Click on Tag icon inside the Chat
2. Select the Media file you want to send.
3. Now, Click on Send button.

{% hint style="info" %}
Kindly refer the below video for better understanding
{% endhint %}

{% embed url="<https://www.loom.com/share/6f08b37abf9548b8ba86f4ccb13228ff?sid=df7aaad9-e983-451e-80f5-09e5e72f44d2>" %}


# 9. How to assign labels, custom field & status in bulk ?

Steps :&#x20;

1. Kindly go to chats
2. Select the particular chat
3. You can select upto 100 chats in one time
4. After selecting, click on bulk action&#x20;
5. Select th action and assign the label, custom fields or status&#x20;
6. Select the required tags and click on done.
7. Congrats, you've assigned the labels, custom fields or status in one go&#x20;

{% hint style="info" %}
Kindly refer the below video for better understanding
{% endhint %}


# 10. How to use click to chat ?

WhatsTool Business's click to chat feature allows you to begin a chat with someone without having their phone number saved in your phone's address book. As long as you know this person’s phone number and they have an active WhatsApp account, you can create a link that will allow you to start a chat with them. By clicking the link, a chat with the person automatically opens.<br>

### Create your own link

\
Use [`https://app.whatstool.business/:api_number/send?phone=`](https://app.whatstool.business/:api_number/send?phone=)`<number>`&#x20;

where the `<number>` is a full phone number in international format. Omit any zeroes, brackets, or dashes when adding the phone number in international format.

#### Examples

\
Use : [`https://app.whatstool.business/:api_number/send?phone=1XXXXXXXXXX`](https://app.whatstool.business/:api_number/send?phone=**1XXXXXXXXXX)<br>

Don't use :  <https://app.whatstool.business/:api_number/send?phone=+001-(XXX)XXXXXXX>


# Efficiently using Chats

Here you've the best guide to use the chats and explaination of each and every features

{% embed url="<https://app.guidde.com/share/playbooks/7Hz86Z3DD7PxP8KiCzPdhz>" %}
Chats
{% endembed %}

Enhance your employee training with this comprehensive guide on utilizing Whatstool. From sending messages to setting up quick replies, this guide will walk you through each step effortlessly.

#### Go to [app.whatstool.business](https://app.whatstool.business)

#### 1. Click "Chats"

Navigate to the "Chats" section.

![Click 'Chats'](https://static.guidde.com/v0/qg%2FghCodWMyQMWa7oM3Kox1Jg4byV62%2F7Hz86Z3DD7PxP8KiCzPdhz%2FireusSYystpPqnLzWiYLzL_doc.png?alt=media\&token=b82ae021-3b10-49c5-8d34-cb827a3a3630)

#### 2. Click "New Chat"

Start a new chat by selecting "New Chat."

![Click 'New Chat'](https://static.guidde.com/v0/qg%2FghCodWMyQMWa7oM3Kox1Jg4byV62%2F7Hz86Z3DD7PxP8KiCzPdhz%2FsjRtq1TqXVR1V51bowp5tb_doc.png?alt=media\&token=fd10702d-d5b8-45e9-ba65-2754642a3598)

#### 3. Enter the Customer number

Enter the WhatsApp number in the designated field.

![Enter the Customer number](https://static.guidde.com/v0/qg%2FghCodWMyQMWa7oM3Kox1Jg4byV62%2F7Hz86Z3DD7PxP8KiCzPdhz%2FstavyVThvXaQf8pmTuakL1_doc.png?alt=media\&token=5b3a3be8-2c71-4c7c-aa88-1fb0835a6383)

#### 4. Click "Select template"

Choose a template by clicking "Select template."

![Click 'Select template'](https://static.guidde.com/v0/qg%2FghCodWMyQMWa7oM3Kox1Jg4byV62%2F7Hz86Z3DD7PxP8KiCzPdhz%2FbE24psDSDamLHDPmx22M29_doc.png?alt=media\&token=a135aa66-3be3-48d6-8082-03ed3313f796)

#### 5. Click "Choose"

Select your choice by clicking on "Choose."

![Click 'Choose'](https://static.guidde.com/v0/qg%2FghCodWMyQMWa7oM3Kox1Jg4byV62%2F7Hz86Z3DD7PxP8KiCzPdhz%2FsD7Xy325rknLFySYsAmfTi_doc.png?alt=media\&token=9e111891-b147-4edb-be1e-e3f198f9c863)

#### 6. Enter the Default variable {{1}}

Proceed by clicking on "Enter default variable {{1}}."

![Enter the Default variable {{1}}](https://static.guidde.com/v0/qg%2FghCodWMyQMWa7oM3Kox1Jg4byV62%2F7Hz86Z3DD7PxP8KiCzPdhz%2F7n3YR63LmN5sLt3SbrCCeF_doc.png?alt=media\&token=19a1d899-af7a-4c42-8d96-bf712012d903)

#### 7. Click "Select Template"

Select a template by clicking on "Select Template."

![Click 'Select Template'](https://static.guidde.com/v0/qg%2FghCodWMyQMWa7oM3Kox1Jg4byV62%2F7Hz86Z3DD7PxP8KiCzPdhz%2Fk9zbeyDNtanPNfSd4neD98_doc.png?alt=media\&token=530b8998-393a-4c8e-921d-1e8ee9facf55)

#### 8. Click "Send"

Send the message by clicking on "Send."

![Click 'Send'](https://static.guidde.com/v0/qg%2FghCodWMyQMWa7oM3Kox1Jg4byV62%2F7Hz86Z3DD7PxP8KiCzPdhz%2Fc1hvMv9isQZedAAyKDFQvt_doc.png?alt=media\&token=13fbf0d1-c44b-45bb-b624-cdd52f3874ff)

#### 9. Click on mic to record the voice note

Click here

![Click on mic to record the voice note](https://static.guidde.com/v0/qg%2FghCodWMyQMWa7oM3Kox1Jg4byV62%2F7Hz86Z3DD7PxP8KiCzPdhz%2FqZYavqLmLpmthawbd7D2Ev_doc.png?alt=media\&token=9acff19a-9799-4738-baca-b547157f4cd2)

#### 10. Click "Send"

Send the message by clicking on "Send."

![Click 'Send'](https://static.guidde.com/v0/qg%2FghCodWMyQMWa7oM3Kox1Jg4byV62%2F7Hz86Z3DD7PxP8KiCzPdhz%2FvsgRDau3MMjSX1Bzr4hiQU_doc.png?alt=media\&token=02199f44-5c41-48ca-8063-e5cf1ad623fe)

#### 11. You change the style of the fonts

Click the selected button

![You change the style of the fonts](https://static.guidde.com/v0/qg%2FghCodWMyQMWa7oM3Kox1Jg4byV62%2F7Hz86Z3DD7PxP8KiCzPdhz%2FpBGFMQwGP5rBcJK4nLDpNz_doc.png?alt=media\&token=ddc1486b-78ff-4262-af04-e20a2d1fc8d3)

#### 12. Add emojis in the text to make the sentence attractive

Click the selected option

![Add emojis in the text to make the sentence attractive](https://static.guidde.com/v0/qg%2FghCodWMyQMWa7oM3Kox1Jg4byV62%2F7Hz86Z3DD7PxP8KiCzPdhz%2Fb9o3d8casVmwKin4JBMbb1_doc.png?alt=media\&token=49edb6df-f3e7-41e8-8903-a1c7c94830e4)

#### 13. Click here

Select this field

![Click here](https://static.guidde.com/v0/qg%2FghCodWMyQMWa7oM3Kox1Jg4byV62%2F7Hz86Z3DD7PxP8KiCzPdhz%2F8gfQKjDSWidprjPEyopoXb_doc.png?alt=media\&token=55be7829-d738-483d-a7c7-6901953e9f17)

#### 14. You'll get all those pre-defined Answers here

Click here

![You'll get all those pre-defined Answers here](https://static.guidde.com/v0/qg%2FghCodWMyQMWa7oM3Kox1Jg4byV62%2F7Hz86Z3DD7PxP8KiCzPdhz%2FaZ265GPcDgGHhwoAWCnVHC_doc.png?alt=media\&token=9e7edca8-0a17-440b-8434-fda724b8ef7a)

#### 15. Click "get\_started\_with\_wtb"

Access "get\_started\_with\_wtb" by clicking on it.

![Click 'get\_started\_with\_wtb'](https://static.guidde.com/v0/qg%2FghCodWMyQMWa7oM3Kox1Jg4byV62%2F7Hz86Z3DD7PxP8KiCzPdhz%2FhYabUS7WrbjqkSmQXRbDH4_doc.png?alt=media\&token=940651e4-e7b7-459f-94d0-be8ae5b48feb)

#### 16. Choose the media

Click the selected option

![Choose the media](https://static.guidde.com/v0/qg%2FghCodWMyQMWa7oM3Kox1Jg4byV62%2F7Hz86Z3DD7PxP8KiCzPdhz%2Fj5U5wFfSR7J3X4Zy9jBbUm_doc.png?alt=media\&token=b5f0a62a-2319-41d3-bb62-9f20b2c46bf1)

#### 17. Select the media

Choose the "QR Code.jpg" file.

![Select the media](https://static.guidde.com/v0/qg%2FghCodWMyQMWa7oM3Kox1Jg4byV62%2F7Hz86Z3DD7PxP8KiCzPdhz%2FesYySa246RVjVjukJEeHuc_doc.png?alt=media\&token=7c2c7732-6868-4e17-990e-717f8fefb099)

#### 18. Choose the template

Navigate to this section

![Choose the template](https://static.guidde.com/v0/qg%2FghCodWMyQMWa7oM3Kox1Jg4byV62%2F7Hz86Z3DD7PxP8KiCzPdhz%2F9b6nBL6G5VRNU2Z9A2pFFj_doc.png?alt=media\&token=cefd1d2c-99ab-4d55-b268-8d3ff42fa242)

#### 19. Click "Choose"

Select an option by clicking on "Choose."

![Click 'Choose'](https://static.guidde.com/v0/qg%2FghCodWMyQMWa7oM3Kox1Jg4byV62%2F7Hz86Z3DD7PxP8KiCzPdhz%2FgfR5DHgkbmUzN6EWQqu7v3_doc.png?alt=media\&token=b5996849-9be0-45ac-920e-23b12f6191a1)

#### 20. Enter the default variable

Enter "Sir" as the default variable.

![Enter the default variable](https://static.guidde.com/v0/qg%2FghCodWMyQMWa7oM3Kox1Jg4byV62%2F7Hz86Z3DD7PxP8KiCzPdhz%2FktJbLPSXfAeLdwWqec9q3y_doc.png?alt=media\&token=68005326-8b1e-4c33-8a35-2e88dbd73a14)

#### 21. Click "Select Template"

Choose a template by clicking on "Select Template."

![Click 'Select Template'](https://static.guidde.com/v0/qg%2FghCodWMyQMWa7oM3Kox1Jg4byV62%2F7Hz86Z3DD7PxP8KiCzPdhz%2FgH8qygCcFFxib2PexUK8DJ_doc.png?alt=media\&token=3cc77fdf-8ef7-4fdd-953d-334589e10205)

#### 22. Click on send Template

Select this option

![Click on send Template](https://static.guidde.com/v0/qg%2FghCodWMyQMWa7oM3Kox1Jg4byV62%2F7Hz86Z3DD7PxP8KiCzPdhz%2F6VACfSqmFUp2szGf4Ev76L_doc.png?alt=media\&token=5cd627b9-e916-4a7f-b2a5-0de0c0e683c9)

#### 23. You can even request the payment from Dashboard

Navigate here

![You can even request the payment from Dashboard](https://static.guidde.com/v0/qg%2FghCodWMyQMWa7oM3Kox1Jg4byV62%2F7Hz86Z3DD7PxP8KiCzPdhz%2FhDwA8VDQnjD9dSkX7Uyi9S_doc.png?alt=media\&token=3b70a2d5-0048-4220-8b31-e24a7d17433f)

#### 24. Enter the amount

Fill in the amount as "1."

![Enter the amount](https://static.guidde.com/v0/qg%2FghCodWMyQMWa7oM3Kox1Jg4byV62%2F7Hz86Z3DD7PxP8KiCzPdhz%2FwsYkVcyyZdesKc7A82xfqV_doc.png?alt=media\&token=549043ee-67bb-4aef-aaba-c6f7e5fcff32)

#### 25. Click "Send"

Send the message by clicking on "Send."

![Click 'Send'](https://static.guidde.com/v0/qg%2FghCodWMyQMWa7oM3Kox1Jg4byV62%2F7Hz86Z3DD7PxP8KiCzPdhz%2FqiXvRX4qFudQ9VKEVSfMQa_doc.png?alt=media\&token=9b7d4e18-ad4f-418f-a1a3-4ceb0c791da3)

#### 26. Click "Private note"

Access the "Private note" section.

![Click 'Private note'](https://static.guidde.com/v0/qg%2FghCodWMyQMWa7oM3Kox1Jg4byV62%2F7Hz86Z3DD7PxP8KiCzPdhz%2FaM47f56w5Lon4McX73er4H_doc.png?alt=media\&token=4600af0e-bab3-4ea5-80d8-c0524c8a2382)

#### 27. Enter the Text that will be visible to only your team members

Select the option "Only visible to you and the team."

![Enter the Text that will be visible to only your team members](https://static.guidde.com/v0/qg%2FghCodWMyQMWa7oM3Kox1Jg4byV62%2F7Hz86Z3DD7PxP8KiCzPdhz%2FmnFxoYVddQYJFThuLUv2Lu_doc.png?alt=media\&token=bb2979fc-3d78-4f20-9ac0-e1c200d3a713)

#### 28. Click "Send"

Send the message by clicking on "Send."

![Click 'Send'](https://static.guidde.com/v0/qg%2FghCodWMyQMWa7oM3Kox1Jg4byV62%2F7Hz86Z3DD7PxP8KiCzPdhz%2F4AxFDMjZmfWejLFZey5ooM_doc.png?alt=media\&token=b974f978-3363-4260-a3ce-f0720cd90e37)

This guide covered a range of actions in Whatstool for employee training purposes, from composing and sending messages to setting up quick replies and private notes. Master the functionalities of Whatstool with these detailed instructions.


# WhatsTool Business Contacts guide

Discover WhatsTool Business, the centralized hub for businesses to efficiently manage and utilize customer data. Simplify contact management for effective communication.

Managing contacts is a crucial aspect of effective communication, and WhatsTool Business provides a centralized hub for businesses to maintain and utilize customer data efficiently.

Now, let's delve into the key terms to understand contacts in more detail&#x20;

<details>

<summary>Bulk Import contacts</summary>

Upload unlimited contacts with fields like name, address, email ID, phone number, etc. from a CSV file or api integration and CRMs

</details>

<details>

<summary>Labels</summary>

With this feature, you can create labels for your contacts so that it becomes easy to categorize and distinguish in your CRM

</details>

<details>

<summary>Custom fields</summary>

This is a unique identifier to assign to your customers for easy access and store any further required information in the product

</details>

<details>

<summary>Bulk assinging</summary>

With this feature, a user can assign 100 labels, status, and customer fields in one go for contacts

</details>


# Features


# Labels

Efficiently categorize and manage contacts and chats with custom Labels. Create, edit, and assign Labels to streamline data organization. Learn how to create a tag in a few simple steps!

Labels play a crucial role in helping you categorize and organize your contacts and conversations, making it easier to locate and manage specific information efficiently. Labels can be created, edited, and assigned to contacts or conversations by authorized users or admins, streamlining your data management process.

To create a Labels:

[How to create a Label\\](https://app.guidde.com/playbooks/fz7cbQoFNrLTNeBJDtigeq)

{% embed url="<https://app.guidde.com/share/playbooks/fz7cbQoFNrLTNeBJDtigeq>" %}

Learn how to efficiently create and customize labels in Whatstool to effectively organize conversations. From naming to color-coding, this guide will walk you through the process step by step.

#### Go to [app.whatstool.business](https://app.whatstool.business)

#### 1. Click "Labels"

Navigate to the Labels section.

![Click 'Labels'](https://static.guidde.com/v0/qg%2FghCodWMyQMWa7oM3Kox1Jg4byV62%2Ffz7cbQoFNrLTNeBJDtigeq%2FqKssaF6Lqkv5HNHrYAuyqe_doc.png?alt=media\&token=d08f0cab-4598-416d-b37b-1bd64d6f1cae)

#### 2. Click "Add Labels"

Initiate the creation of a new label.

![Click 'Add Labels'](https://static.guidde.com/v0/qg%2FghCodWMyQMWa7oM3Kox1Jg4byV62%2Ffz7cbQoFNrLTNeBJDtigeq%2Fsp7NqQKpLukQf4sset6X7q_doc.png?alt=media\&token=4fde9955-bd98-4713-a671-ed21c8e7d355)

#### 3. Enter Label Name"

Select the option to input the label name.

![Enter Label Name'](https://static.guidde.com/v0/qg%2FghCodWMyQMWa7oM3Kox1Jg4byV62%2Ffz7cbQoFNrLTNeBJDtigeq%2FqZVrDu4Qpg3aZSBE9yr3dv_doc.png?alt=media\&token=fd862ec6-bd22-4ccc-bdaf-b1abc13688b3)

#### 4. Enter Description

Navigate to a specific section.

![Enter Description](https://static.guidde.com/v0/qg%2FghCodWMyQMWa7oM3Kox1Jg4byV62%2Ffz7cbQoFNrLTNeBJDtigeq%2FgvUFWQNkpJP3MU7fvKU7Gb_doc.png?alt=media\&token=efba275e-bc48-43d0-a46f-f17feae244a9)

#### 5. Choose the colour which is required for you

![Choose the colour which is required for you](https://static.guidde.com/v0/qg%2FghCodWMyQMWa7oM3Kox1Jg4byV62%2Ffz7cbQoFNrLTNeBJDtigeq%2FrDuG6uB4WHC7x3JhaqrFtD_doc.png?alt=media\&token=23099afa-2c3b-4985-804b-a1d9083f02cc)

#### 6. Choose the Colour

![Choose the Colour](https://static.guidde.com/v0/qg%2FghCodWMyQMWa7oM3Kox1Jg4byV62%2Ffz7cbQoFNrLTNeBJDtigeq%2FvzDbK5kSKz4qV7x3ou9jP8_doc.png?alt=media\&token=64cf3aad-cabc-42bb-877a-262ab06a432e)

#### 7. Click "Add"

Finalize the creation of the label.

![Click 'Add'](https://static.guidde.com/v0/qg%2FghCodWMyQMWa7oM3Kox1Jg4byV62%2Ffz7cbQoFNrLTNeBJDtigeq%2F67oEJkHULfvzZtRpASjogu_doc.png?alt=media\&token=673f9d59-bf1e-4388-8d8f-f7aeacf38508)

<br>


# Custom Field

Customize information collection with Gallabox's Field Collection feature, creating and managing contact and company fields to suit your specific data needs perfectly.

The Custom field feature in WhatsTool  enables you to create and manage various fields for collecting information within your contacts and company profiles. These fields can be customized to suit your specific data needs.

This flexibility allows you to tailor your contact and company information collection to your unique requirements, whether it's related to contact details, preferences, or any other data pertinent to your business.

## How to create the Custom fields

{% embed url="<https://app.guidde.com/share/playbooks/6rJe2pSSquBYaWVaw9scA4>" %}

This guide will walk you through the process of creating custom fields in Whatstool for employee training purposes.

#### Go to [app.whatstool.business](https://app.whatstool.business)

#### 1. Click "Custom fields"

Access the Custom fields section.

![Click 'Custom fields'](https://static.guidde.com/v0/qg%2FghCodWMyQMWa7oM3Kox1Jg4byV62%2F6rJe2pSSquBYaWVaw9scA4%2FcYnJCpeazwyvTNU9SDCjdE_doc.png?alt=media\&token=26108c5a-43dc-4abe-b78e-a80bbbfb06b0)

#### 2. Click "+ Create Custom Fields"

Initiate the creation of a new custom field.

![Click '+ Create Custom Fields'](https://static.guidde.com/v0/qg%2FghCodWMyQMWa7oM3Kox1Jg4byV62%2F6rJe2pSSquBYaWVaw9scA4%2FcJ5sbXvc7wkDwoETobsCJo_doc.png?alt=media\&token=bb585266-6ddf-44b2-b7f1-c2473c499513)

#### 3. Enter the name

Select the option for the field's display name.

![Enter the name](https://static.guidde.com/v0/qg%2FghCodWMyQMWa7oM3Kox1Jg4byV62%2F6rJe2pSSquBYaWVaw9scA4%2FbQSbPUtsx4Y8vuR8zidCVp_doc.png?alt=media\&token=1b400e58-c50c-4959-af52-ceee5a81ae5a)

#### 4. Enter Description

Navigate to the field's description section.

![Enter Description](https://static.guidde.com/v0/qg%2FghCodWMyQMWa7oM3Kox1Jg4byV62%2F6rJe2pSSquBYaWVaw9scA4%2Fg3K2kLzHdVCZhffVHTTkvL_doc.png?alt=media\&token=c780c8b8-55e5-4b10-8f7c-650cda23fd34)

#### 5. Turn on this to see in the Contacts & CRM

Select the appropriate settings.

![Turn on this to see in the Contacts & CRM](https://static.guidde.com/v0/qg%2FghCodWMyQMWa7oM3Kox1Jg4byV62%2F6rJe2pSSquBYaWVaw9scA4%2Favsix5jmCccAQ6AcbLCZ5N_doc.png?alt=media\&token=3a1a1463-3c71-4f46-b843-5b7169708aff)

#### 6. Save the Custom fields

Finalize and create the custom field.

![Save the Custom fields](https://static.guidde.com/v0/qg%2FghCodWMyQMWa7oM3Kox1Jg4byV62%2F6rJe2pSSquBYaWVaw9scA4%2Fay3LbSiwY33gpE4TJHn9zq_doc.png?alt=media\&token=d617af6d-8d98-454c-832f-8230b457ff00)

The guide covered the steps to create custom fields in Whatstool for employee training, ensuring a tailored approach to data management within the application.


# Status

Status are used to categorize and organize conversations between businesses and customers. Businesses can apply status  conversations to help manage and track the status or context of each interaction

## How to create :&#x20;

## [How to create status](https://app.guidde.com/playbooks/paaKnx7BNcQFKzqL3jYTm2)

{% embed url="<https://app.guidde.com/share/playbooks/paaKnx7BNcQFKzqL3jYTm2>" %}

This guide will walk you through the process of creating a status using Whatstool.

#### 1. Introduction

By following the steps, including adding a status name and description, you can enhance task organization and tracking within the application.

![Introduction](https://static.guidde.com/v0/qg%2FghCodWMyQMWa7oM3Kox1Jg4byV62%2FpaaKnx7BNcQFKzqL3jYTm2%2F4haLduhWSsx7wcHSJBpBR1_doc.png?alt=media\&token=a0d2f109-82fb-427a-a35a-167c3e411599)

#### 2. Click "Status"

Click on the "Status" button.

![Click 'Status'](https://static.guidde.com/v0/qg%2FghCodWMyQMWa7oM3Kox1Jg4byV62%2FpaaKnx7BNcQFKzqL3jYTm2%2F3RUHdJknu5hWPYa4urSDxT_doc.png?alt=media\&token=b35ba217-9ab8-4d76-bcbb-3db3c7723c2e)

#### 3. Click "+ Add Status"

Select the option to "+ Add Status".

![Click '+ Add Status'](https://static.guidde.com/v0/qg%2FghCodWMyQMWa7oM3Kox1Jg4byV62%2FpaaKnx7BNcQFKzqL3jYTm2%2FgHCYYKjuDHracttBgp7e52_doc.png?alt=media\&token=52f36ace-5d11-4d45-b7c5-4aa675847af4)

#### 4. Click "Enter Status Name"

Click on the field labeled "Enter Status Name".

![Click 'Enter Status Name'](https://static.guidde.com/v0/qg%2FghCodWMyQMWa7oM3Kox1Jg4byV62%2FpaaKnx7BNcQFKzqL3jYTm2%2Fh8z8DBx5eaEB6ZqJ6kP3WG_doc.png?alt=media\&token=9da36008-2a88-4bb0-b682-efafadebc29f)

#### 5. Go here

Navigate to the specified location.

![Go here](https://static.guidde.com/v0/qg%2FghCodWMyQMWa7oM3Kox1Jg4byV62%2FpaaKnx7BNcQFKzqL3jYTm2%2FwwwFr8ausEpWDVkQLusSND_doc.png?alt=media\&token=65ab40c3-d458-49c3-ad93-fda0fa316a80)

#### 6. Click "Add"

Click on the "Add" button.

![Click 'Add'](https://static.guidde.com/v0/qg%2FghCodWMyQMWa7oM3Kox1Jg4byV62%2FpaaKnx7BNcQFKzqL3jYTm2%2FmzB5Us6gg9tirXeBBjKpzv_doc.png?alt=media\&token=d383fc68-0a61-4dab-be4e-36c0900965ae)

In this guide, you learned how to create a status in Whatstool.

[Powered by **guidde**](https://www.guidde.com)


# Quick Reply

Discover the convenience of Quick Reply - message templates for quick access. Enhance customer interaction with attachments, emojis, and personalized touches.

What are Quick Reply?

Quick Reply are pre-designed message templates that you and your team can easily access. No need to repeatedly type out the same message from scratch.

If you have commonly used messages, save them as Quick Reply for quick use whenever necessary. These responses allow you to:

* Attach files, such as images or documents.
* Incorporate emojis for a touch of expression.
* Personalize the message by using variables.
* Add buttons for seamless and rapid customer interaction.
* Add a WhatsApp Form to enhance the customer interaction.

#### Create a Quick Reply <a href="#create-a-canned-response" id="create-a-canned-response"></a>

1. Select Quick Reply  under Settings. Click on **+ Add New** Quick Reply to open the editor.
2. To create a Quick Reply in WhatsTool Business, provide the name for the Canned Response. Select the channel type as WhatsApp and write the response in **Message Box.** Click on **Add Canned Response** to add to the list of Quick Reply.

* ***Name***: This field allows you to assign a name to your canned response, making it easier for you to identify and utilize it in the future.
* ***Channel Type***: Here, you specify the channel for which the Quick Reply is intended. In this case, "WhatsApp" is selected as the channel type.
* ***Message*****:** This is where you compose the actual text of the Quick Reply. The character limit is 1024, providing ample space for your response.
* ***Buttons*** (Optional): You have the option to include interactive buttons or form along with your canned response. These buttons can be used to guide the conversation or allow the recipient to take specific actions. Including buttons is optional, and you can choose whether to add them or not.

#### Buttons in Canned Response <a href="#buttons-in-canned-response" id="buttons-in-canned-response"></a>

The "**Buttons**" feature provides diverse options for structuring interactive elements within a Canned Response. The available types include:

1. **None:** This option signifies the absence of buttons, creating a straightforward text-based message.
2. **Quick Reply:** Quick Reply buttons offer predefined responses that users can easily select, streamlining communication and interaction.

You can add only 3 buttons in Quick Reply.

1. **List Options:** This feature allows the presentation of a list of options, typically accompanied by buttons for users to choose from, enhancing menu-style interactions.

You can add upto 10 buttons in the List Options.

1. **CTA (Call to Action) URL:** CTA URL prompt users to take specific actions, guiding them towards desired outcomes, such as making a purchase, visiting a website, or engaging in a particular activity.

Points to Note:

1. **Call to Action URL** will only work Cloud API.
2. **Call to Action URL** will not work if Media is a Header or a attachment.


# Q\&A Best Practices


# 1. How to import CSV to add Contacts ?

### How to create the CSV file to import the Contacts along with the Labels, Custom Field and assigning the Team member.

1. Please open the Google Sheets [click here](https://docs.google.com/spreadsheets/u/0/)
2. In the First Column enter the number of the customer.
3. In the Second Column enter the name of the customer.
4. In the Third Column you can enter label you want to assign and Custom field and also assigning the Team member

### Follow below guidelines  to import the Labels

Predefined Labels : All labels should be created in advance to ensure the system recognizes them.

Exact Spelling : Ensure the spelling and format of labels match exactly with those in the system to avoid errors.

Comma Separation : If multiple labels apply to a single entry, separate them with a comma.

**Example:**\
1\. If you are using labels like Hot Lead and Cold Lead, these labels must first be created in the 'Labels' section of the system.\
2\. During import, you should include the labels in the 'Lead' field in the following format:\
3\. Hot Lead, Cold Lead

### Follow below guidelines to Import the Status

Predefined Status: Status should be created in advance to ensure the system recognizes them.

Exact Spelling: Ensure the spelling and format of labels match exactly with those in the system to avoid errors.\
\
**Example:**\
If you are setting status "Open" this status must first be created in the "Status" section of the system

### Follow below guidelines for Assigning by importing

Predefined Agent with email id: Agent email should be added in advance to ensure the system recognizes them.

Exact Spelling: Ensure the spelling and format of email match exactly with those in the system to avoid errors.\
\
**Example:**\
If you are setting assignment to "<example@gmail.com>" then this email id must first be created in the "Team" section of the system.

## Steps to Import the contacts through CSV

1. Kindly go to Contacts & CRM&#x20;
2. Click on Import Contacts&#x20;
3. Chose the CSV file
4. Select the contacts column and name column
5. If you've any Labels, custom field data in the CSV file, kindly select the column for that.
6. And, click on Finish Mapping then Import now.

{% hint style="info" %}
Kindly refer below video for better understanding
{% endhint %}

{% embed url="<https://www.loom.com/share/66bcda92eb9e48b6b69ea6306e509c5c?sid=121afef1-76fb-4e80-ace6-623ef5057000>" %}
Importing the Contacts through CSV File
{% endembed %}


# 2.  How to add contacts manually ?

Steps:&#x20;

1. Kindly go to Contacts & CRM .
2. Click on Add contacts&#x20;
3. Enter the name and number of the Customer
4. Assign Labels, Custom fields & Status (If necessary).
5. Click on Add Contact

{% hint style="info" %}
Kindly refer the below video for better understanding
{% endhint %}

{% embed url="<https://www.loom.com/share/f0023ba92f0647f2911028e546f54db6?sid=f4b5d00c-192f-4e0d-bdd4-a68318b97cb3>" %}
Adding contacts manually
{% endembed %}


# 3. How to start campaign by selecting contacts ?

Steps:  &#x20;

1. Kindly go to Contacts & CRM .
2. Select the required contacts
3. Even, you can filtered out the contacts&#x20;
4. Once you selected the contacts&#x20;
5. Kindly, click on start campaign&#x20;
6. Select the Template&#x20;
7. Now, you can run the campaign or schedule it for later.

{% hint style="info" %}
Kindly refer a below video for better understanding
{% endhint %}

{% embed url="<https://www.loom.com/share/7decbb4074044d7db1e60cc8f13f3a0f?sid=542006f7-0191-47e0-bfc9-6dec21869c1c>" %}
Selecting contacts and running campaign
{% endembed %}


# 4. How to edit the contacts ?

Steps: &#x20;

1. Kindly go to Contacts & CRM .
2. Click on the contacts that you want to edit
3. Kindly edit the required data and save it&#x20;

{% hint style="info" %}
Kindly refer a below video for better understanding
{% endhint %}

{% embed url="<https://www.loom.com/share/a4a58bca03aa4a0fa4d265b5ce8bc550?sid=72e4aad4-4269-4858-afb3-3d0365828330>" %}
Edit Contacts
{% endembed %}


# Efficiently using Contacts & CRM

Here you've the best guide to use the Contacts and explaination of each and every features

{% embed url="<https://app.guidde.com/share/playbooks/a3ye8WDoqnQmFVuuq5u78s>" %}

This guide will walk you through the process to using Whatstool.

#### Go to [app.whatstool.business](https://app.whatstool.business)

#### 1. Click "Contacts"

Click on "Contacts"

![Click 'Contacts'](https://static.guidde.com/v0/qg%2FghCodWMyQMWa7oM3Kox1Jg4byV62%2Fa3ye8WDoqnQmFVuuq5u78s%2Fn7wksQaRxrBSYragPy8GRh_doc.png?alt=media\&token=caa5f40d-da78-4cb6-ba65-3656ebb5d186)

#### 2. Select the contacts

Fill in "on"

![Select the contacts](https://static.guidde.com/v0/qg%2FghCodWMyQMWa7oM3Kox1Jg4byV62%2Fa3ye8WDoqnQmFVuuq5u78s%2FrtyxnivZBKnf4pVeyAWgCF_doc.png?alt=media\&token=daa0b0a2-c051-42c6-a05c-7ae4cc0124f5)

#### 3. Click "Assign Bulk Labels"

Select the "Assign Bulk Labels" option

![Click 'Assign Bulk Labels'](https://static.guidde.com/v0/qg%2FghCodWMyQMWa7oM3Kox1Jg4byV62%2Fa3ye8WDoqnQmFVuuq5u78s%2FhDi1K5K7WP1S9T9M6CKk15_doc.png?alt=media\&token=4cf54553-2e9e-4d53-8975-6c73e17d24c7)

#### 4. Select the label and Assign them

Navigate to the "Assign" section

![Select the label and Assign them](https://static.guidde.com/v0/qg%2FghCodWMyQMWa7oM3Kox1Jg4byV62%2Fa3ye8WDoqnQmFVuuq5u78s%2FopSM5u29woQAg76YGmwgtG_doc.png?alt=media\&token=fd55d51f-7390-4b59-aec9-889604bd9b88)

#### 5. You can the assigned labels will be available

Click on "Interested +1"

![You can the assigned labels will be available](https://static.guidde.com/v0/qg%2FghCodWMyQMWa7oM3Kox1Jg4byV62%2Fa3ye8WDoqnQmFVuuq5u78s%2FkJJbKXTVQyqm1pMSTw9k9Y_doc.png?alt=media\&token=1e717bd3-348d-48ad-82c6-5ab1af89e1a8)

#### 6. Even the multiple labels will be showing

Click the selected option

![Even the multiple labels will be showing](https://static.guidde.com/v0/qg%2FghCodWMyQMWa7oM3Kox1Jg4byV62%2Fa3ye8WDoqnQmFVuuq5u78s%2Fsm4PCm2dqZfRnYBCzaQ1kj_doc.png?alt=media\&token=76a37c4e-22f5-4dc7-9110-66db021f6ad3)

#### 7. Click "Filter"

Select the "Filter" option

![Click 'Filter'](https://static.guidde.com/v0/qg%2FghCodWMyQMWa7oM3Kox1Jg4byV62%2Fa3ye8WDoqnQmFVuuq5u78s%2F9YwBuS6kLmcV5ngv3AaHjy_doc.png?alt=media\&token=0fa23c7b-c493-4227-8af7-07755cde18e1)

#### 8. Filter out the contacts based on your requirements

![Filter out the contacts based on your requirements](https://static.guidde.com/v0/qg%2FghCodWMyQMWa7oM3Kox1Jg4byV62%2Fa3ye8WDoqnQmFVuuq5u78s%2F5yiWW7KDgvSo94wTAnktUs_doc.png?alt=media\&token=3c28bf41-b79d-45ba-92f0-e861d6893da3)

#### 9. Select the label

![Select the label](https://static.guidde.com/v0/qg%2FghCodWMyQMWa7oM3Kox1Jg4byV62%2Fa3ye8WDoqnQmFVuuq5u78s%2FgR5HU42B5f5XMQiSdxzmjP_doc.png?alt=media\&token=ce1c4302-d54b-4bc4-a335-a393956ff1e5)

#### 10. Select the operation

![Select the operation](https://static.guidde.com/v0/qg%2FghCodWMyQMWa7oM3Kox1Jg4byV62%2Fa3ye8WDoqnQmFVuuq5u78s%2F4wFicwqdi9ubuWeKxxDDgX_doc.png?alt=media\&token=cdab27f9-31d9-4a4e-b4a1-3e8e2a1f9af1)

#### 11. This is mandatory

Fill in the text box with "Select ActionInclude ThisExclude This"

![This is mandatory](https://static.guidde.com/v0/qg%2FghCodWMyQMWa7oM3Kox1Jg4byV62%2Fa3ye8WDoqnQmFVuuq5u78s%2FonooHEdRi5H47fHBmtcZAF_doc.png?alt=media\&token=dd654633-51da-4e36-bed7-98715acff062)

#### 12. Click "Apply"

Click on "Apply"

![Click 'Apply'](https://static.guidde.com/v0/qg%2FghCodWMyQMWa7oM3Kox1Jg4byV62%2Fa3ye8WDoqnQmFVuuq5u78s%2FoCFZ9FX9w3pcY3xiqkNvTb_doc.png?alt=media\&token=9c1bb10c-2df1-4f1d-969b-46576956a0ff)

#### 13. You can run the campaign to selected contacts

Choose the "Start Campaign" option

![You can run the campaign to selected contacts](https://static.guidde.com/v0/qg%2FghCodWMyQMWa7oM3Kox1Jg4byV62%2Fa3ye8WDoqnQmFVuuq5u78s%2FtTU9kUhJMwwoDmmwbCXWEk_doc.png?alt=media\&token=0ef88dbc-dd40-4cf1-91d5-deaa9e148aeb)

#### 14. Also you can export these contacts

Select the option to "Export Contacts"

![Also you can export these contacts](https://static.guidde.com/v0/qg%2FghCodWMyQMWa7oM3Kox1Jg4byV62%2Fa3ye8WDoqnQmFVuuq5u78s%2FoVqPtTbKYVyiMsxfhR8ceF_doc.png?alt=media\&token=733388d2-cc21-445f-9739-80dde5c88daa)


# Frequently asked questions

Discover answers and solutions to common issues with conversation access, management, and functionality in our FAQs. Get insights for using this feature effectively.

**Contacts & FAQs**

1. ***What is the file to import the contacts ?***\
   The File format should be CSV while importing the contacts. First column should be the number along with the country code and next column should be variables like Name, Address & Email ID
2. ***can i import contacts through the Xlsx files  ?***\
   No, you cannot use xlsx files for importing the contacts.
3. ***How many contacts i can import through the file ?***\
   You can import unlimited contacts using the CSV files. There is no limit to import the contacts in WhatsApp API
4. ***Can i add the contacts manually ?***\
   Yes, you can add the manually by going to contacts and CRM by enter the name and number!
5. ***Can i assign contacts the labels, status & custom fields in bulk ?***\
   Yes, you can assign up to 500 contacts in one go by applying any advance filter in contacts & CRM


# WhatsTool Business Campaign guide

With WhatsTool Business Broadcast feature, sending messages, updates, and promotions to a large group of recipients has never been easier. Reach your audience with efficiency and ease.

Campaigns in WhatsApp API hold significant importance for businesses and organizations looking to engage with their audience effectively.

<details>

<summary>Broadcast to unlimited contacts</summary>

Retargeting is a powerful feature to retarget users who might have shown interest in your product with personalised offers

</details>

<details>

<summary>Text Reply Analytics</summary>

Once you run a campaign on WTB, if your customers start responding then the product provides analytics about the customers who have responded via messages.

</details>

<details>

<summary>Retargeting</summary>

Retargeting is a powerful feature to retarget users who might have shown interest in your product with personalised offers

</details>

<details>

<summary>Export Analytics</summary>

All the campaign analytics can be downloaded in CSV format

</details>

<details>

<summary>Button clicked Analytics</summary>

Campaigns will have multiple quick reply buttons and WTB provides complete analytics on these buttons such as how many customers clicked and thereafter what action was taken

</details>

<details>

<summary>Schedule the Broadcast</summary>

This feature allows you to schedule your campaign in the future at your convenience rather than sending it now

</details>

<details>

<summary>Session message</summary>

Within an ongoing chat with a customer, for the next 24 hours session chat allows free communication without being charged any fees.

</details>


# Broadcasting the message

With WhatsTool Business Broadcast feature, sending messages, updates, and promotions to a large group of recipients has never been easier. Reach your audience with efficiency and ease.

<figure><img src="https://1440145200-files.gitbook.io/~/files/v0/b/gitbook-x-prod.appspot.com/o/spaces%2F2TgfOHUAGg0ndAgP3vRh%2Fuploads%2FCQh56KAcV56LYd0RGYZo%2Fimage.png?alt=media&amp;token=133f371b-9383-4ef9-8200-4b7d452ad4bf" alt=""><figcaption><p>Campaign Creation</p></figcaption></figure>

### Overview

One of the standout features that WhatsTool Business brings to the table is its Broadcast functionality.

If you've ever wondered how to effortlessly send messages, updates, or promotions to a large group of recipients, you're in the right place. With WhatsTool Business, the process of sending broadcast Messages is user-friendly, allowing you to reach your audience with ease and efficiency.

### Broadcast Dashboard

The Broadcast Dashboard in WhatsTool Business is your central hub for organizing, crafting, and monitoring the performance of your broadcast messages.

To change the WhatsApp Channel,

You can view the daily limits of sending the Broadcast Messages and the Quality rating of your WhatsApp Number.

### Create your first Broadcast

To create your first broadcast, click on Create Broadcast button on the top right side of the window.

### Select Template <a href="#select-template" id="select-template"></a>

Kickstart your broadcast setup by choosing a template and channel. Select the channel for your broadcast and choose an existing template or create a new one.

The first step in the process of creating your first Broadcast is to select the Template and then the channel.

### Select Created Template

If you have already created a message template then you can click on **Select** button besides the template. You will be redirected to choosing the audience for the broadcast. If you haven't created any template for the Broadcast, Click on **"+New Template"** to create one for the campaign. Guide on how to create a WhatsApp Template.

### Search Bar

You can use the Search Bar to search for the Templates that you would like to send in a broadcast.

### Import the Contacts&#x20;

#### By CSV Files :&#x20;

You can import the CSV file which contains the Data and select the columns in which the number is present, if the variables are present you can select those as well. \
\
By Contacts & CRM&#x20;

You can also select the Contacts by applying the filter in the CRM and seggergate the data then you can start the Campaign.


# Campaign Analytics

Discover the power of Broadcast Analytics. Access insightful reports and easily resend broadcasts. Visit us today!

<figure><img src="https://1440145200-files.gitbook.io/~/files/v0/b/gitbook-x-prod.appspot.com/o/spaces%2F2TgfOHUAGg0ndAgP3vRh%2Fuploads%2FkUG2LBL2VFaCip2wDuVz%2Fimage.png?alt=media&amp;token=035ce6f2-bcb1-4834-a28a-90f8a1e756e7" alt=""><figcaption><p>Analytics</p></figcaption></figure>

### Overall Broadcast Analytics

*Right after the broadcast is scheduled. You will be redirected to the following broadcast overview page. Y*ou can check the performances of other Broadcasts on this page.

### Broadcast Report and Duplicate

**Broadcast Report** provide the data summary generated after sending out a broadcast, providing insights into its performance.

**Duplicate** will resend the broadcast message.

**Broadcast Report**

To get the **Broadcast Report**, follow the below GIF:

**Repeat Broadcast**

To **Repeat the Broadcast**, follow the below GIF.

**Broadcast Analytics**

To **View the Broadcast Analytics** on WhatsTool Business, follow the below GIF. You can see how many of your customers have seen, responded, reacted, clicked on the URL shared, or unsubscribed. These stats are important for you to figure out new strategies for broadcast.


# Q\&A Best Practices


# 1. How to create a campaign ?

### Procedures

Steps :&#x20;

1. Kindly go to Campaign
2. Click on create campaign which is in right top&#x20;
3. Select the required message or template to send&#x20;
4. Select the contacts to run the campaign
5. After importing the CSV file, Kindly save the campaign or save and run the campaign

{% hint style="info" %}
Kindly refer the below video for better understanding
{% endhint %}

{% embed url="<https://www.loom.com/share/a0d282ee34444f29b950d35973f6b489?sid=a40a6333-7efb-47d2-9ced-b8d70a01d60b>" %}
Creating the Campaign
{% endembed %}

{% hint style="info" %}
**How should be the CSV file for Campaign** &#x20;

1. Go to Excel&#x20;
2. Column 1 ---> Fill Customers WhatsApp Number with +Country code
3. Column 2 ---> Fill the names of the customers
4. Column 3 & 4 ---> Kindly fill the variables (If template has variable it is neccessary)
5. Save the file in CSV format.
   {% endhint %}

## Importance of Campaign&#x20;

Campaigns in WhatsApp API hold significant importance for businesses and organizations looking to engage with their audience effectively. Here are some key reasons why campaigns in WhatsApp API are crucial:

1. **Direct and Personalized Communication**: WhatsApp allows businesses to send messages directly to users' phones, offering a highly personalized and direct mode of communication. Campaigns enable businesses to tailor messages based on user preferences, demographics, or past interactions, enhancing engagement and relevance.
2. **High Engagement Rates**: WhatsApp boasts high engagement rates, with messages often being read within minutes of receipt. Campaigns leverage this responsiveness to deliver timely and impactful communications, whether it's promotional offers, updates, or customer support.
3. **Rich Media Capabilities**: WhatsApp supports various multimedia formats, including images, videos, and documents. Campaigns can leverage these rich media capabilities to create visually compelling content that captures users' attention and conveys information effectively.
4. **Interactive Features**: WhatsApp API allows for interactive features such as polls, surveys, and quick replies, enabling businesses to gather feedback, conduct market research, or provide personalized assistance seamlessly within the messaging platform.
5. **Opt-In Nature**: Users opt-in to receive messages from businesses on WhatsApp, ensuring that campaigns reach an audience genuinely interested in the brand or its offerings. This opt-in nature fosters a sense of trust and willingness to engage with campaign content.
6. **Cost-Effective Communication**: Compared to traditional marketing channels, WhatsApp campaigns can be a cost-effective solution for businesses, especially for reaching a global audience. With no SMS charges or advertising fees, WhatsApp campaigns offer a cost-efficient way to connect with customers.
7. **Integration with CRM Systems**: WhatsApp API can be integrated with CRM (Customer Relationship Management) systems, allowing businesses to manage contacts, segment audiences, and track campaign performance seamlessly. This integration enhances the effectiveness of campaigns by leveraging customer data and insights.
8. **Compliance and Security**: WhatsApp API ensures compliance with data protection regulations and security standards, providing businesses and users with peace of mind regarding the privacy and security of their communications.

In summary, campaigns in WhatsApp API are crucial for businesses seeking to leverage direct, personalized communication channels to engage with their audience effectively, drive engagement, and achieve their marketing objectives.


# 2. How to schedule a campaign ?

Steps :&#x20;

1. Kindly go to Campaign
2. Click on create campaign which is in right top&#x20;
3. Select the required message or template to send&#x20;
4. Select the contacts to run the campaign
5. Kindly select the schedule later
6. Set a timer to initiate the campaign&#x20;

{% hint style="info" %}
Kindly refer below video for better understanding
{% endhint %}

{% embed url="<https://www.loom.com/share/f4122fb0e5504d7ca43a5cce9eb54a7c?sid=ce1e012c-84eb-4d43-b475-f94c0c368048>" %}
Scheduling campaign
{% endembed %}

{% hint style="info" %}
**How should be the CSV file for Campaign** &#x20;

1. Go to Excel&#x20;
2. Column 1 ---> Fill Customers WhatsApp Number with +Country code
3. Column 2 ---> Fill the names of the customers
4. Column 3 & 4 ---> Kindly fill the variables (If template has variable it is neccessary)
5. Save the file in CSV format.
   {% endhint %}


# 3. How to send session message in bulk ?

Steps :&#x20;

1. Kindly go to Campaign
2. Click on create campaign which is in right top&#x20;
3. Select the session message in the Dropdown.
4. Enter the Quick reply to send
5. Select the contacts to run the campaign
6. After importing the CSV file, Kindly save the campaign or save and run the campaign
7. Even you can schedule the campaign by setting the timer.

{% hint style="info" %}
Kindly refer the below video for better understanding
{% endhint %}

{% embed url="<https://www.loom.com/share/f4122fb0e5504d7ca43a5cce9eb54a7c?sid=ce1e012c-84eb-4d43-b475-f94c0c368048>" %}
Session message
{% endembed %}


# 4. How to retarget the customer using analytics ?

Steps:

1. Kindly go to the analytics
2. Open the particular campaign analytics which you want to retarget the customers
3. Select the section in which you want to retarget&#x20;
4. For eg: If customer click on I'm interested button
5. Then you'll have those data then filtered out in the Analytics
6. Select the contacts in that and click on start campaign
7. Select the required message you want to send&#x20;
8. Kindly the run the campaign. Once it is done.

{% hint style="info" %}
Kindly refer the below video for better understanding
{% endhint %}

{% embed url="<https://www.loom.com/share/3313093f96684b468146fccb5790f111?sid=b40116b3-b68c-4e92-8016-8a02bd3d8d19>" %}
Retargeting Customer
{% endembed %}


# Efficiently using the Campaign

## [How to run a campaign for multiple contacts ?](https://app.guidde.com/playbooks/aVbuKu1UiiqhVTE61tmDqk)

{% embed url="<https://app.guidde.com/share/playbooks/aVbuKu1UiiqhVTE61tmDqk>" %}

Learn how to efficiently run a campaign for multiple contacts using the Whatstool application. From creating a campaign to importing contacts and analyzing performance metrics, this guide will walk you through each essential step for employee training.

#### Go to [app.whatstool.business](https://app.whatstool.business)

#### 1. Click "Campaign"

Access the campaign feature.

![Click 'Campaign'](https://static.guidde.com/v0/qg%2FghCodWMyQMWa7oM3Kox1Jg4byV62%2FaVbuKu1UiiqhVTE61tmDqk%2FsN3cEpPcG97MxW72n5anbJ_doc.png?alt=media\&token=9ddbfe7a-db41-4b82-81cc-7e67d06ca634)

#### 2. Click "Create Campaign"

Begin creating a new campaign.

![Click 'Create Campaign'](https://static.guidde.com/v0/qg%2FghCodWMyQMWa7oM3Kox1Jg4byV62%2FaVbuKu1UiiqhVTE61tmDqk%2F4X5jz2GUwyGGm186qzPnb2_doc.png?alt=media\&token=3018991f-53a3-4c4c-a4d0-246939c95dbb)

#### 3. Click "Select template"

Choose a template for the campaign.

![Click 'Select template'](https://static.guidde.com/v0/qg%2FghCodWMyQMWa7oM3Kox1Jg4byV62%2FaVbuKu1UiiqhVTE61tmDqk%2FkrcDPjjuqCivHSwNYmdLDj_doc.png?alt=media\&token=f98aeccf-e7fb-482b-b79e-ffb65cab5c64)

#### 4. Select the Template

Select the chosen template.

![Select the Template](https://static.guidde.com/v0/qg%2FghCodWMyQMWa7oM3Kox1Jg4byV62%2FaVbuKu1UiiqhVTE61tmDqk%2F6RmkXXEMPtsexcfiMHH42x_doc.png?alt=media\&token=d52933e1-a113-401f-b0dc-f908fa636377)

#### 5. Enter the Default variable

Input a default variable.

![Enter the Default variable](https://static.guidde.com/v0/qg%2FghCodWMyQMWa7oM3Kox1Jg4byV62%2FaVbuKu1UiiqhVTE61tmDqk%2FtndkuRu1fWmZ2RBYrGGvHr_doc.png?alt=media\&token=baf2e5b8-c970-4cbd-950a-e5dc9bbac741)

#### 6. Click "Select Template"

Confirm the template selection.

![Click 'Select Template'](https://static.guidde.com/v0/qg%2FghCodWMyQMWa7oM3Kox1Jg4byV62%2FaVbuKu1UiiqhVTE61tmDqk%2FkHSw5mt2cAvK8vcQ3iKm2s_doc.png?alt=media\&token=30826e45-87a6-4ba5-af10-9c420c2c121a)

#### 7. Import the contacts file

Import contacts from a CSV file.

![Import the contacts file](https://static.guidde.com/v0/qg%2FghCodWMyQMWa7oM3Kox1Jg4byV62%2FaVbuKu1UiiqhVTE61tmDqk%2Fd6Phs9mc8F3b6guET19Spf_doc.png?alt=media\&token=f621f89c-3f8b-486c-b367-5e48edf384a7)

#### 8. Choose the file by clicking on Import CSV

Proceed with the CSV import.

![Choose the file by clicking on Import CSV](https://static.guidde.com/v0/qg%2FghCodWMyQMWa7oM3Kox1Jg4byV62%2FaVbuKu1UiiqhVTE61tmDqk%2FqF3ACpZrQA67XhUnthNqye_doc.png?alt=media\&token=23eea650-ad90-4179-80c0-29bca4531a4a)

#### 9. Select the Column for WhatsApp Number

Select the desired columns.

![Select the Column for WhatsApp Number](https://static.guidde.com/v0/qg%2FghCodWMyQMWa7oM3Kox1Jg4byV62%2FaVbuKu1UiiqhVTE61tmDqk%2FuYPkTCy5PCPEMMDetvk7Cr_doc.png?alt=media\&token=0cb3fbcc-4830-494d-890f-5b46b53c7302)

#### 10. Select another column for Variables

Confirm column selection.

![Select another column for Variables](https://static.guidde.com/v0/qg%2FghCodWMyQMWa7oM3Kox1Jg4byV62%2FaVbuKu1UiiqhVTE61tmDqk%2FqEbGRTM3weaJ85oPHAf8t6_doc.png?alt=media\&token=64e4372e-2544-4f2a-b381-7b0801a0ec28)

#### 11. Click "Continue"

Proceed to the next step.

![Click 'Continue'](https://static.guidde.com/v0/qg%2FghCodWMyQMWa7oM3Kox1Jg4byV62%2FaVbuKu1UiiqhVTE61tmDqk%2Ffd8ThqRAVAw5fMLMQgqCTj_doc.png?alt=media\&token=06e9aa45-2538-4291-902d-b91fcc5027cb)

#### 12. Select "immediate"

Enter the immediate sending details.

![Select 'immediate'](https://static.guidde.com/v0/qg%2FghCodWMyQMWa7oM3Kox1Jg4byV62%2FaVbuKu1UiiqhVTE61tmDqk%2FtwiWCSPVoGPUipWT4xDKQ6_doc.png?alt=media\&token=55e5e385-6cae-46bf-8b2a-f098c588a1e5)

#### 13. Click "Save & Run"

Save and launch the campaign.

![Click 'Save & Run'](https://static.guidde.com/v0/qg%2FghCodWMyQMWa7oM3Kox1Jg4byV62%2FaVbuKu1UiiqhVTE61tmDqk%2FveGxRNcJdmeLxcADMzGqVw_doc.png?alt=media\&token=bbe1a7a1-3beb-4b2f-b3f6-af9e69351c32)

#### 14. Click here for Analytics

Finish the campaign creation.

![Click here for Analytics](https://static.guidde.com/v0/qg%2FghCodWMyQMWa7oM3Kox1Jg4byV62%2FaVbuKu1UiiqhVTE61tmDqk%2FcmaxbympdBfL9HsC28kCeN_doc.png?alt=media\&token=5e2fc850-8cce-4049-942a-5a4b20e20d6f)

#### 15. You can view all the Analytics of the campaign here

Check the sent status.

![You can view all the Analytics of the campaign here](https://static.guidde.com/v0/qg%2FghCodWMyQMWa7oM3Kox1Jg4byV62%2FaVbuKu1UiiqhVTE61tmDqk%2F49ZcjhHPxbGfhq2rj4CZWh_doc.png?alt=media\&token=ee228747-30c1-4404-9d0f-825a433589e5)

#### 16. Even the button clicks Analytics available here

Interact with the campaign response options.

![Even the button clicks Analytics available here](https://static.guidde.com/v0/qg%2FghCodWMyQMWa7oM3Kox1Jg4byV62%2FaVbuKu1UiiqhVTE61tmDqk%2F2am9coiBVYTFLEZfNGGCy8_doc.png?alt=media\&token=e00ab9b3-78e6-4230-8d5b-975c6d0cfa8b)

This guide covered creating, importing contacts, scheduling, and analyzing campaign performance in Whatstool for employee training. Master running campaigns efficiently for multiple contacts with step-by-step instructions provided.


# Frequently asked questions

Discover answers and solutions to common issues with conversation access, management, and functionality in our FAQs. Get insights for using this feature effectively.

**Campaign**

1. ***How many message i can trigger in one go ! ?***\
   Based on the limit given by meta you can trigger the message, you can check the limit in the Settings. To know more about the limit : [4. How often phone number status changes ?](/meta-guide/q-and-a-best-practices/4.-how-often-phone-number-status-changes)
2. ***What are the messaging limit for my WhatsApp Number ?***\
   If your Business is verified starts with 1K TO 100k per day ! If not it’ll be 250 per day
3. ***Will i be charged for failed message ?***\
   No charges will be applicable for the failed message, Only for the successfully sent message will be charged
4. ***Can i download the report of this campaign ?***\
   Yes all the analytics will be available, you can download the report if you’re in the premium plan
5. ***What are the reason for the failed message ?***\
   The reason will be based on the error code you receive. Link : <https://docs.whatstool.business/meta-guide/5.-what-are-the-types-of-error-code-for-failed-message>
6. ***Will my quality score decrease if i keep spamming the user ?***\
   Yes, Even spamming will decrease the Quality score.
7. ***What will be the charges if i retarget to the customer within 24 hrs ?***\
   Once you initiate the template till 24 hrs you can initiate the template with free of cost for the same number. Retargeting the customer will not charge you upto 24 hrs.


# WhatsTool Business Bot guide

Enhance customer interactions and automate communication processes with WhatsTool Business powerful chatbot. Explore the glossary for key terms and functionalities.

WhatsTool Business Chatbot stands out as a powerful tool for enhancing customer interactions and automating communication processes. WhatsTool Business Users can harness the potential of this feature to create dynamic and responsive chatbots tailored to their specific business needs.

Creating a chatbot with WhatsTool Business is a straightforward process. The chatbot's adaptability makes it a versatile tool, capable of handling a range of inquiries and scenarios.

<details>

<summary>Update contact fields</summary>

Update the data provide by the customers to the custom fields

</details>

<details>

<summary>Assign agent on button click</summary>

You can assign the agent based on the button customer clicked

</details>

<details>

<summary>Unlimited Nodes</summary>

Easily build chatbot like automation with drag and drop editor for any questions or lead qualification

</details>

<details>

<summary>Google sheets Integrations</summary>

Send personalised notification from developer api, update your crm or our crm for every update of customer journey.

</details>

<details>

<summary>CRM Integrations</summary>

Send personalised notification from developer api, update your crm or our crm for every update of customer journey.

</details>

<details>

<summary>Ask a questions </summary>

You can ask the questions to the customers and you can store those data in the custom fields

</details>

<details>

<summary>Templates Import</summary>

Importing the Templates can be done and you can connect those to Bots

</details>

<details>

<summary>Quick Reply</summary>

You can import the pre-defined Quick reply and you can connect to bots.

</details>


# Ask Questions

### Ask Questions

Boost customer engagement and double your leads by asking the right questions. Discover how to increase customer interaction on our website today!

<figure><img src="https://1440145200-files.gitbook.io/~/files/v0/b/gitbook-x-prod.appspot.com/o/spaces%2F2TgfOHUAGg0ndAgP3vRh%2Fuploads%2Fl8kwczMkvK4FF5MwKfYi%2Fimage.png?alt=media&amp;token=12c06180-4958-4d19-a98d-3fdd343d8d2e" alt=""><figcaption><p>Interface to use the Ask a Question</p></figcaption></figure>

*Ask questions from your customers to increase customer engagement to increase your lead by 2x!* Let's see what all we can ask from the customers.

Use these cards when you want to wait for the user's response.

<figure><img src="https://1440145200-files.gitbook.io/~/files/v0/b/gitbook-x-prod.appspot.com/o/spaces%2F2TgfOHUAGg0ndAgP3vRh%2Fuploads%2FpDz7qS2nrrkxb2XBFrvh%2Fimage.png?alt=media&amp;token=15feb62f-f01a-4d14-90fd-a61cea8a192d" alt=""><figcaption><p>Ask a Question Options</p></figcaption></figure>


# Ask Email

Optimize user engagement with Ask Email card: Tailor your questions, manage response storage, and fine-tune validation settings. Leverage variables for personalized communication.

**Understanding "Ask** Email"

Ask email from your customer by using **Ask Email card.**

#### **Ask as Text Essentials** <a href="#ask-as-text-essentials" id="ask-as-text-essentials"></a>

Before you start using Ask Email card, here are some things you need to know:

#### **Question Text** <a href="#question-text" id="question-text"></a>

This is the question you want to ask users. Make it clear and short so users know what you're asking.

The **Question text** can be made **Bold**, *Italic*, or ~~strikethrough~~ using the options provided. The text will add the asterisk(\*) for **Bold**, Underscore(\_) for **Italic text**, and Tilde(\~) for **Strikethrough** around the text.

## Implementation Examples :&#x20;

You are asking your customers for their **Email id** to send notifications or product related updates. The Ask Email question type with validation settings will make sure users give helpful responses within a specific character limit.

For the **Question Text** you can enter: *"Kindly share your email with us to send you the help document shortly."*

You have the option to **store the user response** in the variable. You can create a variable - `user_email` for example to store the user response.

Now for the **validation settings**, you could provide the **attempt** limit as 1, Validation Error Message is optional. Provide the **Action on Invalid Response.**

#### Publish the flow <a href="#publish-the-flow" id="publish-the-flow"></a>

To publish the flow, connect the card with the starting button and then click on Publish Button.

#### In WhatsApp <a href="#in-whatsapp" id="in-whatsapp"></a>

This is how "**Ask Email**" card would be on the WhatsApp Platform.

The above sample flow is for you to understand how "**Ask Text**" Card works and it's usage. It is not a representation of what can be achieved with WhatsTool Business.


# Ask Text

Discover the power of "Ask Text" Card in WhatsTool Business. Engage users with open-ended questions and store their responses in a designated variable for use in your BotFlow.

**Understanding "Ask Text"**

"**Ask Text**" Card in WhatsTool Business lets bots ask users open-ended questions, making conversations more fun. Users can share their thoughts, opinions, or give info based on the questions. This user-generated text can be stored in a designated variable, allowing you to use that data in your BotFlow.

You can ask the customer a question as a **Text** or as a **Voice**.

### **Ask as Text Essentials** <a href="#ask-as-text-essentials" id="ask-as-text-essentials"></a>

Learn the basics of the "Ask as Text" option in Ask Text Card to make talking to users more interesting.

#### **Question Text** <a href="#question-text" id="question-text"></a>

This is the question you want to ask users. Make it clear and short so users know what you're asking.

The **Question text** can be made **Bold**, *Italic*, or ~~strikethrough~~ using the options provided. The text will add the asterisk(\*) for **Bold**, Underscore(\_) for **Italic text**, and Tilde(\~) for **Strikethrough** around the text.

### **Implementation Example:** <a href="#implementation-example" id="implementation-example"></a>

Imagine you are asking your customers for their **PAN Card** to evaluate their Financial profile. The Ask Text question type with validation settings will make sure users give helpful responses within a specific character limit.

For the **Question Text** you can enter: *Enter your PAN Card details to evaluate your profile.*

You have the option to **store the user response** in the variable. You can create a variable - `user_details` for example to store the user response.

Now for the **validation settings**, you could provide the **attempt** limit as 1, Validation Error Message is optional. Provide the **Action on Invalid Response**, and turn on the Additional Validation Settings.

In the additional validation settings, provide the **Minimum character, Maximum character, Regex.** The PAN Card number is of 10 digits meaning the minimum characters and the maximum characters are 10.

The first five characters of a PAN Card are letters (**in uppercase by default**), followed by four numerals, and the last (tenth) character is a letter. To capture this you could use a regex - **^\[A-Z]{5}\[0-9]{4}\[A-Z]{1}$** to make sure that the user enters a valid **PAN Number** which matches the following criteria's:

* The PAN Card number must be ten characters long.
* The first five characters must be uppercase letters.
* The next four characters must be numbers.
* The last character must be an uppercase letter.

### Sample Flow Using Ask Text Card <a href="#sample-flow-using-ask-text-card" id="sample-flow-using-ask-text-card"></a>

#### In WhatsTool Business Bot Interface: <a href="#in-gallabox-bot-interface" id="in-gallabox-bot-interface"></a>

#### In WhatsApp: <a href="#in-whatsapp" id="in-whatsapp"></a>

The above sample flow is for you to understand how "**Ask Text**" Card works and it's usage. It is not a representation of what can be achieved with WhatsTool Business.


# Ask Date

### Ask Date

Learn the art of requesting dates from your clients with the Ask Date card. Set validation settings for the time slot you need for a productive discussion.

### Ask Date Card <a href="#ask-date-card" id="ask-date-card"></a>

Ask date from your customer by using **Ask Date card.**

You can ask the customer a question as a **Text** or as a **Voice**.

#### **Ask as Text Essentials** <a href="#ask-as-text-essentials" id="ask-as-text-essentials"></a>

Learn the basics of the "Ask as Text" option in Ask Text Card to make talking to users more interesting.

**Question Text**

This is the question you want to ask users. Make it clear and short so users know what you're asking.

The **Question text** can be made **Bold**, *Italic*, or ~~strikethrough~~ using the options provided. The text will add the asterisk(\*) for **Bold**, Underscore(\_) for **Italic text**, and Tilde(\~) for **Strikethrough** around the text.

### Implementation Example <a href="#implementation-example" id="implementation-example"></a>

Kindly share the date you will be available for 20 mins to have a conversation.

The above text can be made Bold, Italic, or strikethrough using the options provided. The text will add the asterisk(\*) for **Bold**, Underscore(\_) for **Italic text**, and Tilde(\~) for **Strikethrough** as shown in the text below.

### Sample Flow Using Ask Text Card <a href="#sample-flow-using-ask-text-card" id="sample-flow-using-ask-text-card"></a>

Once you have set all the fields required and click on **SAVE.**

PRO TIP: Use Variables in the **Question Text** and in the **Validation Error Message** to make it more personalized.


# Ask Number

### Understanding "Ask Number" <a href="#understanding-ask-number" id="understanding-ask-number"></a>

"Ask Number" is specifically designed to collect numeric input. Asking users for numeric input is a common and valuable tool of WhatsTool Business Bots. This user input can be stored in a designated variable, allowing you to use that data in your BotFlow.

You can ask the customer a question as a **Text** or as a **Voice**.

### **Ask as Text Essentials:** <a href="#ask-as-text-essentials" id="ask-as-text-essentials"></a>

#### **Question Text** <a href="#question-text" id="question-text"></a>

This is the question you want to ask users. Make it clear and short so users know what you're asking.

The **Question text** can be made **Bold**, *Italic*, or ~~strikethrough~~ using the options provided. The text will add the asterisk(\*) for **Bold**, Underscore(\_) for **Italic text**, and Tilde(\~) for **Strikethrough** around the text.

### **Implementation Example:** <a href="#implementation-example" id="implementation-example"></a>

Imagine you are asking your customers to rate your services out of 10. The Ask Number question type with validation settings will make sure users give helpful responses within a specific character limit.

For the **Question Text** you can enter: *On the range of 1 - 10, how would you rate our service? (1 being the worst).*

You have the option to **store the user response** in the variable. You can create a variable - `user_feedback` for example to store the user response.

Now for the **validation settings**, you could provide the **attempt** limit as 1, Validation Error Message is optional. Provide the **Action on Invalid Response**, and turn on the Additional Validation Settings.

In the additional validation settings, provide the **Minimum character, Maximum character, Regex.** The feedback we are looking is on a scale of 1-10, so the minimum character would be 1 and the maximum character would be 2. For regex, we could use - **^\[1-9]\d?$** to make sure that the user enters a rating must between 1 and 9.

#### Publish & Test the Card <a href="#publish-and-test-the-card" id="publish-and-test-the-card"></a>

To publish the flow, connect the card with the starting button and then click on Publish Button. To test the flow, click on Test Bot button to test on a WhatsApp Web Application or on your device.

#### In WhatsApp: <a href="#in-whatsapp" id="in-whatsapp"></a>

This is how "Ask Number" card would be on the WhatsApp Platform.

The above sample flow is for you to understand how "**Ask Number**" Card works and it's usage. It is not a representation of what can be achieved with WhatsTool Business.


# Ask Address

Make it convenient for businesses in Singapore and India to collect customer addresses with the Ask Address feature. Craft a clear and reassuring Header Text to ensure customer safety.

This feature is only available for businesses based in Singapore and their Singapore customers, and businesses based in India and their India customers.

#### **Understanding "Ask Address"** <a href="#understanding-ask-address" id="understanding-ask-address"></a>

The Ask Address card is designed to make it easy for companies to get their customer's addresses for shipping, mailing, or location verification.

#### **Ask as Text Essentials** <a href="#ask-as-text-essentials" id="ask-as-text-essentials"></a>

Learn the basics of the Ask Text Card to make the process of asking the customer's location easier.

In the Header Text, you can craft a concise and welcoming message that immediately informs the customer of the purpose. This should be short, clear, and reassuring to ensure the customer feels safe in providing their address.

**Example:**

"Your Address will be safe with us"

**Question Text**

This is the space which will inform users about your intention of asking their address.

**Example:**

"Kindly provide your address to help us deliver your selected products at your doorstep."

The footer in a message provides important secondary information. In most of the WhatsApp Templates, it offers an option to unsubscribe from messages.

**Example:**

Text STOP to unsubscribe from messages.

**Pre-filled Address**

If you already have your customer's address, you can pre-fill the address using variables for them to double check and confirm that address.

**Store response in the variable**

The user's address input can be stored in a variable named `address`.

**Validation Errors**

You throw errors in the address fields if you feel that the customer might have provided the details wrong and WhatsApp will prevent the customer from submitting the address until the issue(s) are/is resolved.

**Validation Settings**

**Attempt**: Specifies the number of attempts allowed for a user to provide valid input.

**Validation Error Message**: Optional field to enter a custom error message displayed when user input fails validation.

**Action on Invalid Response**: Defines the action to be taken when the user provides invalid input.

#### Best Practices <a href="#best-practices" id="best-practices"></a>

* Be transparent about why you're collecting the address and how it will be used.
* Respect customer privacy and ensure you comply with data protection regulations.
* Provide an option for customers to skip the address collection if it's not mandatory.
* Ensure the address input is as user-friendly as possible, supporting autofill and verification to minimize errors.


# Ask URL

### Ask URL

Request the URL from your customers using the Ask URL card. Set up Regex validation to verify the input meets the specified URL criteria. Save the response in a variable for further use.

### Ask URL Card <a href="#ask-url-card" id="ask-url-card"></a>

Ask URL from your customer by using **Ask URL card.**

You can ask the customer a question as a **Text** or as a **Voice**.

#### **Ask as Text Essentials** <a href="#ask-as-text-essentials" id="ask-as-text-essentials"></a>

Learn the basics of the "Ask as Text" option in Ask Text Card to make talking to users more interesting.

**Question Text**

This is the question you want to ask users. Make it clear and short so users know what you're asking.

The **Question text** can be made **Bold**, *Italic*, or ~~strikethrough~~ using the options provided. The text will add the asterisk(\*) for **Bold**, Underscore(\_) for **Italic text**, and Tilde(\~) for **Strikethrough** around the text.

### Implementation Example <a href="#implementation-example" id="implementation-example"></a>

Please share the URL of the product that you would like to purchase.

The above text can be made Bold, Italic, or strikethrough using the options provided. The text will add the asterisk(\*) for **Bold**, Underscore(\_) for **Italic text**, and Tilde(\~) for **Strikethrough** as shown in the text below.

Once you have set all the fields required and click on **SAVE.**

PRO TIP: Use Variables in the **Question Text** and in the **Validation Error Message** to make it more personalized.


# Ask Location

Ask Location from your customer by using Ask Location card.

You can only ask the co-ordinates from the user not the address in text.

**For example:** Kindly share your location with us to send the service person.

The above text can be made Bold, Italic, or strikethrough using the options provided. The text will add the asterisk(\*) for **Bold**, Underscore(\_) for **Italic text**, and Tilde(\~) for **Strikethrough** as shown in the text below.

#### Other available fields: <a href="#other-available-fields" id="other-available-fields"></a>

1. **Attempt:** In this field, you have to add the number of times you would like to ask the same question to your customers when you get some other response.
2. **Validation Error Message:** This message is for the customer's when they respond randomly to the question you have asked.
3.
4. **Store response in the variable:** You can create or use the previously created variables to store the responses shared by your customers. *If you are creating variables for the first time, all you have to do is type the Variables name in the box; it will ask to create the variable once you click on Create "Variable Name" as shown in the screenshot below.*

Once you have set all the fields required and click on **SAVE.**

PRO TIP: Use Variables in the **Question Text** and in the **Validation Error Message** to make it more personalized.

The ask card sent will have a button with a static text “**Send Location**”. When the end user clicks on “Send Location” will open maps in WhatsApp to share location.


# Ask Phone

Discover the power of the "Ask Phone" card in Gallabox, enabling seamless collection of customer mobile numbers. Get insights on question text, response storage, validation settings, and more.

### Understanding "Ask Phone" <a href="#understanding-ask-phone" id="understanding-ask-phone"></a>

"**Ask Phone**" card in Gallabox lets the bots ask your customers their alternate mobile number.

You can ask the customer a question as a **Text** or as a **Voice**.

### **Ask as Text Essentials** <a href="#ask-as-text-essentials" id="ask-as-text-essentials"></a>

Before we start using Ask Phone Card, here are some things you need to know:

#### **Question Text** <a href="#question-text" id="question-text"></a>

This is the question you want to ask your customers. Make it clear and short so users know what you're asking.

The **Question text** can be made **Bold**, *Italic*, or ~~strikethrough~~ using the options provided. The text will add the asterisk(\*) for **Bold**, Underscore(\_) for **Italic text**, and Tilde(\~) for **Strikethrough** around the text.

### **Implementation Example:** <a href="#implementation-example" id="implementation-example"></a>

Imagine you are asking your customers for their **Alternate contact number** to reach out in case their primary number is not available. The Ask Phone question type with validation settings will make sure users give helpful responses within a specific character limit.

For the **Question Text** you can enter: *"Kindly share your alternate contact number with us."*

You have the option to **store the user response** in the variable. You can create a variable - `user_alternate_contact` for example to store the user response.

Now for the **validation settings**, you could provide the **attempt** limit as 1, Validation Error Message is optional. Provide the **Action on Invalid Response**, and turn on the Additional Validation Settings.

In the additional validation settings, provide the **Regex** - **^(+\[0-9]{1,3}\[- ]\*)?\[0-9]{10}$** to make sure that the user enters a valid phone number which matches the following criteria:

* The contact number can start with a country code, which is a plus sign followed by one to three digits.
* The contact number must be 10 digits long.
* The contact number cannot contain any special characters.

#### Publish & Test the Card <a href="#publish-and-test-the-card" id="publish-and-test-the-card"></a>

To publish the flow, connect the card with the starting button and then click on Publish Button. To test the flow, click on Test Bot button to test on a WhatsApp Web Application or on your device.

#### In WhatsApp <a href="#in-whatsapp" id="in-whatsapp"></a>

This is how "**Ask Phone**" card would be on the WhatsApp Platform.

The above sample flow is for you to understand how "**Ask Phone**" Card works and it's usage. It is not a representation of what can be achieved with Gallabox.


# Bot Actions

Boost Efficiency with Gallabox Actions: Assign conversation, Update fields automatically and many more actions

**Actions** empower you to take control of your communication and get more done in less time.


# Assign Conversation

Enhance customer interactions with a personalized touch using our conversation assignment card. Assign to users, teams, bots, or contact owners in your WhatsTool Business Account.

This card allows your agents to take over the conversation and provide a personal touch.

You can Assign the Conversation to any of the User or Team or Bot or their contact owner listed in the CRM software.

#### Assign to a user <a href="#assign-to-a-user" id="assign-to-a-user"></a>

If you select **Assignee Type as user**, then Assignee will be one of the users that you have invited on your WhatsTool Business Account.


# Update Contact Fields

Streamline customer communication with WhatsTool Business's contact field update feature. Opt to replace, add if empty, or append details seamlessly. Click to find out more!

This card can be used to Update the Contact fields that you ask from your customers like their name, contact number, email, their availability, or any instruction they have given.

After choosing the field that you would like to update and the value for the field, you have to select the operation in some cases:

-> Choose **Replace**, if you want to update the previous contact details with new details.

-> Choose **Add if Empty**, to add the contact details to a particular contact.

-> Choose **Append**, if you want to add more to the details.

You can see the updated contact fields in the **Contact** section of Gallabox.

To change the Marketing Opt-ins, follow the below GIF:

To know more about how to create and update the Fields in WhatsTool Business.


# Unassign Conversations

Ensure seamless customer service by utilizing this card. Connect the final card to retain crucial data and enhance efficiency.

This card is used to unassign the conversation created when a customer goes through the chat-flow.

The best practice is to connect the last card of the chat-flow to **this** card to avoid losing important data.


# Update Conversation Fields

Simplify conversation management with our website's card feature. Update or delete conversation tags with ease by selecting values, operations, and saving changes for a smooth chat-flow experience.

This card can be used to Update for the conversation or remove the tags from the conversation.

If you want to update the **Conversation Tag**, then you have to provide the value for the tag. You can either create the value for the tag or you can add the variables.

Under the variables, you can have Intent, Recipient Details, Contact Fields, or any custom fields as the value.

Once you are done selecting the value, you have to select the operation. You want to Append, replace, or add if empty.

-> Use **Append** if you want to add to the previous value.

-> Use **Replace** if you want to replace the previous value and add a new one.

-> Use **Add if Empty** if the field in a conversation has no value and you want to add.

As a last step, click on Save to update the conversation fields when a customer goes through the chat-flow.

You can find the conversation tags in the conversation window.


# Set up Default Bot

Ready to publish your bot? Find out how to make it default by navigating to the WhatsApp Channel in Settings. Follow the steps to assign the bot and ensure a smooth chat-flow for your users.

Make your Bot default

Once you are done setting up the chat-flow and ready to publish the bot, you can make the bot default.

#### **Set Up Your Default Bot** <a href="#set-up-your-default-bot" id="set-up-your-default-bot"></a>

The other way to make a default bot is

1. Navigate to Default Bot in the Automation
2. Select the Bot based on the scenarios.
3. Set the Timezone and Save the Default Bot

<figure><img src="https://1440145200-files.gitbook.io/~/files/v0/b/gitbook-x-prod.appspot.com/o/spaces%2F2TgfOHUAGg0ndAgP3vRh%2Fuploads%2FIe2ufUJMkQoYJsQer1Di%2Fimage.png?alt=media&amp;token=872492bf-5bf0-405f-993a-e87b0ac6818f" alt=""><figcaption><p>Default Action </p></figcaption></figure>

<figure><img src="https://1440145200-files.gitbook.io/~/files/v0/b/gitbook-x-prod.appspot.com/o/spaces%2F2TgfOHUAGg0ndAgP3vRh%2Fuploads%2Fj2K3jBcYWNTwjxQmeypy%2Fimage.png?alt=media&amp;token=8835a2dc-37ce-4c5d-87b9-f30083000513" alt=""><figcaption><p>Select the Bot</p></figcaption></figure>


# Q\&A Best Practices


# 1. How to create my customise bot message ?

{% hint style="info" %}
Kindly refer the below video for better reference
{% endhint %}

{% embed url="<https://app.supademo.com/demo/ljcVDR9f4UmOyIrtraQP0>" %}

## Procedures

Steps:&#x20;

1. Kindly click on Automation&#x20;
2. Click on create chatbot & give a title and description for chatbot&#x20;
3. Now, you're in Bot Canvas&#x20;
4. Kindly drag & drop the message from left panels
5. Edit the messages and save it&#x20;
6. Drag and drop the next message and connect between two nodes to trigger this message.

{% hint style="info" %}
Types of messages available in Chatbot&#x20;

1. Interactive message&#x20;
2. Menu message&#x20;
3. Text message
4. Media message
5. Button Reference
6. Catalogue message
7. Actions message
8. Ask a question message
9. AI message

&#x20;10\.  Templates
{% endhint %}

## How to assign whatsapp API number ?

Steps :&#x20;

1. Go to particular bot canvas&#x20;
2. Click on the assign on the top&#x20;
3. Select the Whatsapp API Number and click on update&#x20;

Steps 2 :&#x20;

1. Open the Automotion
2. Go to that Particular chatbot
3. Click on Whatsapp icon in the actions
4. Select the Whatsapp API number
5. Click on update.

## How to set a trigger word in Whatsapp API number ?&#x20;

Steps:&#x20;

1. Open the Bot&#x20;
2. Select the First message or starting node
3. On your right, there will be keywords
4. Enter the keywords
5. Click on save to get trigger the message.

## Importance of Chatbot

\
Chatbots play a crucial role in various aspects of business and customer interaction, offering several key benefits:

1. **24/7 Availability**: Chatbots are available round the clock, providing instant responses to customer inquiries regardless of the time of day. This ensures that customers receive assistance and information whenever they need it, improving satisfaction and loyalty.
2. **Scalability**: Chatbots can handle multiple conversations simultaneously, allowing businesses to scale their customer support operations without a proportional increase in staffing costs. This scalability is particularly beneficial during peak periods or when dealing with high volumes of inquiries.
3. **Cost-Effectiveness**: By automating routine inquiries and tasks, chatbots reduce the need for human intervention in customer support, leading to cost savings for businesses. Moreover, chatbots can handle a large number of inquiries simultaneously, further enhancing cost-effectiveness.
4. **Improved Efficiency**: Chatbots provide instant responses to common queries, reducing the time customers spend waiting for assistance. This improves efficiency and enhances the overall customer experience by minimizing response times and streamlining communication.
5. **Personalization**: Advanced chatbots can analyze user data and behavior to deliver personalized recommendations, offers, and assistance tailored to individual preferences and needs. This personalization helps businesses build stronger relationships with customers and drive engagement.
6. **Consistent Service**: Chatbots deliver consistent responses to inquiries, ensuring that customers receive accurate information and assistance regardless of the agent handling their query. This consistency helps maintain brand reputation and customer satisfaction levels.
7. **Data Collection and Analysis**: Chatbots can collect valuable data on customer interactions, preferences, and pain points, providing businesses with insights to improve their products, services, and marketing strategies. Analyzing chatbot interactions helps businesses understand customer behavior and identify areas for optimization.
8. **Lead Generation and Sales Support**: Chatbots can engage customers in conversations, qualify leads, and provide product recommendations, effectively serving as virtual sales assistants. By guiding customers through the purchase process and addressing their concerns, chatbots help drive conversions and increase sales.

In summary, chatbots are essential tools for businesses seeking to enhance customer service, streamline operations, and drive engagement. By providing instant responses, scalability, cost-effectiveness, personalization, and valuable data insights, chatbots play a vital role in improving the overall customer experience and achieving business objectives.


# 2. How to get the feedback using the bot and retrieve the data in Google sheet ?


# Efficiently using the Automation

## [WhatsTool Business](https://app.guidde.com/playbooks/fQ6ZFrY2Dzp38N8XS9Y5ey)

{% embed url="<https://app.guidde.com/share/playbooks/fQ6ZFrY2Dzp38N8XS9Y5ey>" %}

This guide will walk you through the steps to using Whatstool.

#### Go to [app.whatstool.business](https://app.whatstool.business)

#### 1. Click "Chatbot flows"

Click on "Chatbot flows"

![Click 'Chatbot flows'](https://static.guidde.com/v0/qg%2FghCodWMyQMWa7oM3Kox1Jg4byV62%2FfQ6ZFrY2Dzp38N8XS9Y5ey%2FhTvFf9VFpCkMD6z5Ne8ugk_doc.png?alt=media\&token=c3193d5f-1b33-4bf4-8d38-5822eeec03fd)

#### 2. Click "Create Chatbot"

Navigate to "Create Chatbot"

![Click 'Create Chatbot'](https://static.guidde.com/v0/qg%2FghCodWMyQMWa7oM3Kox1Jg4byV62%2FfQ6ZFrY2Dzp38N8XS9Y5ey%2FtLowUREQdZE9UjZXFADJ8D_doc.png?alt=media\&token=bb805593-96e8-4bfa-baac-25bc7ee0b6f8)

#### 3. Enter the bot name

Select the "Enter title" option

![Enter the bot name](https://static.guidde.com/v0/qg%2FghCodWMyQMWa7oM3Kox1Jg4byV62%2FfQ6ZFrY2Dzp38N8XS9Y5ey%2F7NseN8psXW42ycfuRGwbBU_doc.png?alt=media\&token=1c11bbd1-0ceb-46d3-87b5-1c23d51dabed)

#### 4. Click "Create"

Choose the "Create" option

![Click 'Create'](https://static.guidde.com/v0/qg%2FghCodWMyQMWa7oM3Kox1Jg4byV62%2FfQ6ZFrY2Dzp38N8XS9Y5ey%2F37x8Vtrks5REUPQiU5Cj9C_doc.png?alt=media\&token=2a850deb-1eb0-44f9-8ef9-6faa59222a02)

#### 5. You can Drag and Drop the messages from here

Navigate to the "Interactive Message" section

![You can Drag and Drop the messages from here](https://static.guidde.com/v0/qg%2FghCodWMyQMWa7oM3Kox1Jg4byV62%2FfQ6ZFrY2Dzp38N8XS9Y5ey%2FxbAbP3v5ShNS3QJ7KJgtGU_doc.png?alt=media\&token=dd4af5ca-2d21-49bc-9903-4328116306de)

#### 6. This is Editor to edit the message

Click on "Body"

![This is Editor to edit the message](https://static.guidde.com/v0/qg%2FghCodWMyQMWa7oM3Kox1Jg4byV62%2FfQ6ZFrY2Dzp38N8XS9Y5ey%2FaYxYYYajny77VBejUubci5_doc.png?alt=media\&token=1080ac24-633d-4bec-a4c2-673b3ce62ec1)

#### 7. You can add the buttons here

Select the option to "Add Another Button"

![You can add the buttons here](https://static.guidde.com/v0/qg%2FghCodWMyQMWa7oM3Kox1Jg4byV62%2FfQ6ZFrY2Dzp38N8XS9Y5ey%2FxrF33vj2DeX9UFNEcUqQM9_doc.png?alt=media\&token=bd5f2cad-9c49-4b35-b8ec-cc56fcc73564)

#### 8. Enter the Button text

Navigate to the "Button Title" section

![Enter the Button text](https://static.guidde.com/v0/qg%2FghCodWMyQMWa7oM3Kox1Jg4byV62%2FfQ6ZFrY2Dzp38N8XS9Y5ey%2FrKvw8xSYJbLH6jYjNjHw4z_doc.png?alt=media\&token=c481da9d-d97f-47c2-a8ed-a0e604d7c13f)

#### 9. You can connect from one node to another node

Click here

![You can connect from one node to another node](https://static.guidde.com/v0/qg%2FghCodWMyQMWa7oM3Kox1Jg4byV62%2FfQ6ZFrY2Dzp38N8XS9Y5ey%2F9WbxbHBYY2Cw6RgRPDvFU7_doc.png?alt=media\&token=210080f7-f788-40fa-97c7-bf22c2363c68)

#### 10. You can duplicate here

Choose the "Duplicate" option

![You can duplicate here](https://static.guidde.com/v0/qg%2FghCodWMyQMWa7oM3Kox1Jg4byV62%2FfQ6ZFrY2Dzp38N8XS9Y5ey%2F1qZkKdADqJ6LnW5rhes8Ne_doc.png?alt=media\&token=5e53d607-f52d-4767-8347-aac008cabd17)

#### 11. Click "Action"

Select the option to "Action"

![Click 'Action'](https://static.guidde.com/v0/qg%2FghCodWMyQMWa7oM3Kox1Jg4byV62%2FfQ6ZFrY2Dzp38N8XS9Y5ey%2F4hQdNa6LxDfNDXQf2xPvnZ_doc.png?alt=media\&token=db18482c-9c8c-4ba3-ab3e-a5d6a1f1b43b)

#### 12. Drag and Drop to Update the input to CRM from User

Navigate to the "Update contact fields" section

![Drag and Drop to Update the input to CRM from User](https://static.guidde.com/v0/qg%2FghCodWMyQMWa7oM3Kox1Jg4byV62%2FfQ6ZFrY2Dzp38N8XS9Y5ey%2F8WtUDStmfFKmRtnDU8jrVH_doc.png?alt=media\&token=526ce7c5-f20d-47a7-9303-f8ac7ed83034)

#### 13. Click "Assign Team Member"

Navigate to "Assign Team Member"

![Click 'Assign Team Member'](https://static.guidde.com/v0/qg%2FghCodWMyQMWa7oM3Kox1Jg4byV62%2FfQ6ZFrY2Dzp38N8XS9Y5ey%2FvkxXzEdGREmmB5Gg1YSYFz_doc.png?alt=media\&token=704448a5-d32f-4272-bfa0-507da644a8d7)

#### 14. Assign the team member here

Select the "Select method Manual Assignment rule" option

![Assign the team member here](https://static.guidde.com/v0/qg%2FghCodWMyQMWa7oM3Kox1Jg4byV62%2FfQ6ZFrY2Dzp38N8XS9Y5ey%2FrZvuoqDTEe57xYbbFaXjqu_doc.png?alt=media\&token=5a7835d8-c09d-4ec8-b8b3-fdde7e0ce41c)

#### 15. Click "Ask a question"

Click on the "Ask a question" field

![Click 'Ask a question'](https://static.guidde.com/v0/qg%2FghCodWMyQMWa7oM3Kox1Jg4byV62%2FfQ6ZFrY2Dzp38N8XS9Y5ey%2F6WjX9YdmpGbcaBy5QgrncN_doc.png?alt=media\&token=310fb718-289e-4880-b9cb-66f8f82532b9)

#### 16. Click "Ask text"

Select the option to "Ask text"

![Click 'Ask text'](https://static.guidde.com/v0/qg%2FghCodWMyQMWa7oM3Kox1Jg4byV62%2FfQ6ZFrY2Dzp38N8XS9Y5ey%2F9XDrtekiKn57Qw5j52ZdBJ_doc.png?alt=media\&token=c6d31f53-17ac-498b-9ddc-d43e31b16e68)

#### 17. Enter the questions here

Select this field

![Enter the questions here](https://static.guidde.com/v0/qg%2FghCodWMyQMWa7oM3Kox1Jg4byV62%2FfQ6ZFrY2Dzp38N8XS9Y5ey%2Fbp2jzpePtk9bN4BESNuN6Y_doc.png?alt=media\&token=dfbbddf2-d895-4cb1-9fbf-f797e72f9e92)

#### 18. Store this answer in the Custom Field

Navigate to "Noneage - textrole - textcompany\_size - textbusiness\_name - textcampaign\_type - textlead\_type - textlocation - textcustomer\_name - textemail\_1 - textnotes\_1 - textwebsite\_1 -..."

![Store this answer in the Custom Field](https://static.guidde.com/v0/qg%2FghCodWMyQMWa7oM3Kox1Jg4byV62%2FfQ6ZFrY2Dzp38N8XS9Y5ey%2FrMdNJLiD4hXkj24eeo18UJ_doc.png?alt=media\&token=8b1da40b-708b-46ff-9b96-c0f8ecf40ac5)

#### 19. You can import the templates from here

Choose the "Open Templates" option

![You can import the templates from here](https://static.guidde.com/v0/qg%2FghCodWMyQMWa7oM3Kox1Jg4byV62%2FfQ6ZFrY2Dzp38N8XS9Y5ey%2FdPy25TycLj3Hyd2MtHRycb_doc.png?alt=media\&token=c7365617-125a-4d85-a3c9-05293ccedd8e)

#### 20. Click "Save"

Click on the "Save" field

![Click 'Save'](https://static.guidde.com/v0/qg%2FghCodWMyQMWa7oM3Kox1Jg4byV62%2FfQ6ZFrY2Dzp38N8XS9Y5ey%2FbveLSbhDPwo7QfUiHMxGqV_doc.png?alt=media\&token=2300ebba-0566-4e0c-9560-700af8cde58a)


# Frequently asked questions

Discover answers and solutions to common issues with conversation access, management, and functionality in our FAQs. Get insights for using this feature effectively.

**Automation**

1. ***Can i export the user input by the bot integrating with the google sheets ?***\
   Yes, you can do this by calling the api in the chatbot, all the data from the user will be store in the Google sheet.
2. ***Can i store the user input in the CRM ?***\
   Yes you can use the Actions in the chatbot to store the custom field in Dashboard.
3. ***Can i use the two starting node in bot canvas ?***\
   No, You can keep only one Starting node in the One bot.
4. ***What should be length of the Chatbot ?***\
   There is no restriction for the length of the chatbot
5. ***Can i use the AI bots in WhatsTool Business ?***\
   Yes you can use the AI Bot by integrating the OpenAI in the Chatbot.
6. ***Is there any limit for the keywords to trigger the bot ?***\
   There is no limit for the keywords you can add triggers by providing the “ , “.


# WhatsTool Business Commerce guide

Bring your shopify or ecommerce website into WhatsApp catalog for auto-checkout

Enhance your WhatsApp business operations by integrating your Facebook Catalog with WhatsTool. Display products within chats and simplify order placement for a seamless shopping experience.

<figure><img src="https://1440145200-files.gitbook.io/~/files/v0/b/gitbook-x-prod.appspot.com/o/spaces%2F2TgfOHUAGg0ndAgP3vRh%2Fuploads%2FOO9nHW80ywoc8z6eRn5H%2Fimage.png?alt=media&amp;token=2d67115f-8b61-47d1-966b-b90c867f8bca" alt=""><figcaption></figcaption></figure>

<details>

<summary>WhatsApp Catalog</summary>

Bring your shopify or ecommerce website into WhatsApp catalog.

</details>

<details>

<summary>Auto-checkout</summary>

Make purchase on WhatsApp just like e-commerce for faster checkout along with payment

</details>

<details>

<summary>Shopify Integration</summary>

Bring Shopify Catalog in WhatsApp catalog, abundant cart notification, delivery notification.

</details>

<details>

<summary>Abandoned cart reminders</summary>

Send reminder for abandoned cart purchase

</details>


# Connect the Catalog with Meta

Easily connect your catalog with Meta Business Manager. Access your Business Manager, navigate to WhatsApp Accounts, & open WhatsApp Manager. Verify your phone number and select the desired catalogue.

**Connect Your Catalog with Meta Business Manager**

To connect your catalog with Meta, follow the below steps:

<figure><img src="https://1440145200-files.gitbook.io/~/files/v0/b/gitbook-x-prod.appspot.com/o/spaces%2F2TgfOHUAGg0ndAgP3vRh%2Fuploads%2FUmbKhNzhlpnuG3tD6jUQ%2Fimage.png?alt=media&amp;token=9a6f8bef-1ef5-4ce7-a70b-bf53ef86bc72" alt=""><figcaption><p>Catalog Connection</p></figcaption></figure>

1. Go to your Business Manager using the link <https://business.facebook.com/settings/>. Scroll down the left navigation and choose **WhatsApp Accounts** under Accounts. Select the WhatsApp Account from the options (if you have more than 1 WhatsApp Account)
2. Click on Settings under the selected WhatsApp Account. Click on WhatsApp Manager.
3. Once the WhatsApp Manager opens up, from the left navigation click on Phone Number to double check if your number is connected. Move to click on Catalogue option below the Phone Number in the left navigation.
4. Click on "Choose a Catalogue" button to open the drop-down for selecting the catalogue you would like to connect with the particular WhatsApp Number.
5. From the drop-down either scroll down or type the name of the catalogue in the search bar to select the desired catalogue. Click on Connect to Connect the Catalogue with the WhatsApp Account.
6. Once the Catalogue is connected, you have the option to Disconnect the Catalogue. ***Use this option only when you wish to connect another catalogue with the WhatsApp Account.*** In any other case, make sure the Catalogue stays connected.

<figure><img src="https://1440145200-files.gitbook.io/~/files/v0/b/gitbook-x-prod.appspot.com/o/spaces%2F2TgfOHUAGg0ndAgP3vRh%2Fuploads%2FiZefbuMEsSGgqDzV2Si3%2Fimage.png?alt=media&amp;token=0c2ff37a-2e93-4c6e-88aa-f015906c96ff" alt=""><figcaption><p>Products</p></figcaption></figure>


# Q\&A Best Practices


# 1. How to connect my catalogs in WhatsApp API ?

##


# 2. How to create a catalogue ?

**Link**: <https://business.facebook.com/commerce/>

**Kindly click on above link**

<figure><img src="https://1440145200-files.gitbook.io/~/files/v0/b/gitbook-x-prod.appspot.com/o/spaces%2F2TgfOHUAGg0ndAgP3vRh%2Fuploads%2Fm1RHV9htF3QYQxuXw2Gm%2Fcatalogue.png?alt=media&amp;token=1f983dfa-bbd5-4b71-9c1f-598a59564015" alt=""><figcaption></figcaption></figure>

&#x20;**Click on Add catalogue and follow the below steps to create a catalogue.**

## Start creating your catalogue:

**Step 1:** If this will be your first catalogue, click Get started. Select Create a catalogue and then click Get started.

**Step 2:** Select + Add catalogue to create a new one.

**Step 3:** Select the type of inventory that you advertise or sell, then click Next.

**Step 4:** E-commerce (products) only: Choose how you want to add items to your catalogue

**Step 5:** Select Upload product info if you plan to add items yourself in Commerce Manager.

**Step 6:** Enter a name for your catalogue.

**Step 7:** Click on Create.


# 3. How to add product items to catalogue ?

**Link:** <https://business.facebook.com/commerce/catalogs/>

**Kindly click on above link**

<figure><img src="https://1440145200-files.gitbook.io/~/files/v0/b/gitbook-x-prod.appspot.com/o/spaces%2F2TgfOHUAGg0ndAgP3vRh%2Fuploads%2FIBT2MLmvr6hJzjypnmxe%2Fmanually-add-item.png?alt=media&amp;token=07c82640-0a8f-4e02-b48a-02197956a829" alt=""><figcaption></figcaption></figure>

Click on Add Item and follow the below steps to complete the process.

**Step 1:** Go to Commerce Manager and select your catalogue.

**Step 2:** Open the Catalogue tab and go to Items.

**Step 3:** Select Add items. In the drop-down, select Add multiple items.

**Step 4:** Select Manual followed by Next.

**Step 5:** In the form, each row contains information for one item. First, add an image of your item. Images must be at least 500 x 500 pixels, in JPEG or PNG format and a maximum of 8 MB.

**Step 6:** Enter a name, description and other details for your item. Scroll to the right-hand side or use the Tab key on your keyboard to view and fill in all fields. We recommend that you provide as much information as possible to help customers make a purchase decision.

**Step 7:** To add a new item, select + New row or select the drop-down next to it to add 5 or 10 new rows at once. To duplicate an item, select and then Duplicate item. Edit any information that's different about the duplicated item. When you've finished, select Upload items in the bottom right-hand corner. In the confirmation window, select Done.


# Frequently Asked Questions

Discover answers and solutions to common issues with conversation access, management, and functionality in our FAQs. Get insights for using this feature effectively.


# Efficiently using the Ecommerce


# WhatsTool Business Templates guide

Learn how to create effective WhatsApp message templates for marketing. Follow guidelines, avoid restricted content, and get your templates approved hassle-free.

WhatsApp marketing uses pre-approved message templates by Meta, including broadcasts, greetings, and ads. Have your most-used messages approved for smooth communication.

**Rules for creating WhatsApp templates**

For your WhatsApp messages to get approved, follow these simple guidelines:

1. **Template Name:** Use only lowercase letters, numbers, and underscores. The name should be relevant to the WhatsApp Message Content.

For Instance: If you are creating a Welcome Message Template, the name should be `welcome_message` not any random name like `jjjhhhh` or `shopify_template`.

1. **Restricted Content:** Avoid promoting restricted items like drugs, weapons, etc. [Learn more.](https://www.whatsapp.com/legal/commerce-policy/)
2. **No Sensitive Data:** Don't ask for financial or sensitive information.
3. **Variable Format:** Use `{{variableName}}` for variables, and provide samples for clarity.

For example:

**`{{name}}`** = John

**`{{price}}`** = 138 INR or

**`{{companyName}}`** = WhatsTool Business

Once you have created your template you can submit it for approval. It can take up to 24 hours for an approval decision to be made. Once a decision has been made, a tag will appear with your WhatsApp Message Template.

**WhatsApp Template Categories**

Template messages can be divided into three categories:

1. `UTILITY`
2. `MARKETING`
3. `AUTHENTICATION`

Utility templatesAuthentication templatesMarketing templates

Utility templates are usually triggered by a user action or request. They should include specific details about the current transaction, account, subscription, or interaction. For instance, an order confirmation must have an order number.

Any template containing both utility and marketing content will be considered a marketing template.

**WhatsApp templates Status**

Once a template message is created and approved, it can have the following statuses:

| Template Status         | Description                                                                                                                                                                                                   |
| ----------------------- | ------------------------------------------------------------------------------------------------------------------------------------------------------------------------------------------------------------- |
| **`Pending`**           | Your template has been submitted and is awaiting review. Be patient; it's in the queue for the approval process                                                                                               |
| **`Submitted`**         | Your template is in the process of being reviewed by WhatsApp/Meta. Wait for approval; the review typically takes around 24 hours.                                                                            |
| **`Recently Approved`** | Your template has met WhatsApp's guidelines. Wait for the status to change to `Approved` to share the Template.                                                                                               |
| **`Approved`**          | Your template is ready to use. Start sending your approved messages to contacts.                                                                                                                              |
| **`Rejected`**          | Your template didn't meet WhatsApp's guidelines and needs adjustments. Re-create your template as per feedback and resubmit for review.                                                                       |
| **`Error`**             | An issue occurred during the template process; it might be incomplete or incorrect (wrong template category, or invalid link in the CTA). Review the template for errors and resubmit the template if needed. |

**Template Approval Process**

Each template must be reviewed and approved by Meta before being sent to customers. When you send a template approval request, Meta immediately validate its category.

* **If Meta agrees** with the category you selected, the template status is set to `PENDING`; the template will then go through template review.
* **If Meta disagrees** with your designation, the template will be created, but its `status` is set to `REJECTED` .

We recommend including the `allow_category_change to` `Yes` in your template creation request. This will prevent your template from being rejected due to miscategorization and ensure it continues to template review process.

The review process can take up to 24 hours. You can only send templates with an **`Approved`** status.

**WhatsApp Template Types**

You can only send Templates that have **`Approved` status**. The following template types can be sent:

* **Text Templates**: These are your classic message templates with just words.
* **Media templates**: Think of these like flyers or mini-presentations you can send through WhatsApp.
* **Interactive message templates**: These templates let users take action within the message, like clicking buttons or making selections.
* **Multi-Product Message templates**: Imagine a mini-catalog you can send through WhatsApp to show off different options.
* **Location-based message templates**: These templates can include a map or directions, useful if you have a physical store or offer location-based services.


# Q\&A Best Practices


# 1. How to create a template ?

{% hint style="info" %}
Kindly refer the below video for better understanding
{% endhint %}

{% embed url="<https://app.supademo.com/demo/rAw1lBk4YrfJNQkBG4Wuc>" %}
Template Section
{% endembed %}

## Procedures

Steps : &#x20;

1. Kindly go to templates and click on create templates&#x20;
2. Select the templates category and enter the template name
3. Select the Header --> Text & Media&#x20;
4. Enter the message in the body
5. Click on submit

### Adding a variable in the templates.

Steps:

1. When you enter the body message&#x20;
2. If you need to add the variable in the message&#x20;
3. Click on the Add variable&#x20;
4. Kindly fill the Default variable for the submitting the template.

### Adding a media in the templates.

Steps:

1. When you want to add the media in header
2. Select the header. Media size : Photo : 5MB, Video : 15MB & PDF : 15MB
3. Choose the media and upload the file.

## Importance of Templates

Template messages serve as structured, pre-defined messages that can be used repeatedly for various purposes across different communication channels. Their importance lies in several key areas:

1. **Consistency**: Templates ensure consistency in messaging, as they contain pre-approved content that aligns with brand voice, style, and messaging guidelines. This consistency helps maintain a cohesive brand identity and fosters trust and familiarity among customers.
2. **Efficiency**: Using templates saves time and effort by eliminating the need to create messages from scratch for repetitive tasks or common scenarios. Templates streamline communication processes, enabling quicker response times and greater productivity for individuals and teams.
3. **Accuracy**: Template messages are carefully crafted and approved, reducing the likelihood of errors or inaccuracies in communication. By providing standardized content, templates help ensure that essential information is consistently conveyed to recipients.
4. **Compliance**: In regulated industries or environments with legal requirements, template messages can help ensure compliance with relevant regulations and policies. By using approved templates, businesses can mitigate the risk of inadvertently sharing non-compliant or sensitive information.
5. **Scalability**: Templates facilitate scalability by allowing businesses to easily replicate and adapt messages for different audiences, channels, or scenarios. This scalability is particularly beneficial for businesses experiencing growth or managing large volumes of communication.
6. **Personalization**: While templates provide a structured framework, they can also be customized to include personalized elements such as recipient names, order details, or specific preferences. This balance between standardization and personalization ensures that messages resonate with individual recipients while maintaining efficiency and consistency.
7. **Analytics and Optimization**: Template messages can be tracked and analyzed to measure their effectiveness and optimize future communications. By monitoring metrics such as open rates, click-through rates, and conversion rates, businesses can refine their templates to improve engagement and outcomes over time.
8. **Cross-Channel Integration**: Templates can be adapted for use across various communication channels, including email, SMS, chatbots, and social media. This cross-channel integration ensures a cohesive messaging strategy and enhances the omnichannel customer experience.

In summary, template messages are essential for maintaining consistency, efficiency, accuracy, compliance, scalability, personalization, analytics, and cross-channel integration in communication efforts. By leveraging templates effectively, businesses can streamline their messaging processes, enhance customer engagement, and achieve their communication objectives more effectively.


# Efficiently using Templates

Templates are used in template messages to open marketing, utility, and authentication conversations with customers.

Templates are used in template messages to open marketing, utility, and authentication [conversations](https://developers.facebook.com/docs/whatsapp/pricing#conversations) with customers. Unlike free-form messages, template messages are the only type of message that can be sent to customers who have yet to message you, or who have not sent you a message in the last 24 hours.

Templates must be approved before they can be sent in template messages. In addition, templates may be disabled automatically based on customer feedback and engagement. Once disabled, a template cannot be sent in a template message until its quality rating has improved or it no longer violates our [business](https://l.facebook.com/l.php?u=https%3A%2F%2Fwww.whatsapp.com%2Flegal%2Fbusiness-policy%2F\&h=AT0X436CIyJ94Eg6swxHReCUwd1gPVcdCo582aZO3-_Nd-m2SulUYQqhqBZpaaeyjTm0m14Zzvi9aKxXXXxupX_gVUMypJIXYGIT6xoi9NXXEnXZL2Uc2rCLcisPRhuZXrCF-2ZJ_XSnpq3CH6KyHk6jy97AvcKLieJ4-Q) or [commerce](https://l.facebook.com/l.php?u=https%3A%2F%2Fwww.whatsapp.com%2Flegal%2Fcommerce-policy%2F\&h=AT1edzPxSZq9P2NVGGVpJkP9hWVZLF9QTM0jTFYavjG7-9avynL1tm8ibNVhBLaRED-vAw0zyt_myOlqQbS_Eg0IJT-MnCUUCCms9Cl5ucmEN7oCfY5dxvMcn7JRGtVp0vyd2E8D93yEoqQAGhm1Sg87AaJ_sRoJCo-kow) policies.

### Creation <a href="#creation" id="creation"></a>

Use the Business Management API to create templates. See [Create and Manage Templates](https://developers.facebook.com/docs/whatsapp/business-management-api/message-templates) to learn how. Alternatively, you can [use the WhatsApp Manager to manually create templates](https://www.facebook.com/business/help/2055875911147364).

### Approval Process <a href="#approval-process" id="approval-process"></a>

Once you have created your template you can submit it for approval. It can take up to 24 hours for an approval decision to be made. Once a decision has been made, a notification will appear in your WhatsApp Manager and we will send an email to your Business Manager admins. In addition, we will send a webhook notification if you are subscribed to message template status changes. See [Monitoring Status Changes](https://developers.facebook.com/docs/whatsapp/message-templates/guidelines/#monitoring-status-changes).

If your message template is approved, it's status will be set to **Active - Quality pending** and you can begin sending it to customers. If it is rejected, you can [edit it](https://developers.facebook.com/docs/whatsapp/message-templates/guidelines/#editing) and resubmit for approval, or [appeal](https://developers.facebook.com/docs/whatsapp/message-templates/guidelines/#appeals) the decision.

#### Samples <a href="#samples" id="samples"></a>

If your template uses variables you must include sample variable values (media assets, text strings, etc.) with your submission. This makes it easier for us to visualize how your template will appear to customers.

To include a sample with your submission in the WhatsApp Manager, first create your template, adding any variables that it requires, then click the Add Sample button. The preview pane will render any sample media assets or sample text values you provide.

If using our APIs to create templates, include the `examples` property for each template component object in your request that uses a variable.

#### Common Rejection Reasons <a href="#common-rejection-reasons" id="common-rejection-reasons"></a>

Submissions are commonly rejected for the following reasons, so make sure you avoid these mistakes.

* Variable parameters are missing or have mismatched curly braces. The correct format is `{{1}}`.
* Variable parameters contain special characters such as a `#`, `$`, or `%`.
* Variable parameters are not sequential. For example, `{{1}}`, `{{2}}`, `{{4}}`, `{{5}}` are defined but `{{3}}` does not exist.
* The message template contains content that violates WhatsApp’s Commerce Policy: When you offer goods or services for sale, we consider all messages and media related to your goods or services, including any descriptions, prices, fees, taxes and/or any required legal disclosures, to constitute transactions. Transactions must comply with the [WhatsApp Commerce Policy](https://www.whatsapp.com/legal/commerce-policy/).
* The message template contains content that violates the [WhatsApps Business Policy](https://l.facebook.com/l.php?u=https%3A%2F%2Fwww.whatsapp.com%2Flegal%2Fbusiness-policy%2F\&h=AT1zt6lGA9QXmfnMCQlh7NUOSI-4vAtfh9z9TOxi_hu8MQYLdpgs3yP8TbxvMjrzaxh5b1UaDzoo4WPhXP8OrlAEJEKu8RUX3pgpkhE44JK6EqVR7y7g2-5rbg7PPv7LFzvZVKYYxbmVVKyHCqJ7ra-7iRInzmtnBBFDJw): Do not request sensitive identifiers from users. For example, do not ask people to share full length individual payment card numbers, financial account numbers, National Identification numbers, or other sensitive identifiers. This also includes not requesting documents from users that might contain sensitive identifiers. Requesting partial identifiers (ex: last 4 digits of their Social Security number) is OK.
* The content contains potentially abusive or threatening content, such as threatening a customer with legal action or threatening to publicly shame them.
* The message template is a duplicate of an existing template. If a template is submitted with the same wording in the body and footer of an existing template, the duplicate template will be rejected.

A rejection notification that includes the rejection reason will appear in [Business Support Home](https://business.facebook.com/business-support-home). You can view rejections in the **Business Support Home** by navigating to **Account Overview** > **View my accounts** (button) > (your Meta Business Account) > (your WABA) > **Rejected message templates**. Rejection info will also be sent via email.

You can refer to the **Business Support Home** notification to see the name and language of the existing template with the same content as the rejected duplicate template. You may also choose to edit the template and resubmit.

This check does not apply to templates categorized as `AUTHENTICATION`.

### Editing <a href="#editing" id="editing"></a>

You can edit a template using the [WhatsApp Manger](https://www.facebook.com/business/help/287011426725347) or the [Message Template](https://developers.facebook.com/docs/whatsapp/business-management-api/message-templates#edit-a-message-template) endpoint. Note that if you edit a message template and resubmit it for approval, its status will be set to **In Review** and it can't be sent to customers until its status has been set to **Active**.

### Sending Templates <a href="#sending-templates" id="sending-templates"></a>

Once a template has been approved (its `status` is set to `ACTIVE`) you may begin sending it to customers. To send a template using Cloud API, see [Send Template Messages](https://developers.facebook.com/docs/whatsapp/cloud-api/guides/send-message-templates). To send a template using On-Premises API, see [Sending Template Messages](https://developers.facebook.com/docs/whatsapp/message-templates/creation).

Note that a message template's `status` can change automatically from `ACTIVE` to `PAUSED` or `DISABLED` based on customer feedback and engagement. For this reason, we recommend that you [monitor status changes](https://developers.facebook.com/docs/whatsapp/message-templates/guidelines/#monitoring-status-changes) and take appropriate actions whenever a message template that you rely upon becomes, or is in danger of becoming, paused or disabled.

### Statuses <a href="#statuses" id="statuses"></a>

Templates can have the following statuses.

* **In-Review**: Indicates that the template is still under review. Review can take up to 24 hours.
* **Rejected**: The template has been rejected during our review process or violates one or more of our policies. See [Appeals](https://developers.facebook.com/docs/whatsapp/message-templates/guidelines/#appeals).
* **Active - Quality pending**: The message template has yet to receive quality feedback or read-rate information from customers. Message templates with this status can be sent to customers. See [Quality Rating](https://developers.facebook.com/docs/whatsapp/message-templates/guidelines/#quality-rating).
* **Active - High Quality**: The template has received little to no negative customer feedback. Message templates with this status can be sent to customers. See [Quality Rating](https://developers.facebook.com/docs/whatsapp/message-templates/guidelines/#quality-rating).
* **Active - Medium Quality**: The template has received negative feedback from multiple customers, or low read-rates, but may soon become paused or disabled. Message templates with this status can be sent to customers. See [Quality Rating](https://developers.facebook.com/docs/whatsapp/message-templates/guidelines/#quality-rating).
* **Active - Low Quality**: The template has received negative feedback from multiple customers, or low read-rates. Message templates with this status can be sent to customers but are in danger of being paused or disabled soon, so we recommend that you address the issues that customers are reporting. See [Quality Rating](https://developers.facebook.com/docs/whatsapp/message-templates/guidelines/#quality-rating).
* **Paused**: The template has been paused due to recurring negative feedback from customers, or low read-rates. Message templates with this status cannot be sent to customers. See [Template Pausing](https://developers.facebook.com/docs/whatsapp/message-templates/guidelines/#template-pausing).
* **Disabled**: The template has been disabled due to recurring negative feedback from customers. Message templates with this status cannot be sent to customers.
* **Appeal Requested**: Indicates that an appeal has been requested. See [Appeals](https://developers.facebook.com/docs/whatsapp/message-templates/guidelines/#appeals).

You can view a template's status by going to **WhatsApp Manager** > **Overview**, mousing over the suitcase icon (**Account tools**) and clicking **Message templates**. If you have multiple WhatsApp Business Accounts, select the account whose template statuses you want to view from the list of accounts in the dropdown menu in the top-right corner.


# Frequently asked questions

Discover answers and solutions to common issues with conversation access, management, and functionality in our FAQs. Get insights for using this feature effectively.

**Templates**

1. ***What is the timeline to get approved by meta ?***\
   Meta will approve the templates within 24 hrs, generally it will take upto 10-15 mins to get approval after creation.
2. ***What is the difference between marketing, utility & authentication ?***\
   Marketing is promotional message, Utility will be provide the Information about the updates & Authentication is sharing the OTP to login into accounts.
3. ***What are the charges for the templates ?***\
   For India, Marketing will be 77 paisa/ conversation, Utility cost you 33paisa/conversation, Service will be 0.33 paisa/conversation. Other countries : <https://docs.google.com/spreadsheets/d/1_2ZfUyytEoVO-jFOLJ30QiO8KFcJuuKilkf1XoeBRgk/edit#gid=0>
4. ***How many buttons i can add in the templates ?***\
   You can add up to 10 Buttons where maximum 2 Website buttons & 1 Call to action rest of them will be Quick reply button ! We suggest you to add the stop promotion in the marketing templates.
5. ***What are types of header in the templates ?***\
   Headers can be Any media like JPEG, PNG, Audio & PDF in the templates.
6. ***What is character limit in the templates ?***\
   You can use up to 1024 Characters limit in the templates


# WhatsApp API Number


# 1. How to update the whatsapp profile ?

{% hint style="info" %}
Kindly refer the below video for better understanding
{% endhint %}

{% embed url="<https://www.loom.com/share/86125adfad894d76baab4037e68330fe?sid=2dce5820-7183-47f2-8d7f-09ee2d071c81>" %}
Update Profile
{% endembed %}

## Procedure

1. Kindly go to settings&#x20;
2. Click on WhatsApp API Number&#x20;
3. Click on three dots on the right top and select the update profile
4. Kindly fill all the details in the Whatsapp Profile.
5. Click on save and click on Sync.

{% hint style="info" %}
Required things to update the WhatsApp Profile

1. Profile Picture
2. Select the business Category
3. Address of your business
4. Support Email
5. Website and Social media link
   {% endhint %}


# Manage Team


# 2. How to add team member in WhatsTool Business ?

Team member allows you to manage user access and permissions within WhatsTool Business.

{% hint style="info" %}
Kindly refer the below video for better understanding.
{% endhint %}

{% embed url="<https://app.supademo.com/demo/L-SooyqNXN_8TVD4jn8WI>" %}

### Team Member

As a Team member you can assign them in three different roles :

1. Team Member
2. Manager
3. Custom

**Team Member** : In this section he can only  access My chats, Contacts and creating templates, Quick Reply and uploading media, rest all things will be read only.

**Manager :** In this section he'll be having each and every access, only the WhatsApp API number access will be read only.

**Custom** : In this section the who is providing the access can decide which he wants to give and assign the team member.

{% hint style="info" %}
Masking the customer contacts is also available in the Team member section.
{% endhint %}

### Procedures

\
**Steps:**&#x20;

1. &#x20;Kindly go to settings
2. Click on add team member
3. Fill the details Email ID and name of the team member
4. Select the role for your team member
5. Assign the Whatsapp API Number.
6. Click on Add


# 3. How to assign team member in       assignment rule ?

{% hint style="info" %}
Kindly refer the below video for better understanding
{% endhint %}

{% embed url="<https://www.loom.com/share/371bc32531664c79991c730d31d956fa?sid=77aa8c8e-82c0-4faf-becf-2635919b1770>" %}
Assignment rule
{% endembed %}

## Assignment rules:

There are two different rules to assign agent in Whatstool&#x20;

1. Manual : This only works in manual mode when team member assign the chat to different team member manually
2. Round robin : Round robin is automated way of assigning the Team member by providing the data in Assignment rule&#x20;

## Procedures:

Steps:

1. Kindly go to settings&#x20;
2. Click on the manage team member&#x20;
3. Click on assignment rule
4. Select the method
5. If it is manual, select and click on save
6. If it is round robin, provide the rank for the team member in sequence and make sure they're active&#x20;
7. Click on update and finally click on Save


# Media Gallery


# WhatsApp Conversation Credit (WCC)

### Overview

META don't charge you for every single message you send. Instead, they charge for the conversations you have with your customers. A conversation is like a chat that lasts for 24 hours between you and a customer.

### **Categories**

Conversations fall into categories. There are four types:

* **Marketing**: When you send messages about promos, updates, or invites.
* **Utility**: These help with specific requests, like confirming transactions.
* **Authentication**: Used to verify users, like one-time passcodes during login.
* **Service**: To help you solve customer questions.

### **Customer Service Window**

When a customer messages you, there's a 24-hour timer. While it's running, you can send different types of messages. During this duration, businesses can converse with the customers in any free-form or normal text messages. After 24 hours, you can only send template messages.

### **Conversation Duration**

Most conversations last 24 hours. If a new conversation starts, it resets the timer. But [free-entry point conversations](broken://pages/ybMfTCd5QVn4HarTIPCt#free-entry-point-conversation) have a 72-hour timer.

### [**How Marketing, Utility & Authentication Conversation charged**](https://go.facebookinc.com/rs/267-PVB-941/images/WhatsApp-Business-Platform-Pricing-Explainer.pdf)

* Other than service conversation, all other conversation initiated from the business end needs to be done by sending a template.
* On sending a template message now, each of the templates opens up a 24-hour window of that type of conversation
* Once the message is delivered, the pricing will be charged based on the conversation type window opened.
* If a customer replies, a business can then send any free-form or normal text messages
* If a business sends a marketing template at 9am and a utility template at 10am, two conversation windows will open up and charged accordingly. To understand the pricing with its use cases, check out this document

### **Free Tier Conversations**

You get 1,000 free service conversations every month. They reset at the beginning of each month.

### WhatsApp Conversation Pricing in INR :

{% embed url="<https://docs.google.com/spreadsheets/d/1_2ZfUyytEoVO-jFOLJ30QiO8KFcJuuKilkf1XoeBRgk/edit#gid=0>" %}

{% embed url="<https://app.supademo.com/demo/pacJn1dqSvZBWFDEywSCx>" %}


# WhatsTool Platform Pricing

Unlock the magic of WhatsApp for your Business

### Unlock the magic of WhatsApp for your Business

In our Platform we offer 4 Different Plans  :&#x20;

1. Growth&#x20;
2. Growth +
3. Pro&#x20;
4. Pro + (Custom)

These are the plans where you can purchase it for **Quarterly** and **Yearly**:&#x20;

## Quarterly Plan&#x20;

<figure><img src="https://1440145200-files.gitbook.io/~/files/v0/b/gitbook-x-prod.appspot.com/o/spaces%2F2TgfOHUAGg0ndAgP3vRh%2Fuploads%2FTIaQ3ziqnQSnY2jkMiKc%2FScreenshot%202024-02-15%20131019.png?alt=media&amp;token=52639874-1570-49e2-9e63-65d7ccded03b" alt=""><figcaption><p>Plans and Pricing</p></figcaption></figure>

## Yearly Plan

<figure><img src="https://1440145200-files.gitbook.io/~/files/v0/b/gitbook-x-prod.appspot.com/o/spaces%2F2TgfOHUAGg0ndAgP3vRh%2Fuploads%2F1gjx8Z4XwxcBtrGt5F3K%2FScreenshot%202024-02-15%20131038.png?alt=media&amp;token=b76a384e-b0e1-44b4-bed3-c29a6bf3c443" alt=""><figcaption><p>Plans and Pricing</p></figcaption></figure>

### **Subscription Details**

The "Plan & Subscription" section provides details about your active subscription, including the plan name, billing frequency, plan start date, plan end date, and access to your invoices.

Additionally, you have access to your subscription invoices, which provide a detailed breakdown of your billing history and payments.

### **Active Plan**

This is the name of your current subscription plan. It outlines the features and services included in your subscription.

<figure><img src="https://1440145200-files.gitbook.io/~/files/v0/b/gitbook-x-prod.appspot.com/o/spaces%2F2TgfOHUAGg0ndAgP3vRh%2Fuploads%2Fzs946idjZL5w65wBGDpN%2FScreenshot%202024-02-15%20131304.png?alt=media&amp;token=fc0a696b-c12b-485a-80ef-af42e1827335" alt=""><figcaption><p>Active Plan</p></figcaption></figure>

### **Upgrade Plan**

This option allows you to explore other subscription plans and potentially switch to a different one if it better suits your needs.

### **Invoice**

This is where you can access your subscription invoices. Invoices provide detailed information about your billing history, including the breakdown of charges, payments, and other financial records related to your subscription.


# Team Member - Add-Ons

## Pricing of Team member

1. Growth : 200rs/month per Agent
2. Growth+ : 300rs/month per Agent&#x20;
3. Pro : 500rs/month per Agent

**Steps** :&#x20;

1. Go to **Plan**&#x20;
2. &#x20;Select **Add-Ons Plans**&#x20;
3. Click on **Get this Add-on**&#x20;
4. Select the count of the team members you want&#x20;
5. Complete the payment&#x20;

<figure><img src="https://1440145200-files.gitbook.io/~/files/v0/b/gitbook-x-prod.appspot.com/o/spaces%2F2TgfOHUAGg0ndAgP3vRh%2Fuploads%2F4IOi3WVmdE9wKE8BmRRu%2FScreenshot%202024-02-15%20132405.png?alt=media&amp;token=90f6404c-156d-4f29-8359-5fe134029ceb" alt=""><figcaption><p>Team Member Addons</p></figcaption></figure>


# Google Sheet

Google Sheets is a cloud-based spreadsheet software developed by Google . It offers a wide range of features for creating, editing, and collaborating on spreadsheets in real-time.

## GSheet Integration

Google Sheets offers various ways to integrate with other services and tools to enhance functionality and automate tasks. Here are some common methods for Google Sheets integration:

Follow these Steps:

1. Open the Google Sheets
2. Click on Extensions
3. Open the App Script and paste the Below Code.
4. **Google Apps Script:** Google Apps Script is a JavaScript-based scripting language that allows you to automate tasks and extend Google Workspace (formerly G Suite) applications. You can use Google Apps Script to create custom functions, automate data import/export, and even build custom menu options within Google Sheets. To get started, go to "Extensions" -> "Apps Script" within Google Sheets.

<figure><img src="https://1440145200-files.gitbook.io/~/files/v0/b/gitbook-x-prod.appspot.com/o/spaces%2F2TgfOHUAGg0ndAgP3vRh%2Fuploads%2Ff0yhmuJXqPyreInmOp7g%2FScreenshot%202024-02-15%20133410.png?alt=media&amp;token=95940003-34f8-4d84-b49c-597e1d6dea81" alt=""><figcaption><p>Code for Gsheet</p></figcaption></figure>

1. **Google Sheets API :** The Google Sheets API allows you to programmatically access and modify Google Sheets data. This is more advanced and requires coding skills. You can use the API to read and write data, format cells, and perform various operations on your Google Sheets. Documentation and examples can be found on the Google Sheets API documentation.

**Copy this Code and Paste in App Script**

```javascript
function onEdit(e) {

  editFun(e)

}

function onChange(e) {

  var sheet = SpreadsheetApp.getActiveSheet();

  var range = sheet.getActiveRange();

  var row = range.getLastRow();

  SpreadsheetApp.getActiveSpreadsheet().toast(">" + e.changeType + " " + row + " " + sheet.getName());

}

function editFun(e) {

  var range = e.range;

  Logger.log("hello this is onEdit");

  const as = e.source.getActiveSheet();

  const name = e.source.getActiveSheet().getName();

  console.log("postDataValue: ", name)

  //Step 1 : Set your Trigger Value 
  var triggerValue = 6

  if (name == "Sheet1" && e.range.columnStart == triggerValue) {

    var row = e.range.rowStart;

    console.log("rangeData: ", e.range.columnStart)

    var headers = getHeadrs(triggerValue)

    console.log("headers: ", headers)

    var data = {}

    for (let i = 0; i < triggerValue; i++) {

      data[headers[0][i].toString()] = as.getRange(row, i + 1).getValue().toString()

    }

    console.log("rangeDataDetails: ", data, `${data["Name"]}`)

    if (Object.keys(data).length > 0) {

      const payload =

      //Step 2 : Paste your Template Json here       
      {

        "to": `${data["Phone"]}`,

        "type": "template",

        "template": {

          "id": "1370745846809427",

          "namespace": "ae3cbb41_4ec3_48af_9a58_68a1c0332ce6",

          "language": {

            "code": "en"

          },

          "name": "ca",

          "components": [{ "type": "header", "parameters": [{ "type": "image", "image": { "link": "https://storage.googleapis.com/wtx_public_bucket_prod/1696485239038.png" } }] }, { "type": "body", "parameters": [{ "type": "text", "text": "Shashi" }] }]

        }
      }


    const options = {

          method: 'POST',

          // followRedirects: true,

          // muteHttpExceptions: true,

          payload: JSON.stringify(payload),

          contentType: 'application/json',

          headers: {

            //Step 3 : Paste your API Key here 
            "x-api-key": "eyJhbGciOiJIUzI1NiIsInR5cCI6IkpXVCJ9.eyJidXNpbmVzc0lkIjoiNjJjODFiZWM3MTVlOGRlYTZlYjQ2MjcyIiwia2V5VmVyc2lvbiI6Ind0Yl85MjMwZmE1NTQxMGUiLCJpYXQiOjE2OTA1Mzg1NzB9.tCIUxL5xZdb1SLU5BjAbNpYuOLgbgjX6Y8dvDTSHPqM",

            "content-type": "application/json"

          }

        };

        try {
          //Step 4: Paste your API number below & remove the bracket
          const res = UrlFetchApp.fetch("https://api.whatstool.business/developers/v1/messages/{Paste your API Number}", options).getContentText()

      console.log("UrlFetchAppResponse: ", JSON.stringify(res))

        } catch(e) {

          console.log("UrlFetchAppError: ", e)

        }

      }

      console.log("postDataValue: ", data)

    }

  }


function getHeadrs(e) {

  return header = SpreadsheetApp.getActiveSpreadsheet().getActiveSheet()

    .getRange(1, 1, 1, 6).getValues();

  // console.log("headers: ", header[0].toString())

}

```

```jsx
```

**Steps 1 :** In this you need to Change **the Trigger Value in Which Column the Data Ends take that count and enter it as Trigger value.**

**Step 2 :** Copy the Template JSON from WhatsTool \*\*Go to WhatsTool Business > Settings > Templates > Select the Template > Copy the JSON.

Step 3 :\*\* Change The API Key **Go to WhatsTool Business > Settings > Developers API > Generate the API Key and Copy that**

Step 4 : Kindly Click on Triggers and Change the status as below Image and Save.

<figure><img src="https://1440145200-files.gitbook.io/~/files/v0/b/gitbook-x-prod.appspot.com/o/spaces%2F2TgfOHUAGg0ndAgP3vRh%2Fuploads%2FwlSgfYwf8J708hUxKgjJ%2FScreenshot%202024-02-15%20133518.png?alt=media&amp;token=0d295580-9915-4a10-b16f-d5e2dc01c444" alt=""><figcaption><p>Trigger Config</p></figcaption></figure>

Step 5 : Kindly Add new Entry in the Excel Sheet.

Step 6 : Click on Execution to check the Logs of the message Triggered.

{% hint style="info" %}
Kindly refer the below video for better understanding
{% endhint %}


# Zoho CRM

Zoho CRM is a software developed by Zoho Corporation. It is designed to help businesses manage their customer relationships effectively by providing tools or sales automation, marketing automation.

Zoho CRM (Customer Relationship Management) is a cloud-based platform designed to help businesses manage their customer relationships, streamline sales processes, and improve overall productivity.\
\
Steps to Install the App and Authorize :&#x20;

1. **Access Zoho CRM:**
   * Log in to your Zoho CRM account using your credentials.
2. **Navigate to Marketplace:**
   * Once logged in, look for the "Setup" or "Settings" option (this might vary based on the version and customization of your Zoho CRM).
   * Find the "Marketplace" or "Apps" section.
3. **Browse or Search for the App:**
   * In the Marketplace or Apps section, you can browse for the Whatstool Business app you want to install. Alternatively, you can use the search feature to find the our app.
4. **Select the App:**
   * Click on the app to install .<br>

     <figure><img src="https://1440145200-files.gitbook.io/~/files/v0/b/gitbook-x-prod.appspot.com/o/spaces%2F2TgfOHUAGg0ndAgP3vRh%2Fuploads%2FBFwxDrLjazQBDX68bEbn%2FScreenshot%202023-12-19%20121447.png?alt=media&amp;token=4f4347fd-4ab8-4652-9d66-a678e112fc82" alt=""><figcaption></figcaption></figure>
5. **Install the App:**
   * There should be an option to "Install" or "Get Now" on the app's page. Click on this button to initiate the installation process.
6. **Configure Settings:**
   * Follow the on-screen instructions to configure any settings or permissions required for the app to integrate with Zoho CRM.
7. **Authorize Access:**
   * Some apps may require authorization to access your Zoho CRM data. Follow the prompts to grant the necessary permissions.
8. **Complete Installation:**
   * Once configured, complete the installation process.
9. **Verify Installation:**
   * Go back to your Zoho CRM dashboard or the relevant section where the app should now be accessible. Verify that the app is installed and functioning correctly.
10. **Review Documentation:**
    * Check the app's documentation or support resources for any additional setup or customization options.

Once this is Completed you need to follow few steps to send message to the Customer using Zoho CRM.&#x20;

1. **Go to Leads section and select the lead whom you want to send a WhatsApp Message**
2. **Click on Send Message on the Right Top.**&#x20;
3. **Enter your API Number and API Key**&#x20;
4. **Select the Template and Send a Message.**&#x20;

{% hint style="info" %}
Kindly Refer the below Video if you face any Issue.&#x20;
{% endhint %}


---

[Next Page](/llms-full.txt/1)